Sans Souci Studios
Follow us on Facebook!
  • Home
  • Gallery
    • Fursuit Heads and Partials
    • Paper Mache Masks 2000- 2014
  • Blog
  • About
    • About
    • Embarking on the Road to Furry Fandom
  • Contact
  • Thanks to Our Supporters!

Mask Shape and Warpage

6/14/2007

0 Comments

 
Picture
Picture
Picture
As I've been casting different masks using papier mache strips, I've been noticing that the masks' overall shape has a lot do do with the degree to which they try to warp during drying.

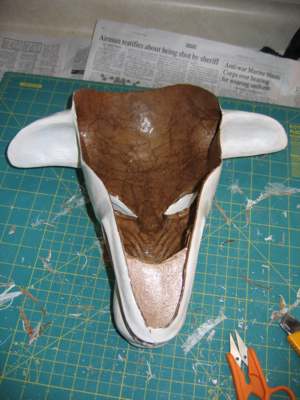
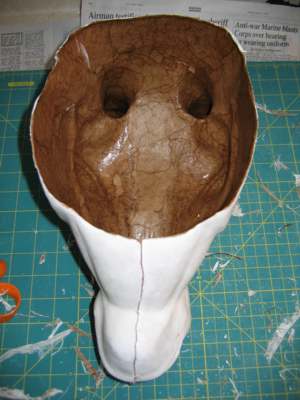
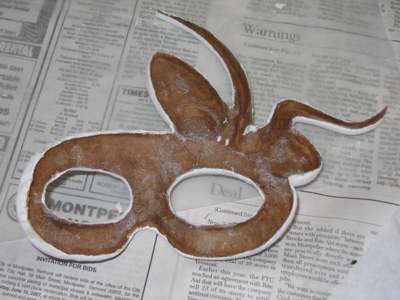
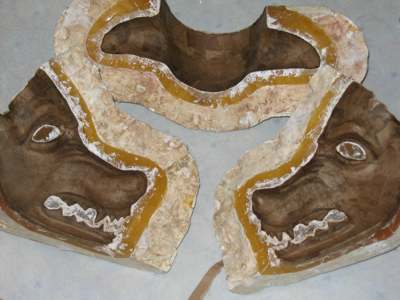
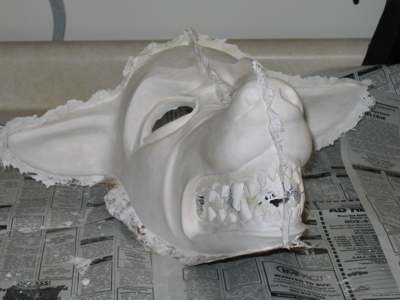
Above I have posted pics of the backs and insides of a "Rip" mask, a "Rival" horse mask, and a little eyeball mask.

The "Rip" mask really wants to warp during drying. I believe it's because the mask has an overall cylindrical/conical shape with a wedge cut out of the bottom. I think papier mache strips tend to want to pull along curved surfaces as they dry. There is nothing to stop that pull along the bottom of this mask, so it warps. You can see that I wound up putting a triangular "plug" in the jaw to prevent this.

The horse mask "Rival" warps only a tiny bit during drying. I believe this is because the cylindrical/conical part of this mask is closed, and the open part on the bottom is circular. As the papier mache strips dry and try to pull, there isn't anywhere that they can move to. All the available space is filled.

The little eyeball mask does not warp at all during drying. It doesn't have much of a curved shape to it, and besides, it has 1/4" lip at a roughly 90 degree angle to the mask all around the edges. I believe the pull of the papier mache strips on this little lip cancel out the pull of those on main mask as they dry. This lip, while a tremendous pain in the butt to cast, also adds a lot of strength to the edges of the mask, which also helps to reduce the number of layers of paper I need to use.

In general, the more details a mask has (folds, wrinkles, bone structures, etc) the less likely it is to warp, as the details interrupt the pull of the strips as they dry. Conversely a smooth mask is more likely to warp, as little interrupts that pull.

Technicalities... but let me tell you, a warped mask is no fun!!!
0 Comments

Large Multipart Paper Mache Mask Casts

6/13/2007

0 Comments

 
Picture
Picture

I've spent the last month or so trying the papier mache strip method I'd practiced in my smaller 'eyeball' masks in larger, multipart molds. I've continued to use an initial detail coat layer of a Polyfilla/Weldbond mix, a second layer of cheesecloth with the Polyfilla/Weldbond mix, and subsequent layers of kraft paper and outdoor wood glue.

Some differences I've found in making small masks and large multipart masks this way:

1) I need to use much more care in the cheesecloth layer in a large mask than in a small one. There is more opportunity for overlapping layers of cheesecloth to build up thickness in a large mask, which does not contribute anything to strength, and can prevent the Polyfilla/Weldbond mix from penetrating all the way through to the mold. This can leave many pits and holes in the surface of the mask that will later need to be filled. I use extra care around deep and very detailed areas, and I try to overlap the cheesecloth just to be sure there is no gaps in coverage, but no more.

2) I need to use more layers of paper in large masks than in small ones. How many? It depends entirely on the shape and level of detail in the mask, with very detailed areas (wrinkles, lips, gumlines, etc) naturally being stronger and very smooth ones (cheeks, etc) being comparatively weaker. I still use only two layers of paper in areas with lots of detail, and up to ten in very smooth ones. I also use eight to ten layers of paper around the edges of the mask. A mask with enough layers will have only a slight amount of flex to it. I have found one sure way to know that I need more layers- if I put sealer on the mask, and it becomes limp and rubbery and then warps all to hell, I haven't used enough. Waaaahhhh!!!!!

3) Obviously, I need to join the pieces somehow or another. I'm not sure I'm done experiementing with this, but here's what I do now. I cast each piece of the mask seperately. I overhang the cheesecloth just a little over the edges of the mold and glue it down tightly, using a weaker glue such as Elmer's (no point in using a stronger glue which I'll just have to trim off later!) I do the same thing with one layer of paper in areas which I won't be able to reach into when the mold is closed (ears, tips of noses and lips, etc.) (You can see this cheesecloth edge in the pic of the unassembled mold above, and see the resulting "fringe" in the pic of the raw cast.) I have found, much to my great suprise, that this little edge of paper and or cheesecloth will not interfere with the mold assembly, as long as it is smoothly and tightly pressed down, and it is fairly easy to trim off afterwards with a craft knife. I then apply a bead of straight Weldbond to paper edges, a Polyfilla/Weldbond mix to the cheesecloth edges, clamp all the pieces of the mold together, and apply two more layers of kraft paper over the seams I can reach. Then I anxiously wait for the whole thing to feel dry, and unmold it!

In general, this method yields nice results. The masks are very light and strong, and the detail and finish are exceptional. The downside is that this method is extremely time consuming- it takes me fourteen hours to cast a "Rip" mask (the one shown above) this way, compared to eight for my infamous Paperclay slip/Sculpt and Coat method. I think the resulting quality is worth it, and I'm going to see if I can cut back on time spent elsewhere in production. I'm going to look into airbrushing, to see if I can spend less time painting!
0 Comments

    Author

    I make masks. Because art is more fun when you put it on your head.

    Categories

    All
    A Day In The Life
    Airbrushing
    Artemis
    Casting
    Cat Masks
    Color Design
    Deer Mask
    Ears
    Eyes
    Fur
    Garm
    Handpaws
    Head Base
    Horse/unicorn Masks
    Jawsets
    Lips
    Maxine
    Methods And Materials
    Moldmaking
    Moving Jaw
    Noses
    Painting
    Paper Mache
    Patterning
    Photography
    Rabbit Masks
    Resin
    Rip
    Sculpting
    Sewing
    Shaving And Trimming
    Silas
    Silicone
    Strapping
    Studio Announcements
    Tails
    Tongues
    Videos
    Wolf Masks

    Archives

    October 2021
    September 2021
    May 2021
    March 2021
    July 2020
    November 2019
    March 2019
    January 2019
    December 2018
    June 2018
    April 2018
    March 2018
    December 2017
    June 2017
    May 2017
    April 2017
    February 2017
    January 2017
    December 2016
    November 2016
    October 2016
    July 2016
    August 2014
    June 2014
    February 2014
    November 2013
    October 2013
    March 2012
    October 2011
    September 2011
    March 2011
    November 2010
    September 2010
    August 2010
    June 2010
    October 2009
    September 2009
    March 2009
    February 2009
    February 2008
    June 2007
    April 2007

    Enter your email address:

    Delivered by FeedBurner

    RSS Feed

Proudly powered by Weebly