Sans Souci Studios
Follow us on Facebook!
  • Home
  • Gallery
    • Fursuit Heads and Partials
    • Paper Mache Masks 2000- 2014
  • Blog
  • About
    • About
    • Embarking on the Road to Furry Fandom
  • Contact
  • Thanks to Our Supporters!

Painting Pupils on Resin Eye Blanks

10/28/2016

0 Comments

 
Tools and materials for making a pupil stencil for a resin eye blank
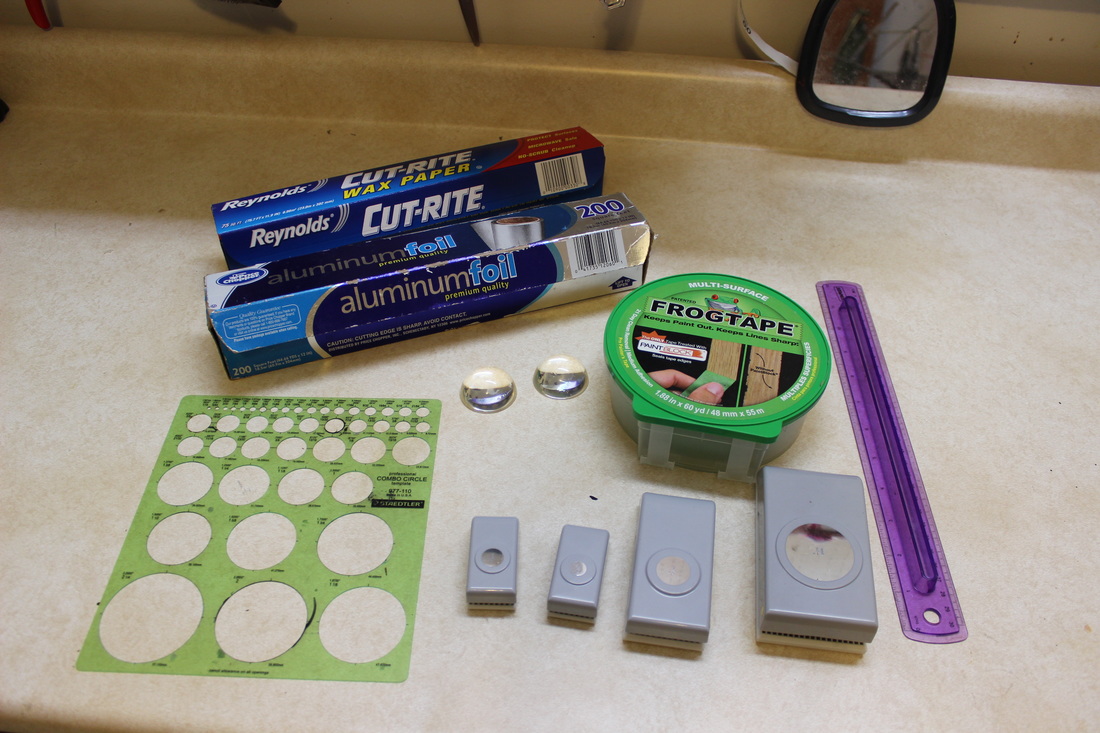
In my last post I failed to cast usable resin eye blanks using Little Windows resin and so bought blanks from Dreamvision Creations.In this post I will paint pupils on them. For the last furry head, I used a “Staedler Professional Combo Circle Template", from here on in known as "The Circle Thingy” to lightly trace pupils onto my resin eye blank with a black watercolor pencil, which I then carefully painted in. This time I wanted to make a stencil for the pupil, so I could fuss a little more with its placement. The resin eyes hugely magnify any errors at the center, so if the placement looks a little off from the back of the eye, it can look way off from the front!
The first order of business, however, was to decide on a diameter for the pupil. Anything in the center of the resin eye blank is greatly magnified, so it's good to try out a bunch of different sized pupils to see what looks best, knowing that the actual circle used will be smaller than how it will appear. The Circle Thingy came in handy for this- I put it down over a piece of black construction paper and simply moved the blank over each opening, until I found a size I liked.
Then to make a stencil. A craft hole punch in the size I selected (grey things in pictures) comes in handy here. I make sure the punch is nice and sharp by punching lots of holes in a sheet of aluminum foil (yes, really). Then I carefully stick a piece of Frog Tape onto a piece of wax paper. Frog Tape is supposedly a special kind of masking tape that is less prone to paint bleeding under its edges than other masking tapes, so is more likely to make sharp clean lines. Using the Circle Thingy I draw a circle on the tape/wax paper the size of the eye and then mark the center on the circle using the guides on the template (you can see some of them around large opening on the Circle Thingy in the picture to the left.)
stencil for painting pupil on Dreamvision Creation resin eye blank
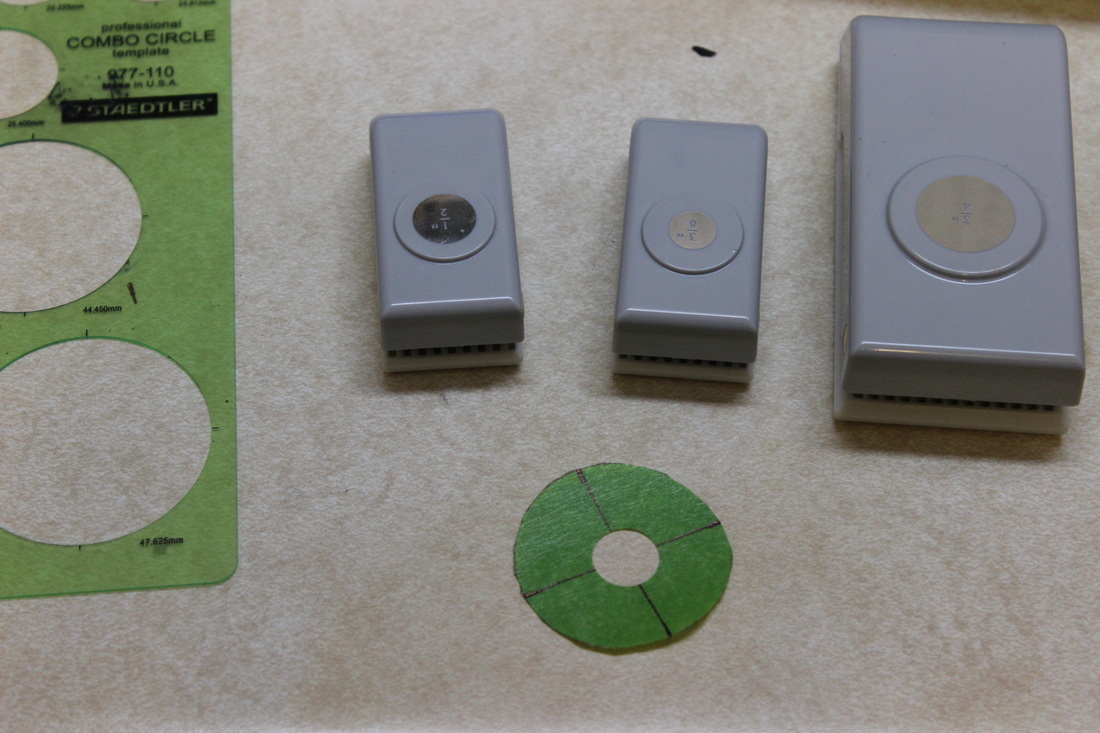
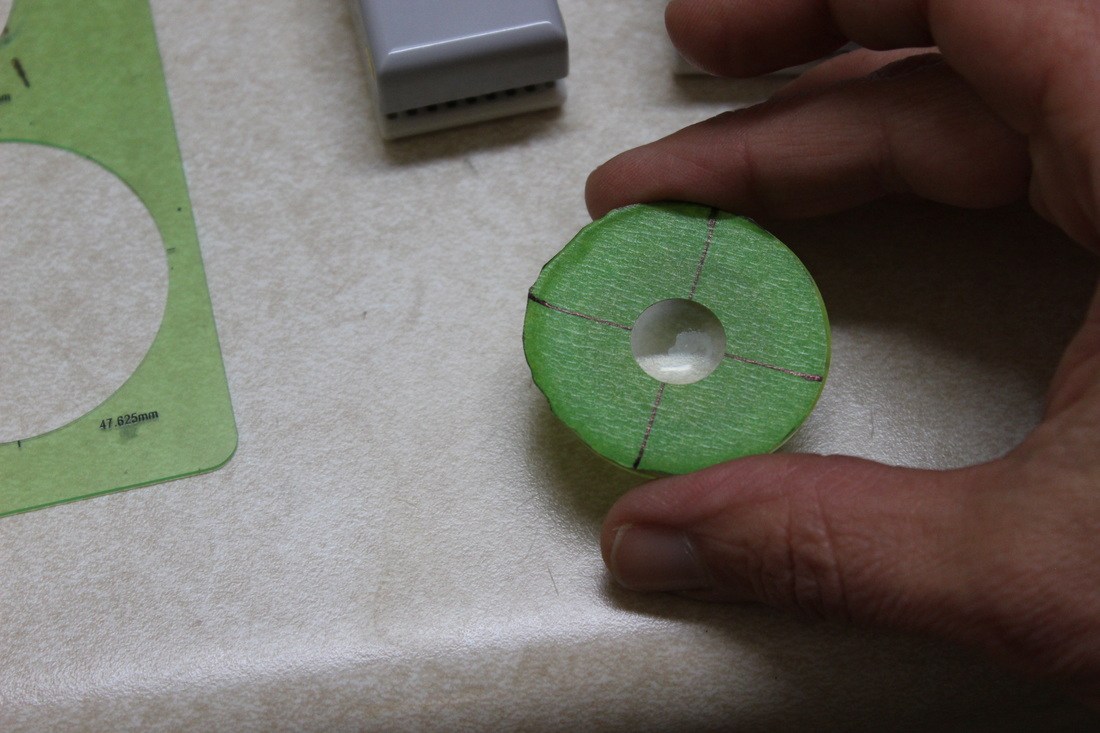
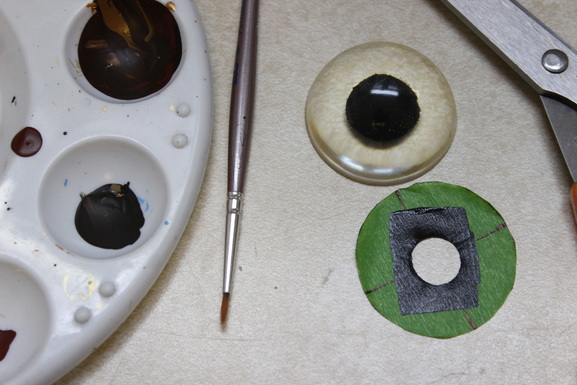
I then cut out the circle and folded down one little edge so that I could get it centered in the hole punch, since it won't fit otherwise. I use the target to try to get the hole as close to the middle of the circle as possible. Then I peel the wax paper off the back of my new stencil and carefully position it over the back of the eye before pressing it down firmly. Even though the hole punch has been carefully positioned over the "X", and the stencil may be smack dab in the middle of the eye, the placement of the stencil may still need fiddling- again, any little error is magnified hugely by the center of the eye.
stencil for painting pupil on back of resin eye blank by Dreamvision Creations
stencil for painting pupil on back of Dreamvision Creations resin eye blank
**note** it's best to use the new stencil ASAP after it's made, specifically, it's best to remove the tape promptly from the wax paper, as the longer the tape sits on the paper the more firmly it gets stuck.
paint applied to stencil for pupil on resin eye  blank

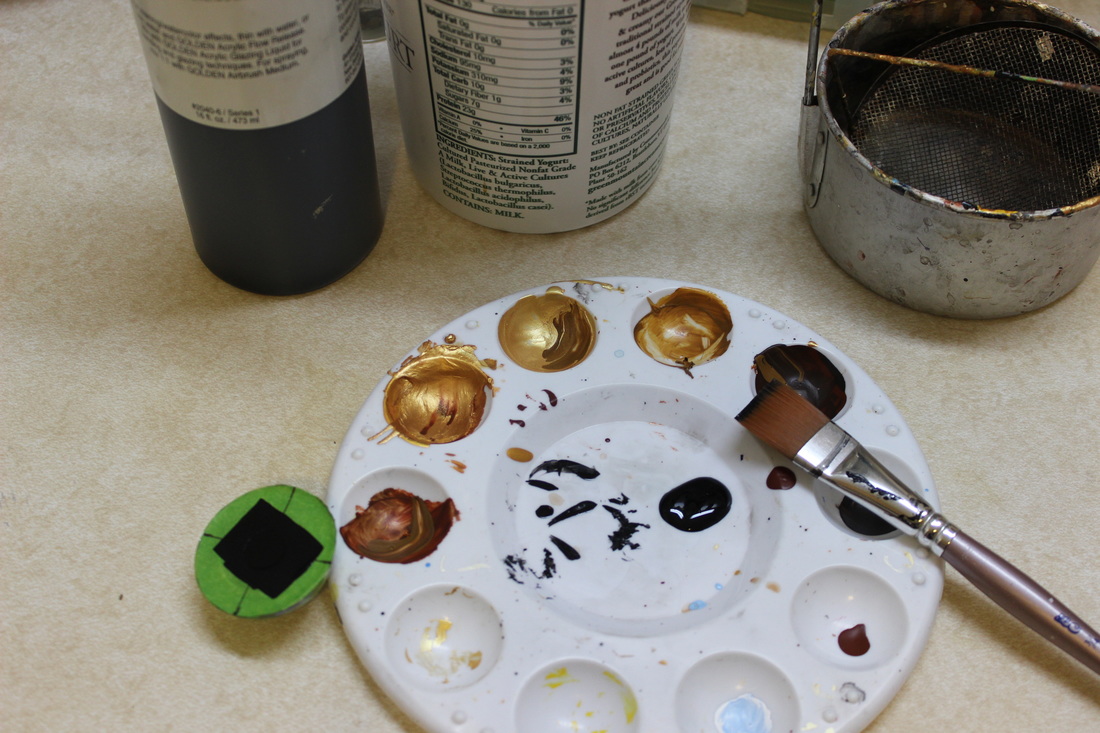
Then I rub the edges of the stencil down to make sure they're firmly attached to the eye.  Then I use a fluid body acrylic (aka bottled, not tubed) such as Golden, and a wide, flat wash  brush to apply the paint. The wash brush tends to leave fewer  brushstrokes in my experience. I try to pat the paint on as much as possible, and try not to stroke the paint up under the edges of the stencil.
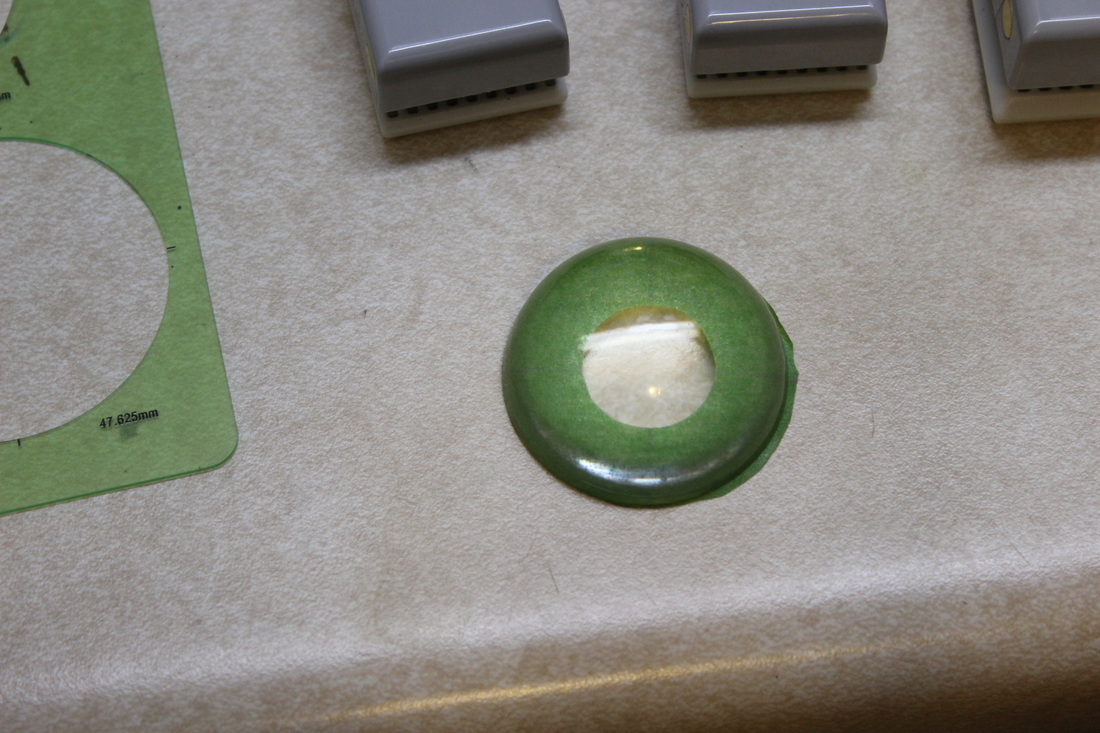
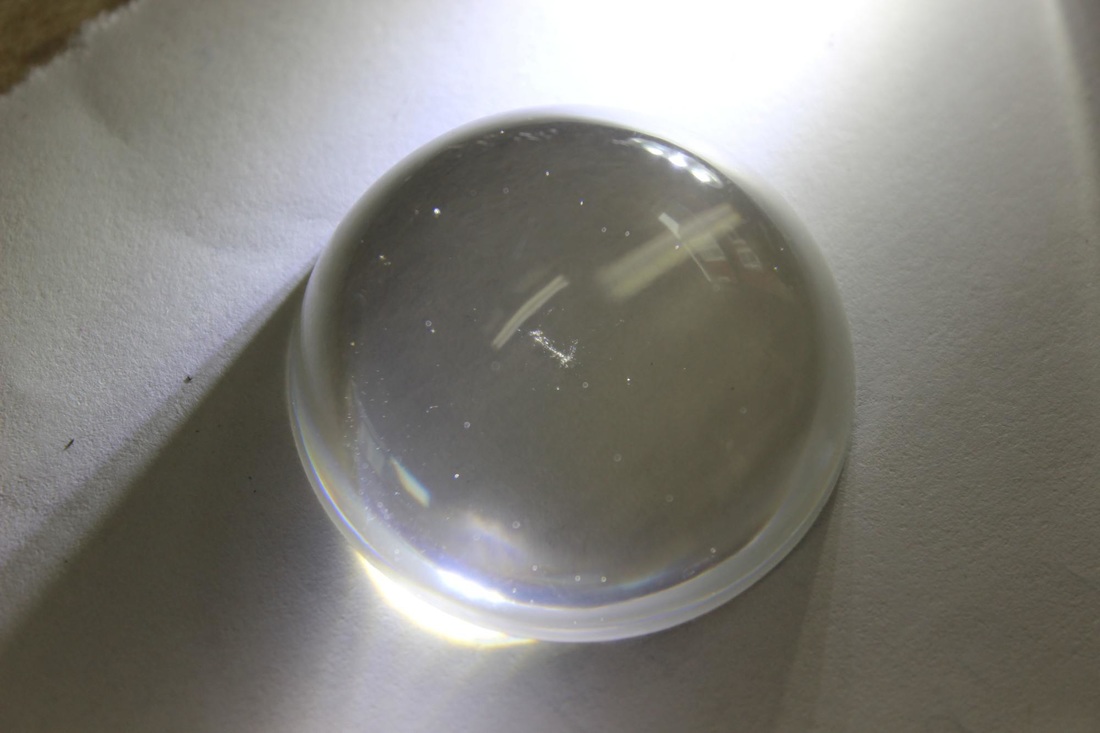
 When the paint is dry I remove the stencil. I **do not** use a hair dryer to speed drying as I sometimes do, as I've found it can cause a skin to form between the stencil and the eye, which can make the paint on the eye peel off when I remove the stencil. I scrape off any little spots that managed to get up under the tape anyway with my fingernail. In case of a total disaster, it's possible to wash the paint off the eye and start over again, though it's best to do this sooner rather than later- the paint is easiest to get off  before it has fully cured, usually within 24 hours. And, the finished pupil!
pupil painted on Dreamvision Creations resin eye blank
UPDATE 11/15/16: I want to share some good tips I got from Furaffinity, Livejournal and Facebook after I posted this article there. Some suggestions: Try using a paint marker, with a metal washer for a template; use spraypaint or an airbrush to get a better edge with the stencil; use frisket film for the stencil. I had tried to use frisket film previously but the punches can't handle it. However I might try putting the frisket film directly on the eye, drawing the circle on the film and cutting away the hole from there with an exacto knife.
0 Comments

(Mis) Adventures in Resin Eye Casting

10/22/2016

0 Comments


reject resin eyes for fursuit head worn by Carrie
According to the Interwebs, I am the only person on Earth who cannot get beautiful bubble free castings using Little Windows casting resin.

Painting the eyes was my favorite part of making my first furry mask. I had fantasies of a little sideline on Etsy painting eyes. In order to keep the price competitive with what other sellers on Etsy were offering, I'd need to find a way to cast the eyes myself. I figured the eyes would cost me about $10 a pair to make using Little Windows resin, where they cost me $30 ready made from Dreamvision Creations on Etsy. That, plus the fact Little Windows resin is supposed to be non-toxic and odorless, made this option initially very attractive.


I saw some very cool eyeball painting techniques on the Little Windows website and wasted a lot of time trying them out. (Here they are, they really are beautiful!) Specifically, they involved making the castings in layers-one for the pupil, one for the iris, and one for the eyewhites (if desired) and painting each one after it set, embedding the paint and achieving perfectly circular and concentric areas of color, in theory anyway. Firstly I found that the resin would almost always crawl up the side of the mold I was pouring it on, making that area somewhat less than perfectly circular (and trying to brush it away would only change its shape to be a different kind of less than perfectly circular, and probably introduce lint besides) and secondly I found that I would not get the desired follow-me effect using this technique. The color had to be entirely on the back of the casting for that to work. (I did, however, come up with some eyeballs that made some very cool props for family photos, as you can see.)


reject resin eyes for fursuit heads worn by Isabelle
So I decided I was done experimenting with new ways of painting eyes and was ready to buckle down and concentrate on getting some good bubble free castings to paint. In theory it looked simple: make sure Part A is comfortably warm to the touch, microwaving if necessary; gently mixing the proper amounts of Part A and Part B together; letting them rest a preordained time in their mixing cup, then scooping off the bubbles which should have obediently risen to the top; pouring the mix gently down one side of the mold to minimize new bubbles; and then checking the casting once or twice during the first twenty minutes of setting to pop any more bubbles that dutifully would come to the surface.

First mistake: not getting part A warm enough, so that the mix would be too thick for any bubbles formed while stirring to rise up and pop. If Part A was too cold, bubbles were also more likely to form while stirring in the first place.

Second mistake: getting part A too warm. The mix would be beautifully bubble free in the mixing cup, but new bubbles would form no matter how gently I poured down one side of the mold and then the mix would set too fast to allow these bubbles to rise up to the top and pop.

Third mistake: mixing the part A and part B as little as possible, so that there would be no bubbles but there would also be unmixed spots in the casting. These would not cure but would remain soft and sticky no matter what.

resin eye blank for fursuit heads with bubbles
bubbly reject resin eye blank for fursuit heads
scratched bubbly reject resin eye blank for furuit heads
At first the owner of Little Windows was a huge help and spent much time by phone and email helping me work out my problems. Her first suggestion was to let the mix stand in the cup as long as necessary for the bubbles to rise to the top before pouring into the mold. This, unfortunately, never happened. Her next suggestion was to adjust the microwave in increments of seconds to see what time worked best for getting the right temperature, but unfortunately my ancient microwave does not have this capability. Her next suggestion was to wipe down my mold with rubbing alcohol or acetone so that bubbles would not stick to its surface and rise more easily after the resin was poured. Unfortunately I found the only thing this did was introduce yet another opportunity to get lint in the mold. She felt bad that I had used up an entire kit without getting a single bubble free casting and sent me a new replacement kit free of charge. Then, she stopped returning my calls and emails.

reject resin eyes for fursuit heads worn by Brian
To be fair, the mold I was using ( the 1 1/2 cabochon mold) is one of the largest mold sizes that is used with Little Windows resin. I'm under the impression that most other craftspeople use this resin to cast smaller pieces, for beads and jewelry and such, and bubbles would have an easier time rising out of smaller amounts of material. I also suspect that if I waited until a warmer time of year when the ambient temperature were higher (it was early spring in VT, and it was in the 60's in the house) I might have had better luck. I also took some comfort reading online that casting clear resin can be tricky for most people to learn.
However...I had piles and piles of bubbly castings, so I decided to keep the ones that had cured properly and use them later to try out new eye painting ideas. I put them all in a plastic baggie and set them on a shelf... and a month later, they had all yellowed. So that, ladies and gentlemen, was the end of that.

I briefly considered making eyes out of other kinds of resin, but rumor has it that Easy Cast, another commonly used resin, is hit or miss in the curing department and also yellows over time, and Smooth On's Crystal Clear- what Dreamvision Creations uses for its eyes- is somewhat toxic and as such is not suitable for a home studio. (Plus, when I asked about it, they told me they also use a vacuum chamber to make sure the castings come out bubble free!) When I called Smooth On's excellent tech department to ask what clear casting resin would be suitable to use in a home environment, they recommended Epoxacast 690, with the caveat that the two parts were fussy to mix and I would need a scale that could measure down to 1/100 of a gram. If I do go back to trying to cast my own eyes, this will be the material I start with. However I decided I had spent enough time chasing this rabbit down the hole and I needed to get back to what I was most interested in in the first place: making masks.
I write my tale of woe here so that either a) you my dear reader can either learn from my mistakes and perhaps achieve a bubble free casting where I could not or b) save yourself a lot of time, money and aggravation and proceed directly to Etsy to buy a pair of blank bubble free resin eyes to paint for yourself. Which is what I ultimately wound up doing.


family photo with reject resin eyes for fursuit heads
0 Comments

    Author

    I make masks. Because art is more fun when you put it on your head.

    Categories

    All
    A Day In The Life
    Airbrushing
    Artemis
    Casting
    Cat Masks
    Color Design
    Deer Mask
    Ears
    Eyes
    Foam
    Fur
    Garm
    Handpaws
    Head Base
    Horse/unicorn Masks
    Jawsets
    Lips
    Maxine
    Methods And Materials
    Moldmaking
    Moving Jaw
    Noses
    Painting
    Paper Mache
    Patterning
    Photography
    Rabbit Masks
    Resin
    Rip
    Sculpting
    Sewing
    Shaving And Trimming
    Silas
    Silicone
    Strapping
    Studio Announcements
    Tails
    Tongues
    Videos
    Wolf Masks

    Archives

    September 2024
    August 2024
    April 2024
    December 2023
    September 2023
    April 2023
    March 2023
    December 2022
    October 2022
    July 2022
    June 2022
    May 2022
    March 2022
    February 2022
    November 2021
    October 2021
    September 2021
    May 2021
    March 2021
    July 2020
    November 2019
    March 2019
    January 2019
    December 2018
    June 2018
    April 2018
    March 2018
    December 2017
    June 2017
    May 2017
    April 2017
    February 2017
    January 2017
    December 2016
    November 2016
    October 2016
    July 2016
    August 2014
    June 2014
    February 2014
    November 2013
    October 2013
    March 2012
    October 2011
    September 2011
    March 2011
    November 2010
    September 2010
    August 2010
    June 2010
    October 2009
    September 2009
    March 2009
    February 2009
    February 2008
    June 2007
    April 2007

    Enter your email address:

    Delivered by FeedBurner

    RSS Feed

Proudly powered by Weebly