Sans Souci Studios
Follow us on Facebook!
  • Home
  • Gallery
    • Fursuit Heads and Partials
    • Paper Mache Masks 2000- 2014
  • Blog
  • About
    • About
    • Embarking on the Road to Furry Fandom
  • Contact
  • Thanks to Our Supporters!

More Eyeballs

6/21/2018

0 Comments

 
fursuit resin eyes pupil


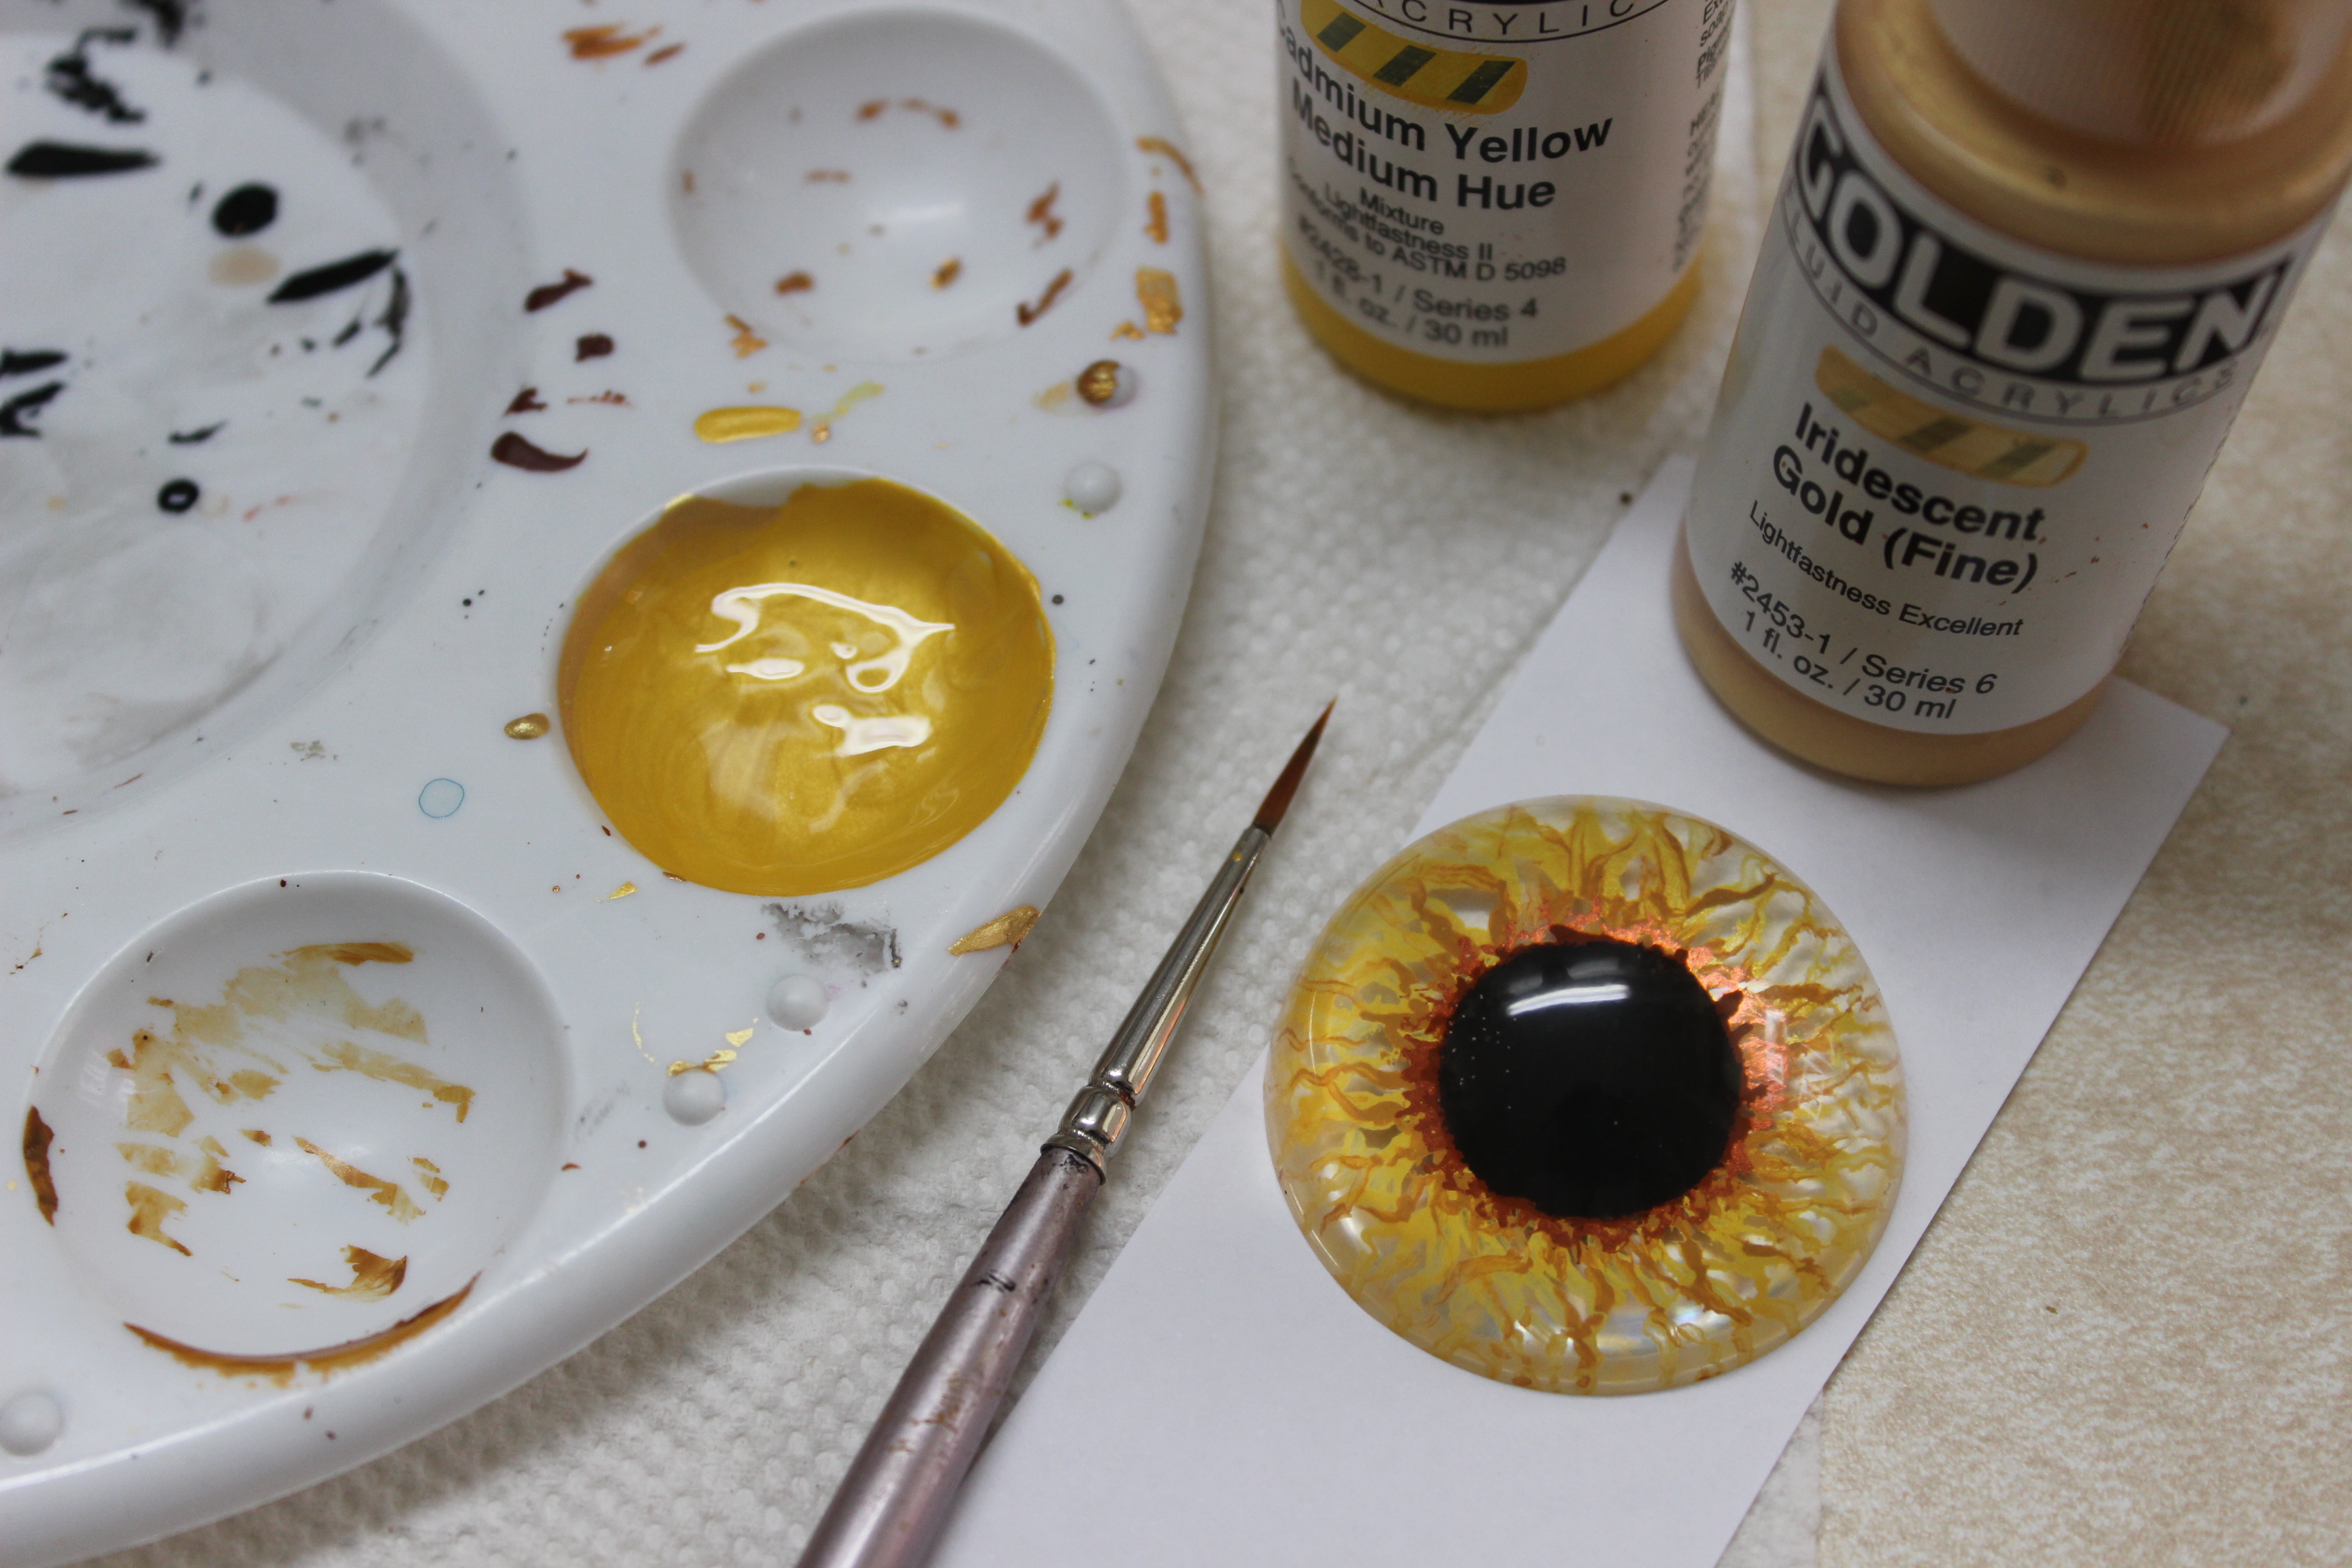
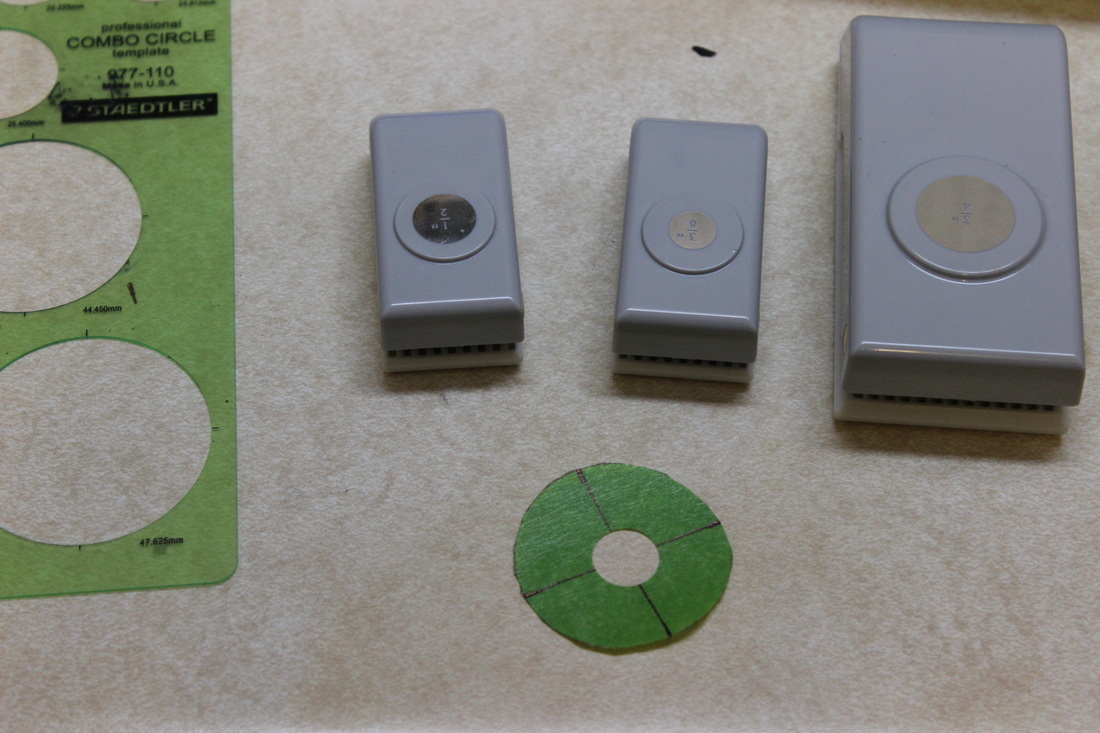
​Adding to the thoughts I had on painting eyeballs I previously blogged about here. ​​​One of the areas I saw the most room for improvement was in painting pupils. I had come up with a method of making stencils for the pupils that I really liked, but I was not happy with the brushmarks in the pupils.


fursuit resin eyes pupil


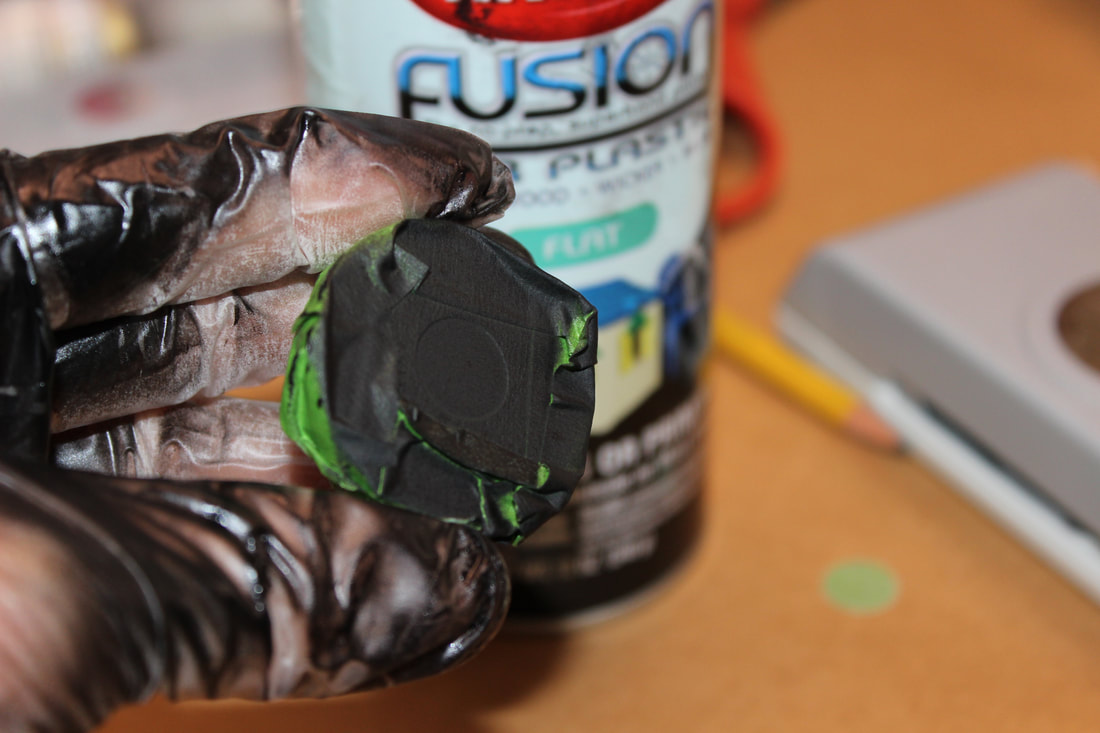
  Solution- make the stencils as previously, mask out the rest of the eye as well, and SPRAY the pupil on with spray paint. 
fursuit resin eyes pupil


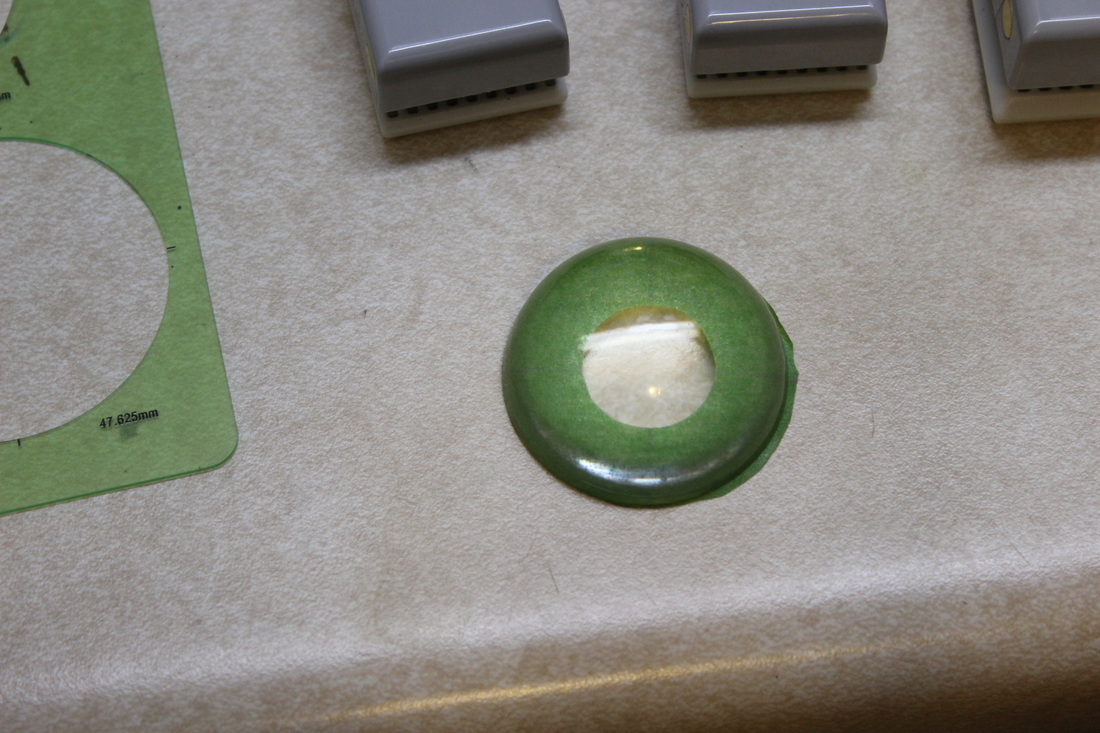
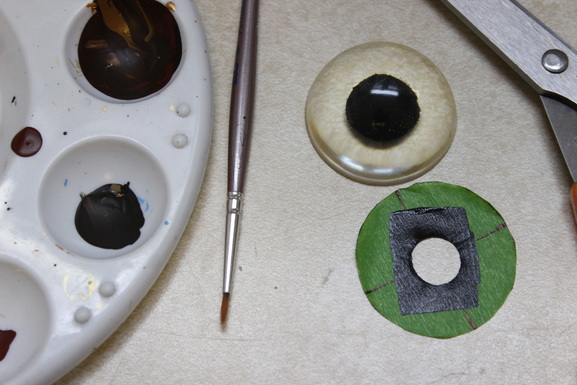
​Another interesting and challenging thing about painting eyes is that painted parts look completely different when viewed from the front or the back, as the curve of the plastic greatly magnifies anything in the center. Here, these two pupils are painted the same size, but you can see how much bigger the pupil looks when viewed from the front. 


I find it helpful when designing eyes to make a mock up like this on paper, and then put the resin eye over it to see how the curve will change it.  


Easy peasy!


fursuit resin eyes pupil
painting fursuit resin eyes


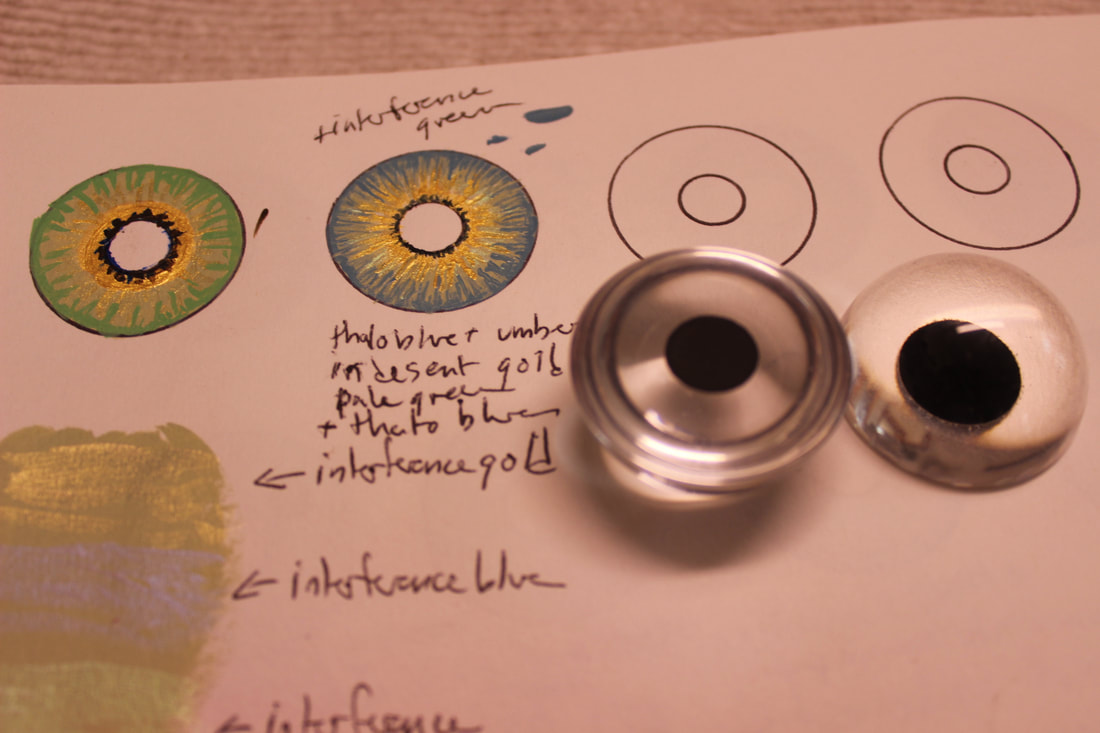
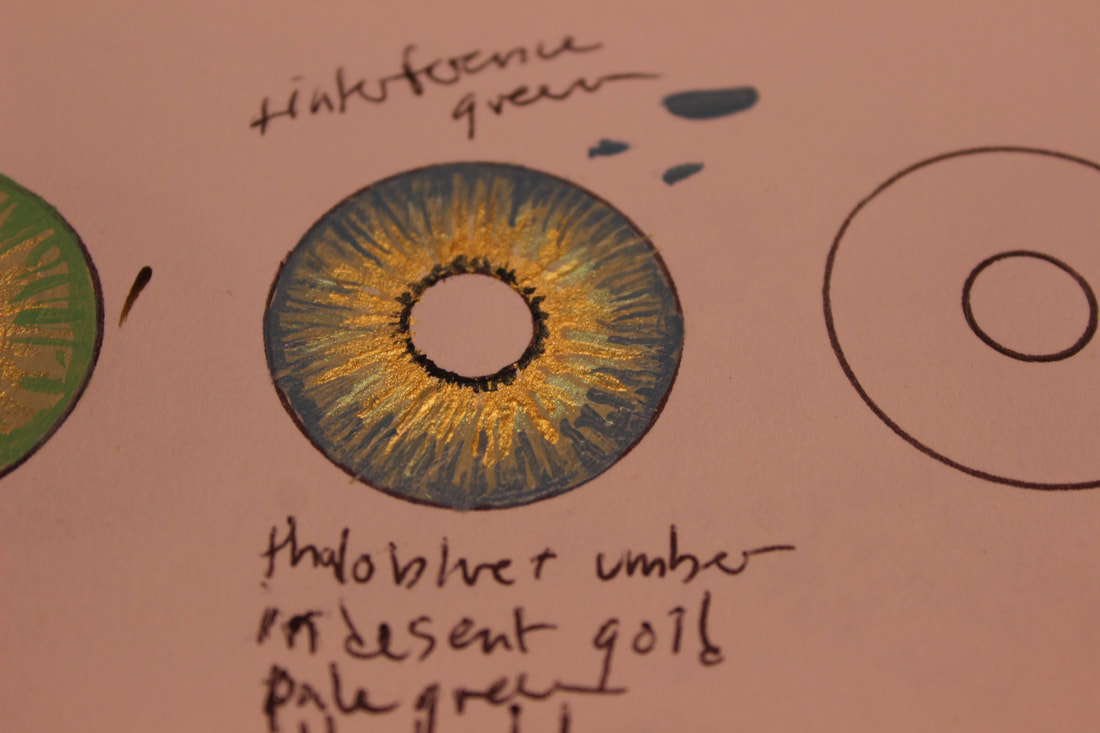
​Again you can see how much bigger the pupil looks, Also, you can see how anything painted around the outer edge  is greatly minimized. The blue in the mock up fills the outer half of the circle, but when the eye is placed over it, only a thin rim of blue is visible.
painting fursuit resin eyes


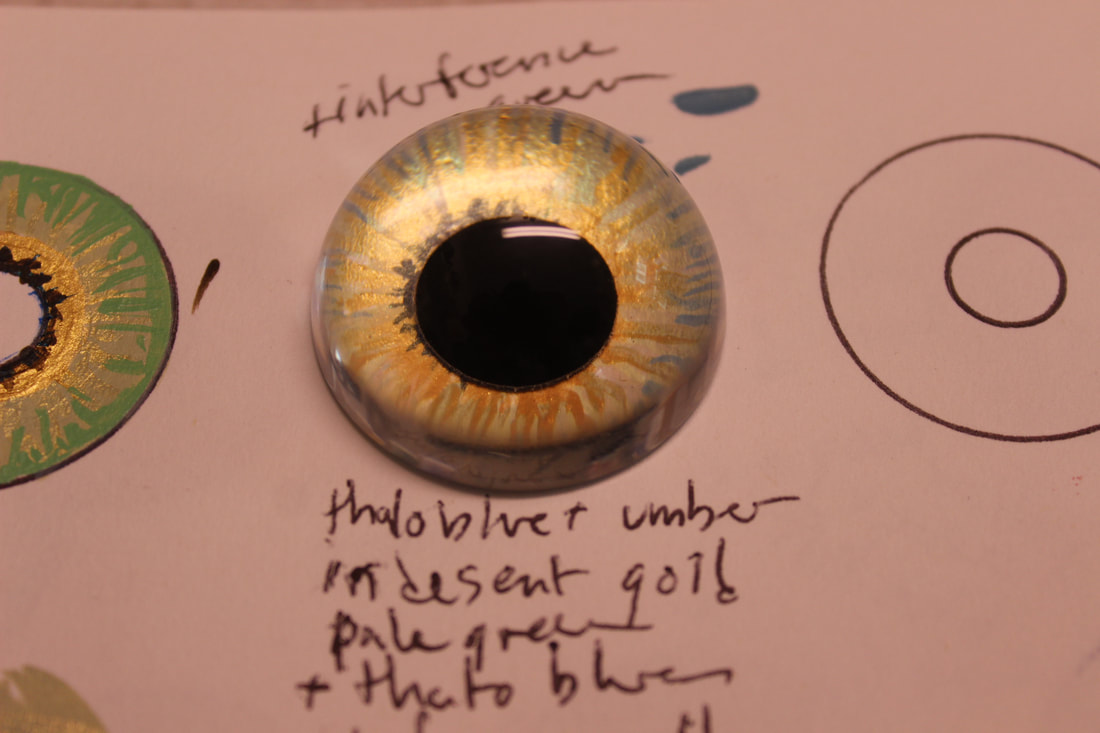
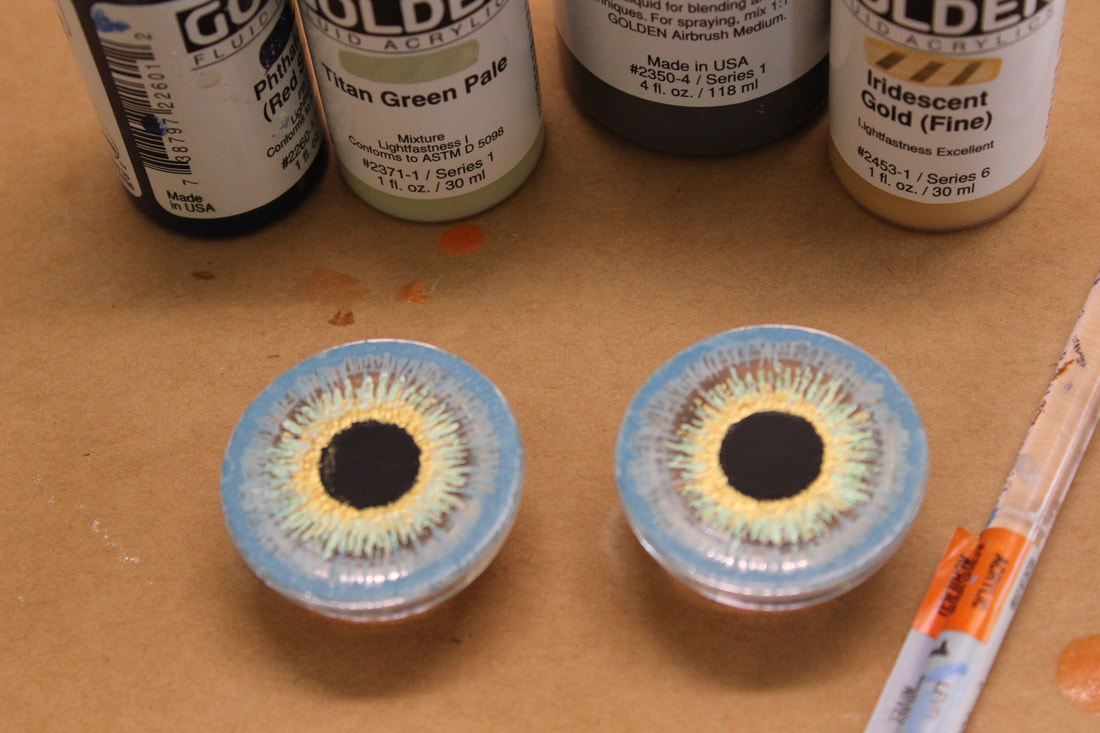
Starting to paint the actual eyes. Here they are both viewed from the back...
painting fursuit resin eyes

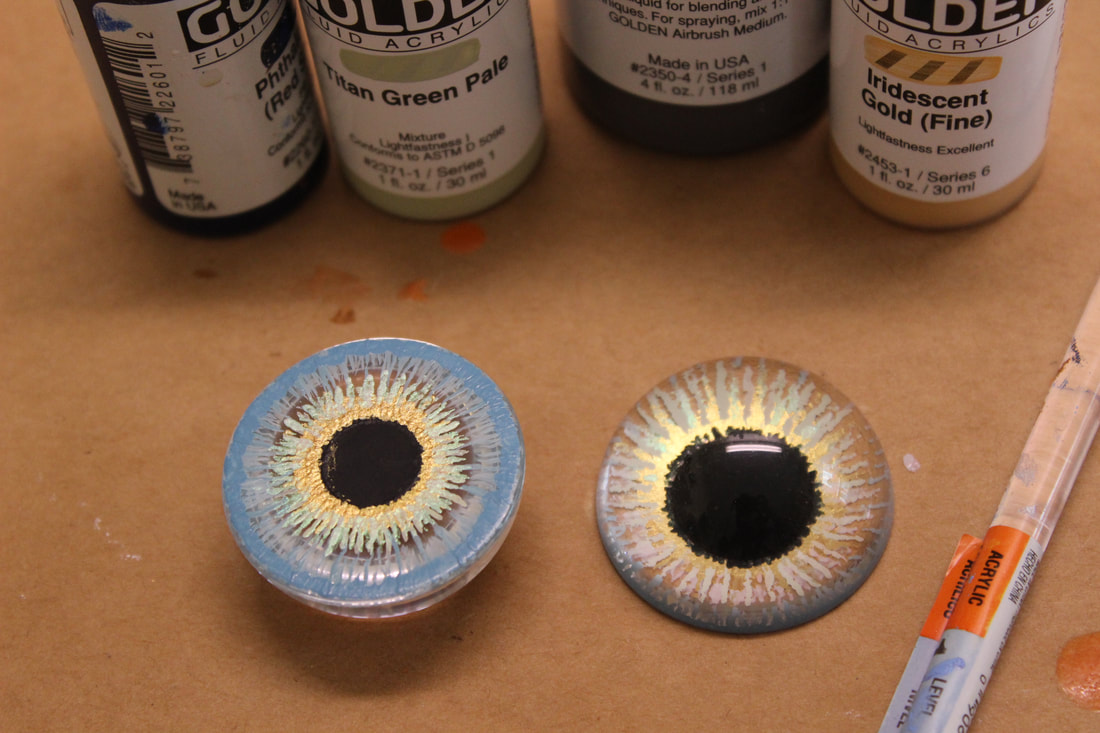
 And then one flipped over to show how different it looks when viewed from the front. 
wolf eyes resin fursuit

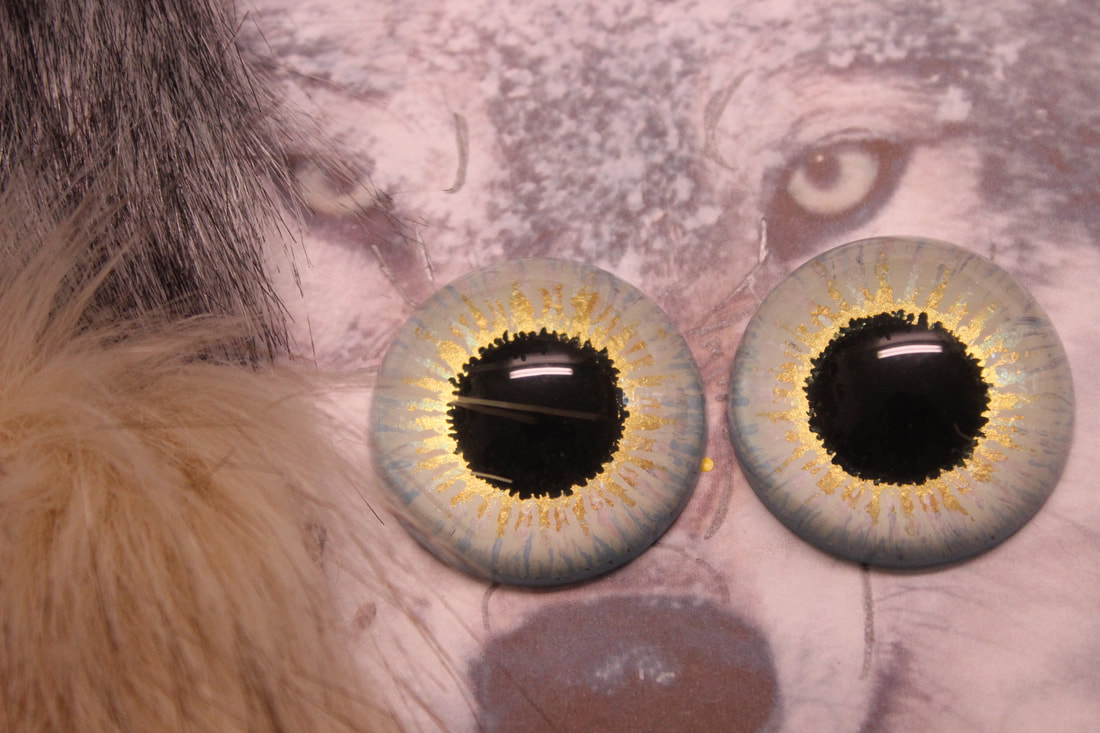
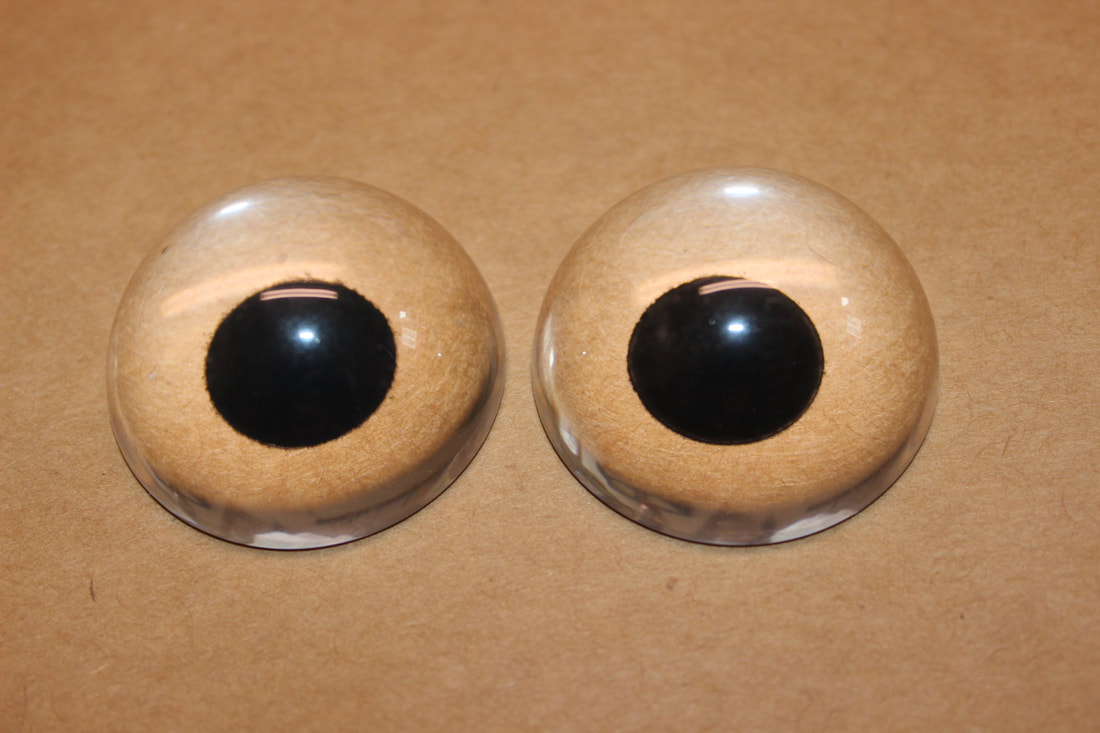
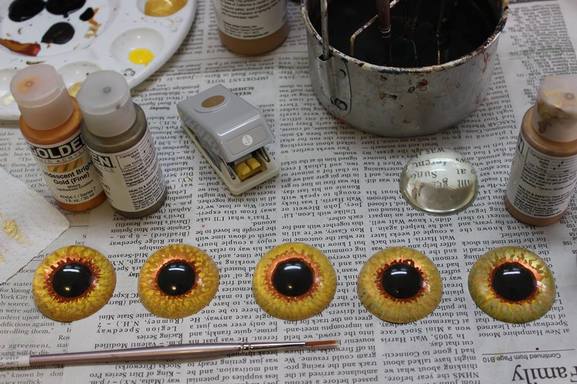
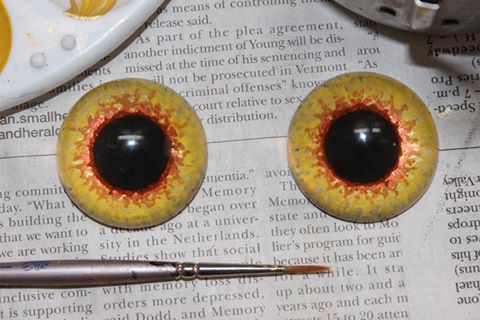
And, finished eyeballs, along with the reference picture I used. I did two sets like this, one for the grey wolf and another for the grey and black wolf I blogged about here.
​
wolf fursuit resin eyes

​

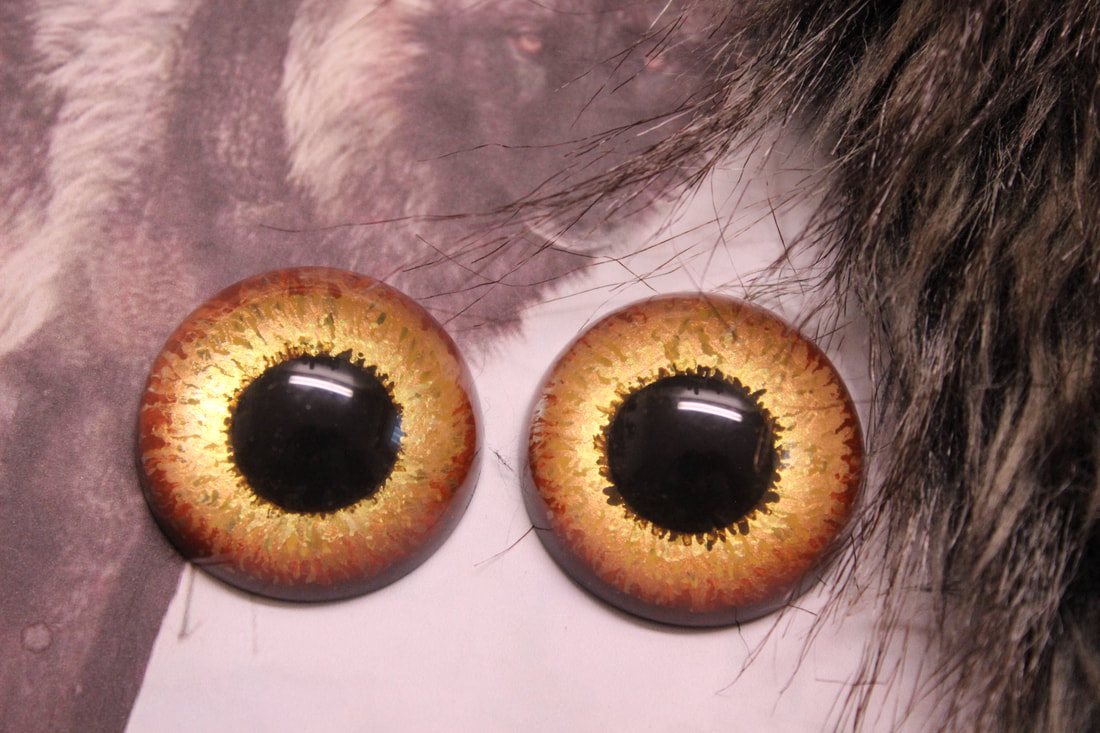
Another set of finished eyeballs, along with the reference picture I used. This will be for the brown and black guy I blogged about here.

​
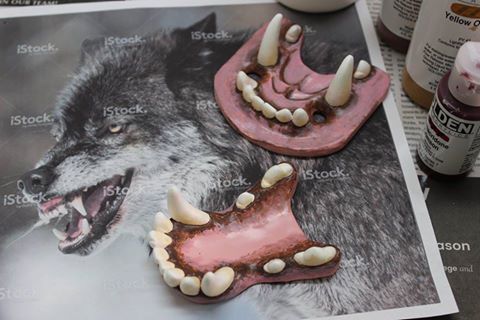
Now, I just need to get some teeth painted, so I can start building some heads!
0 Comments

Painting Resin Teeth

12/10/2016

0 Comments

 
 For my last head, I was in so much noobie awe of my resin jawset from DVC that I was afraid to alter it in any way, shape or form. By the time I was ready to make this head, I had seen how cool jawsets could look when painted, and especially since I love to play with color, I wanted to give it a whirl. Here is the tutorial I used to paint my teeth.
Color ideas for resin jawset
So I ordered the same jawset from DVC that I had the last time, the pink/white semi realistic large K9 jawset, and dremelled it down to make it fit my own resin head. I shortened the front of the upper jaw, as otherwise the teeth would sit too far back in the head, and narrowed the back of the lower jaw as otherwise it wouldn't fit in the head at all. Fortunately the color is solid all the way through these jawsets so the dremelling didn't show as much as it might have otherwise.

Left, my handy dandy color notebook, and below, my reference photos. I played with colors until I was satisfied with how they looked with the jawset- my intention wasn't to paint over the entire jawset, just to add some accents and shadings. (One thing to keep in mind- acrylic paint darkens slightly as it dies.) The colors I ultimately settled on were a mix of titanium white, quinacridone crimson, and just a teeny smidge of yellow ochre for the pink parts of the gums, and a mix of burnt sienna, carbon black and titanium white for the brown parts. For the teeth I settled on titanium white and yellow ochre, using more white toward the tips of the teeth and more ochre at the bases, to paint the "tartar buildup" there. 
 
Painted resin dreamvision creations jawset
Painted and glossed dreamvision creations resin jawset
Above, top, the painted jawset before gloss acrylic sealer was applied, and bottom, after. (Oooo, shiny!!)

Public Service Announcement- when spraying sealer, make sure the little arrow on the trigger thingy is pointing TOWARDS the object you're spraying! In what might have  been my biggest "D'OH!" moment ever I sprayed myself in the face with the sealer, coating my $400 progressive glasses with a fine and very tough mist. My noble husband rode to the rescue and spent a half an hour in the basement gently cleaning the lenses with mineral spirits, and amazingly enough, was able to salvage them. Thank goodness I was wearing the glasses and didn't spray myself directly in the eyes!!!
0 Comments

Painting Resin Eyes

11/20/2016

1 Comment

 
Wolf eyes painted on Dreamvision Creations resin blanks
Above, the finished eyes for "Max", my first fursuit head, along with the reference picture I used. I wanted the eyes for my next head to be pretty much the same color,though I wanted to use strictly acrylic paint this time. I had also used watercolor pencils in Max's eyes to sketch in some details, but found the results to be unpredictable and a little difficult to control.
Notebook of color sketches for painting resin wolf eyes for a fursuit head
 It would help if I could remember what colors I had used the first time around! So I got myself a multimedia sketchbook and this time took notes on my experiments. (It's worth noting that the steps in painting eyes on paper is in reverse order to painting eyes on clear resin- on paper you paint the dark background first and work your way up to the ring of color around the pupil; on resin, you'd start with  the ring of color and work to the dark background.)
resin wolf eyes for a fursuit head one layer of color applied

It also helps to have the big pile of reject resin eyes from my Little WIndows debacle to experiment on. The one in this picture is one of these- you'll notice the bubbles and the slightly yellow cast to the clear resin.

But in any case I was able to recreate the color scheme I used. Here's the ring of color around the pupil, Burnt Sienna, applied with a #1 liner brush. I've found it's impossible to find brushes too thin and skinny to paint these eyes.
resin wolf eyes for a fursuit head two layers of color applied


The next color added, Iridescent Copper. God how I love metallic paints!!
Resin eyes for a fursuit head three layers of color applied
resin wolf eyes for a fursuit head four layers of color applied


Next, a mix of Iridescent Copper and Yellow Ochre. As much as I want to make everything shiny, adding a little matte paint into the mix helps break up the sheen and thus adds an interesting sparkle.


Building up the layers of color. Next, a mix of Cadmium Yellow Medium Hue and Iridescent Gold. Again, adding a little matte color into the metallic.
Picture


Now it's finally time to MAKE IT SHINY!! A layer of Iridescent Gold applied straight up, this time with a "bigger" brush, a #2 round. This picture, taken with a flash, shows how the lines of matte paint breaks up the metallic paint and adds that sparkle.
resin wolf eyes for a fursuit head layer of metallic gold paint applied


Next to last step, a layer of Interference Gold, applied with an even "bigger"  brush, a #4 round. I like just the little extra depth of color this paint adds.
Picture

Finally, a layer of black paint, applied with a 1/2" wash brush. Before this step I check to make sure there are no thin spots in the last two layers of colors  by laying the eye down on a sheet of black paper and making sure there's nothing that leaps out at me. The black adds a lot more depth to the color and helps to show up the layers of brushstrokes.
Group of resin wolf eyes for a fursuit head
One downside of having piles of reject resin eyes, however, is that the OCD has free reign and its sufferer feels compelled to paint piles and piles and piles of experimental eyes until one comes out Just Right! The above eyes pretty much have all the same color scheme, but have slightly different styles of brush work.
Finished wolf eyes painted on Dreamvision Creations resin blanks
And finally, the eyes I'm going to use on my next head, painted on sparkly clear bubble free resin eye blanks from Dreamvision Creations. I am pleased with how they came out and can't wait to install them!
1 Comment

Painting Pupils on Resin Eye Blanks

10/28/2016

0 Comments

 
Tools and materials for making a pupil stencil for a resin eye blank
In my last post I failed to cast usable resin eye blanks using Little Windows resin and so bought blanks from Dreamvision Creations.In this post I will paint pupils on them. For the last furry head, I used a “Staedler Professional Combo Circle Template", from here on in known as "The Circle Thingy” to lightly trace pupils onto my resin eye blank with a black watercolor pencil, which I then carefully painted in. This time I wanted to make a stencil for the pupil, so I could fuss a little more with its placement. The resin eyes hugely magnify any errors at the center, so if the placement looks a little off from the back of the eye, it can look way off from the front!
The first order of business, however, was to decide on a diameter for the pupil. Anything in the center of the resin eye blank is greatly magnified, so it's good to try out a bunch of different sized pupils to see what looks best, knowing that the actual circle used will be smaller than how it will appear. The Circle Thingy came in handy for this- I put it down over a piece of black construction paper and simply moved the blank over each opening, until I found a size I liked.
Then to make a stencil. A craft hole punch in the size I selected (grey things in pictures) comes in handy here. I make sure the punch is nice and sharp by punching lots of holes in a sheet of aluminum foil (yes, really). Then I carefully stick a piece of Frog Tape onto a piece of wax paper. Frog Tape is supposedly a special kind of masking tape that is less prone to paint bleeding under its edges than other masking tapes, so is more likely to make sharp clean lines. Using the Circle Thingy I draw a circle on the tape/wax paper the size of the eye and then mark the center on the circle using the guides on the template (you can see some of them around large opening on the Circle Thingy in the picture to the left.)
stencil for painting pupil on Dreamvision Creation resin eye blank
I then cut out the circle and folded down one little edge so that I could get it centered in the hole punch, since it won't fit otherwise. I use the target to try to get the hole as close to the middle of the circle as possible. Then I peel the wax paper off the back of my new stencil and carefully position it over the back of the eye before pressing it down firmly. Even though the hole punch has been carefully positioned over the "X", and the stencil may be smack dab in the middle of the eye, the placement of the stencil may still need fiddling- again, any little error is magnified hugely by the center of the eye.
stencil for painting pupil on back of resin eye blank by Dreamvision Creations
stencil for painting pupil on back of Dreamvision Creations resin eye blank
**note** it's best to use the new stencil ASAP after it's made, specifically, it's best to remove the tape promptly from the wax paper, as the longer the tape sits on the paper the more firmly it gets stuck.
paint applied to stencil for pupil on resin eye  blank

Then I rub the edges of the stencil down to make sure they're firmly attached to the eye.  Then I use a fluid body acrylic (aka bottled, not tubed) such as Golden, and a wide, flat wash  brush to apply the paint. The wash brush tends to leave fewer  brushstrokes in my experience. I try to pat the paint on as much as possible, and try not to stroke the paint up under the edges of the stencil.
 When the paint is dry I remove the stencil. I **do not** use a hair dryer to speed drying as I sometimes do, as I've found it can cause a skin to form between the stencil and the eye, which can make the paint on the eye peel off when I remove the stencil. I scrape off any little spots that managed to get up under the tape anyway with my fingernail. In case of a total disaster, it's possible to wash the paint off the eye and start over again, though it's best to do this sooner rather than later- the paint is easiest to get off  before it has fully cured, usually within 24 hours. And, the finished pupil!
pupil painted on Dreamvision Creations resin eye blank
UPDATE 11/15/16: I want to share some good tips I got from Furaffinity, Livejournal and Facebook after I posted this article there. Some suggestions: Try using a paint marker, with a metal washer for a template; use spraypaint or an airbrush to get a better edge with the stencil; use frisket film for the stencil. I had tried to use frisket film previously but the punches can't handle it. However I might try putting the frisket film directly on the eye, drawing the circle on the film and cutting away the hole from there with an exacto knife.
0 Comments

    Author

    I make masks. Because art is more fun when you put it on your head.

    Categories

    All
    A Day In The Life
    Airbrushing
    Artemis
    Casting
    Cat Masks
    Color Design
    Deer Mask
    Ears
    Eyes
    Fur
    Garm
    Handpaws
    Head Base
    Horse/unicorn Masks
    Jawsets
    Lips
    Maxine
    Methods And Materials
    Moldmaking
    Moving Jaw
    Noses
    Painting
    Paper Mache
    Patterning
    Photography
    Rabbit Masks
    Resin
    Rip
    Sculpting
    Sewing
    Shaving And Trimming
    Silas
    Silicone
    Strapping
    Studio Announcements
    Tails
    Tongues
    Videos
    Wolf Masks

    Archives

    October 2021
    September 2021
    May 2021
    March 2021
    July 2020
    November 2019
    March 2019
    January 2019
    December 2018
    June 2018
    April 2018
    March 2018
    December 2017
    June 2017
    May 2017
    April 2017
    February 2017
    January 2017
    December 2016
    November 2016
    October 2016
    July 2016
    August 2014
    June 2014
    February 2014
    November 2013
    October 2013
    March 2012
    October 2011
    September 2011
    March 2011
    November 2010
    September 2010
    August 2010
    June 2010
    October 2009
    September 2009
    March 2009
    February 2009
    February 2008
    June 2007
    April 2007

    Enter your email address:

    Delivered by FeedBurner

    RSS Feed

Proudly powered by Weebly