Sans Souci Studios
Follow us on Facebook!
  • Home
  • Gallery
    • Fursuit Heads and Partials
    • Paper Mache Masks 2000- 2014
  • Blog
  • About
    • About
    • Embarking on the Road to Furry Fandom
  • Contact
  • Thanks to Our Supporters!

Attempting casting resin in two colors, part three- success!!!

1/13/2019

0 Comments

 
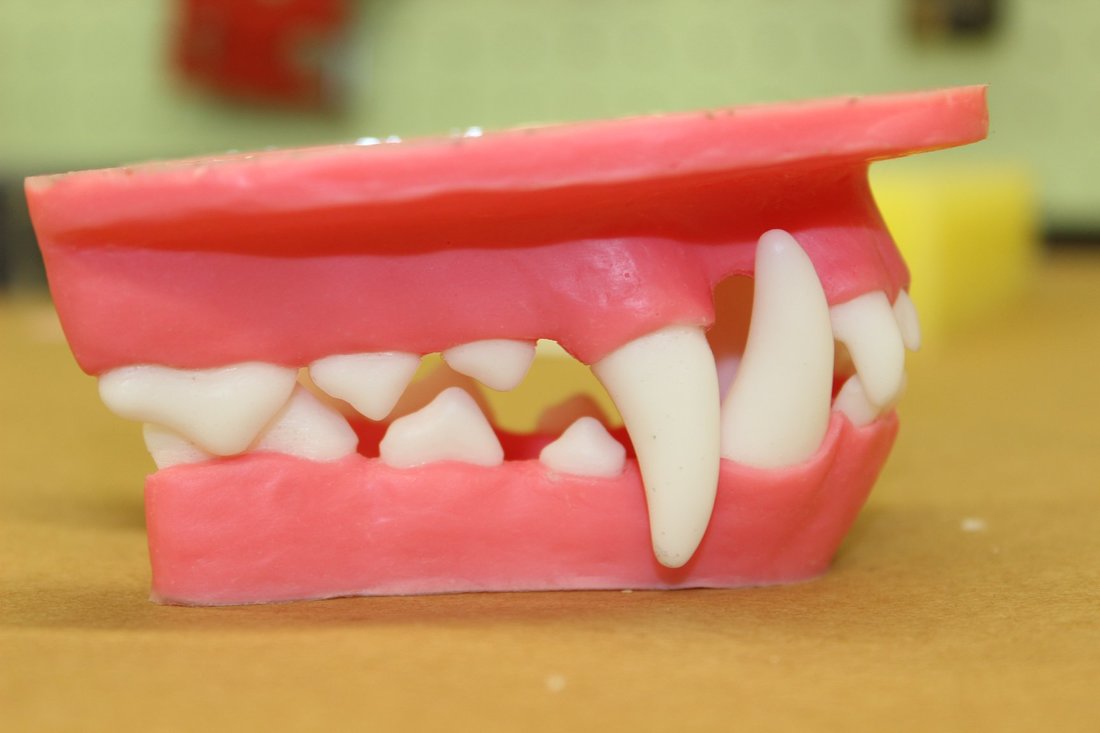
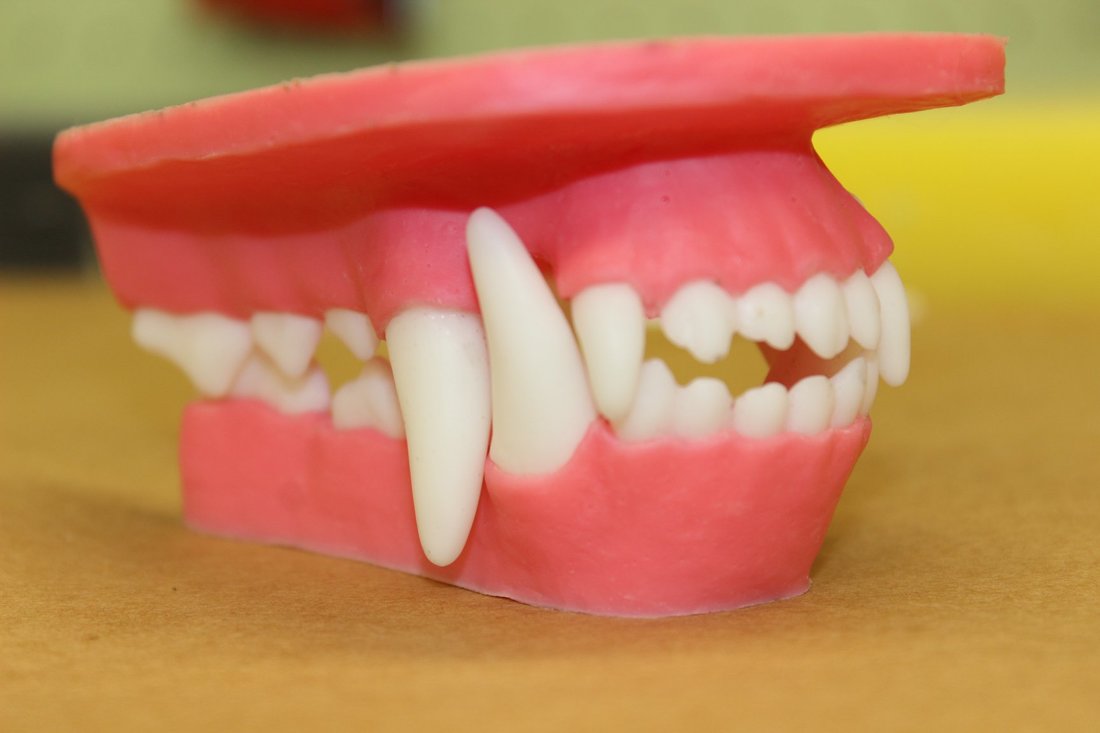
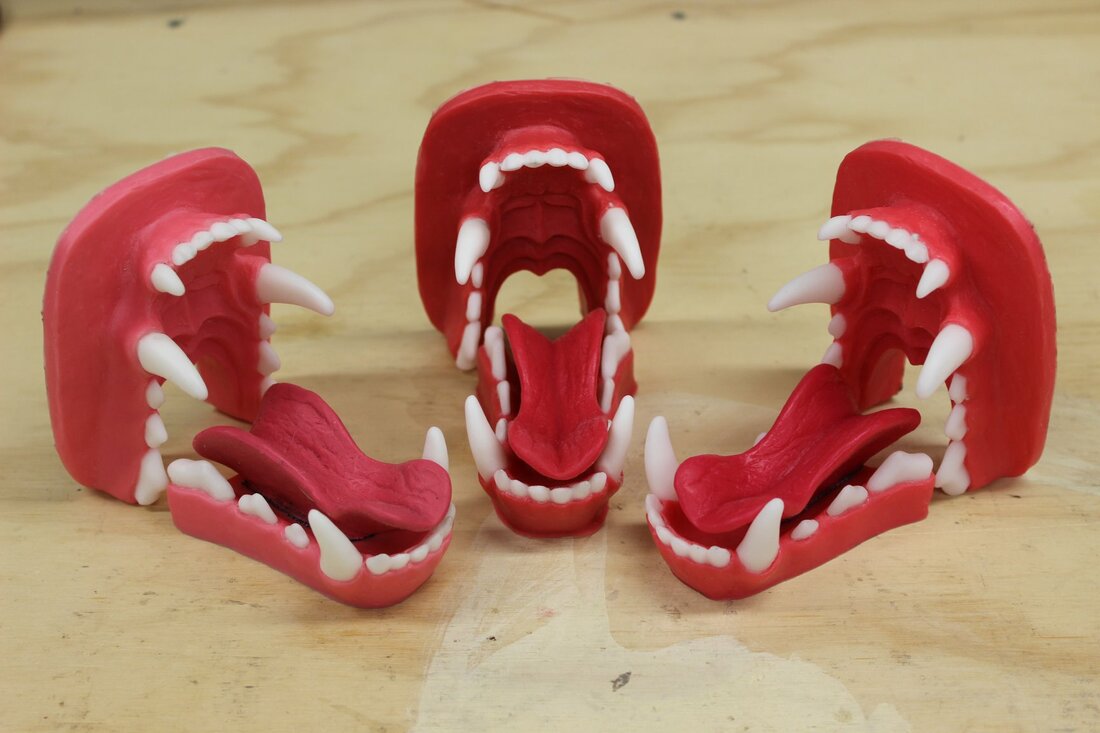
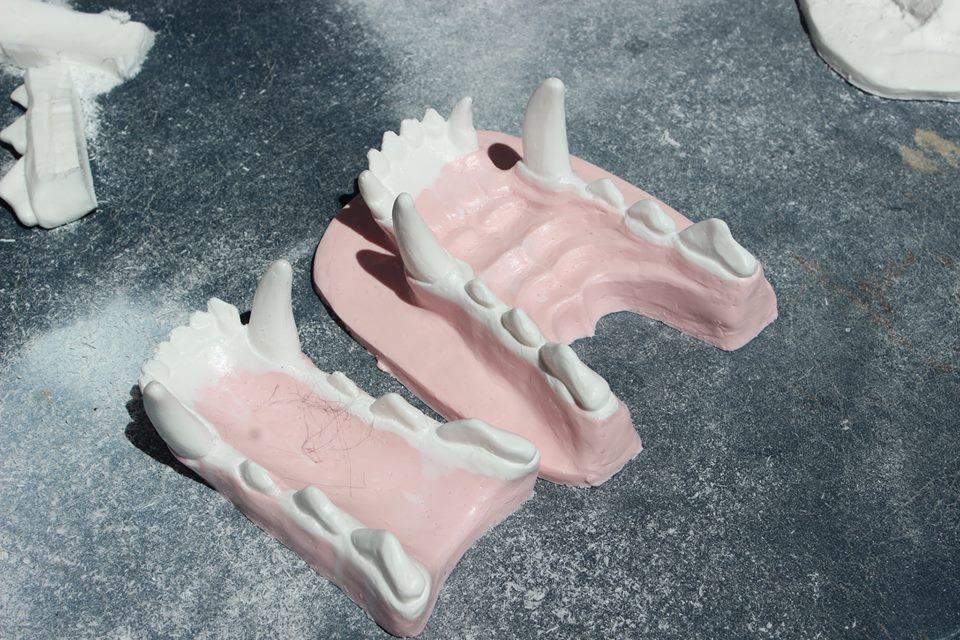
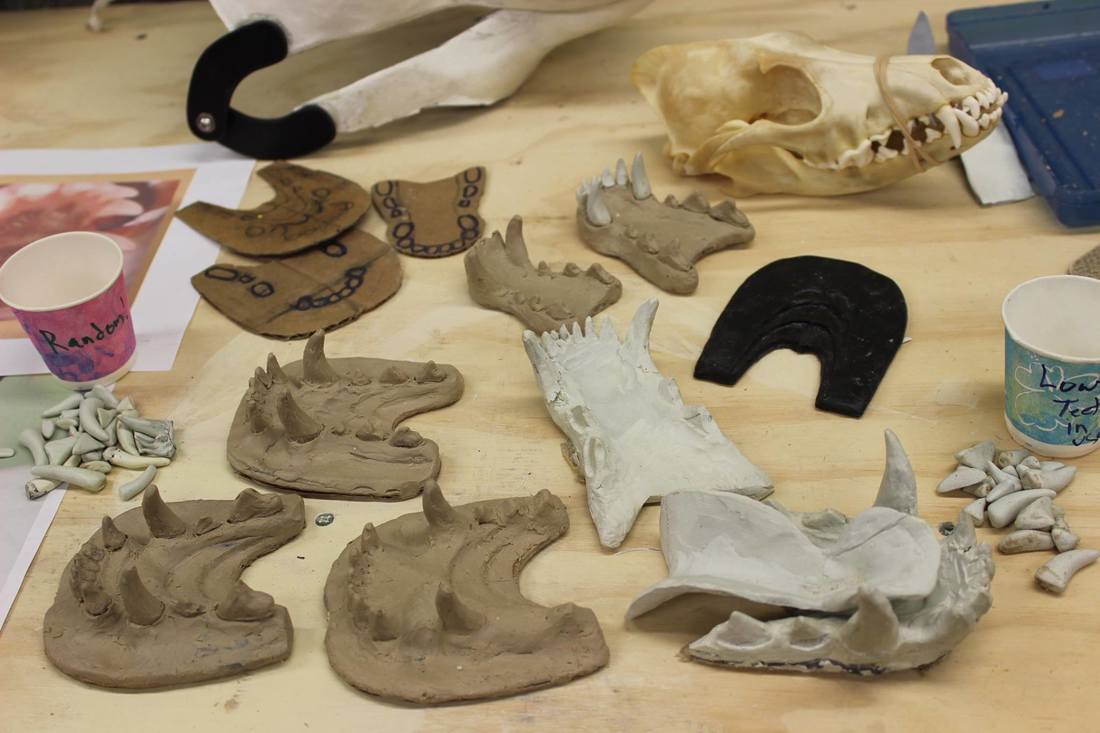
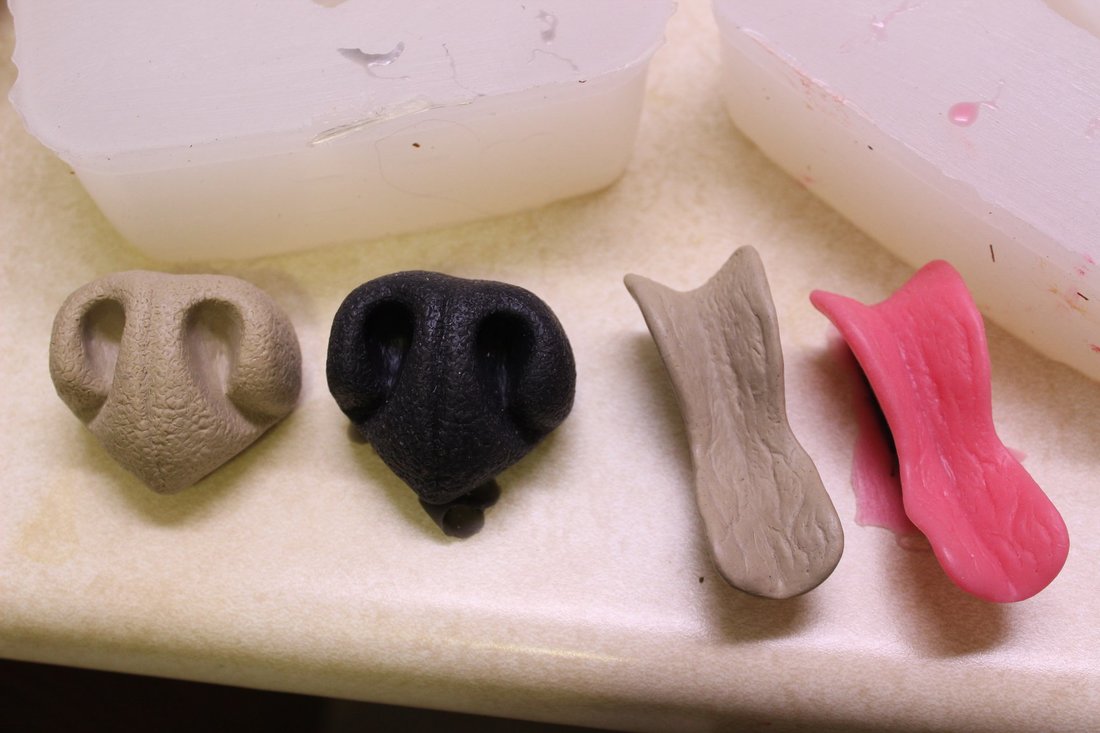
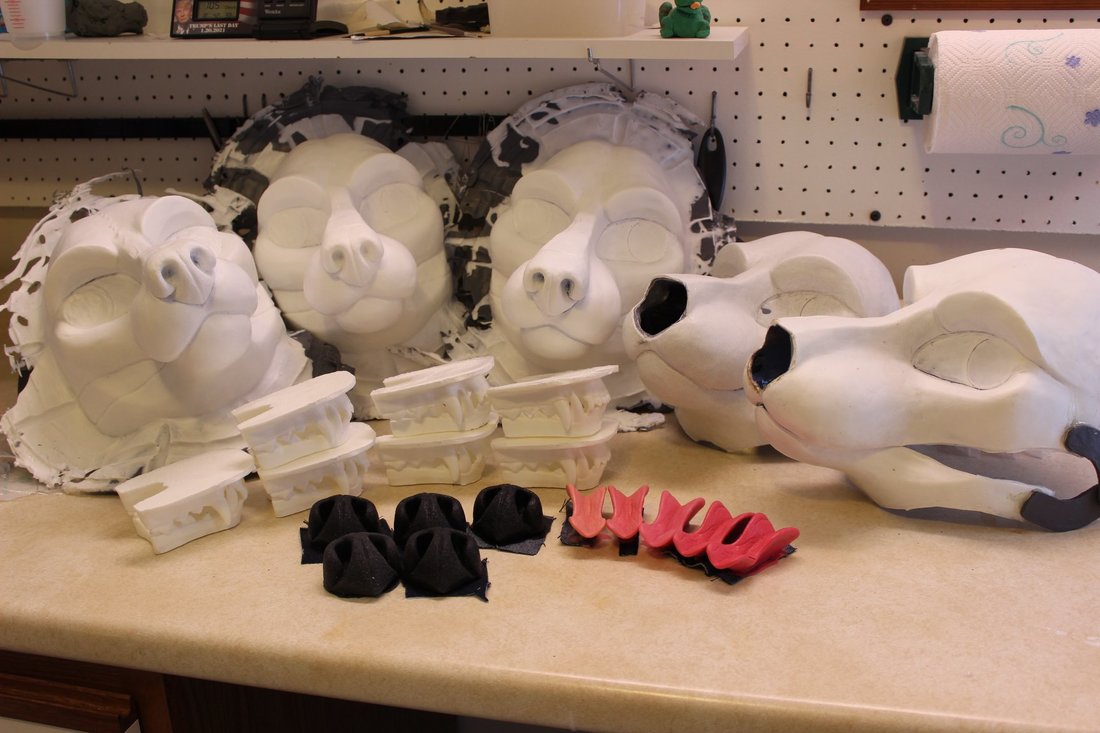
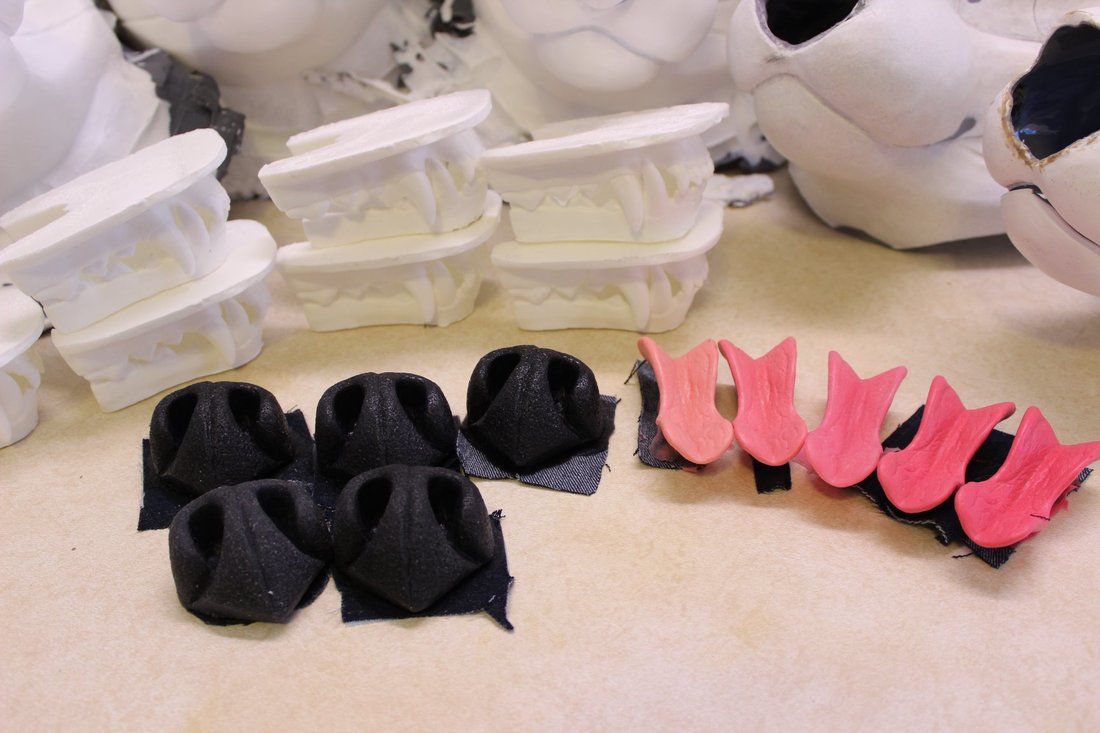
 Check it out! Jawsets cast in two different colors! Aren't they bee-oootyful??
resin canine jawset cast in two colors
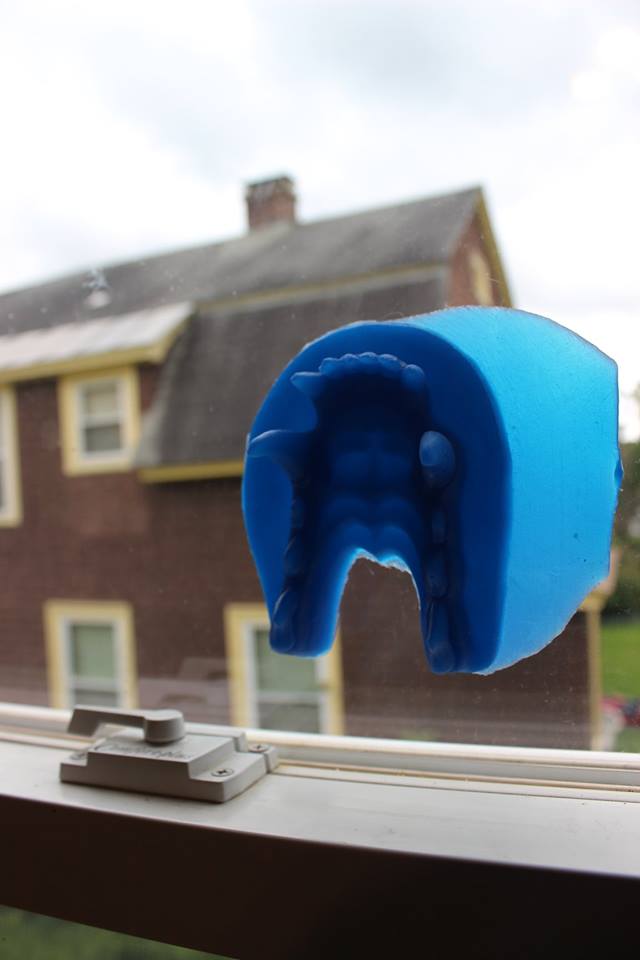
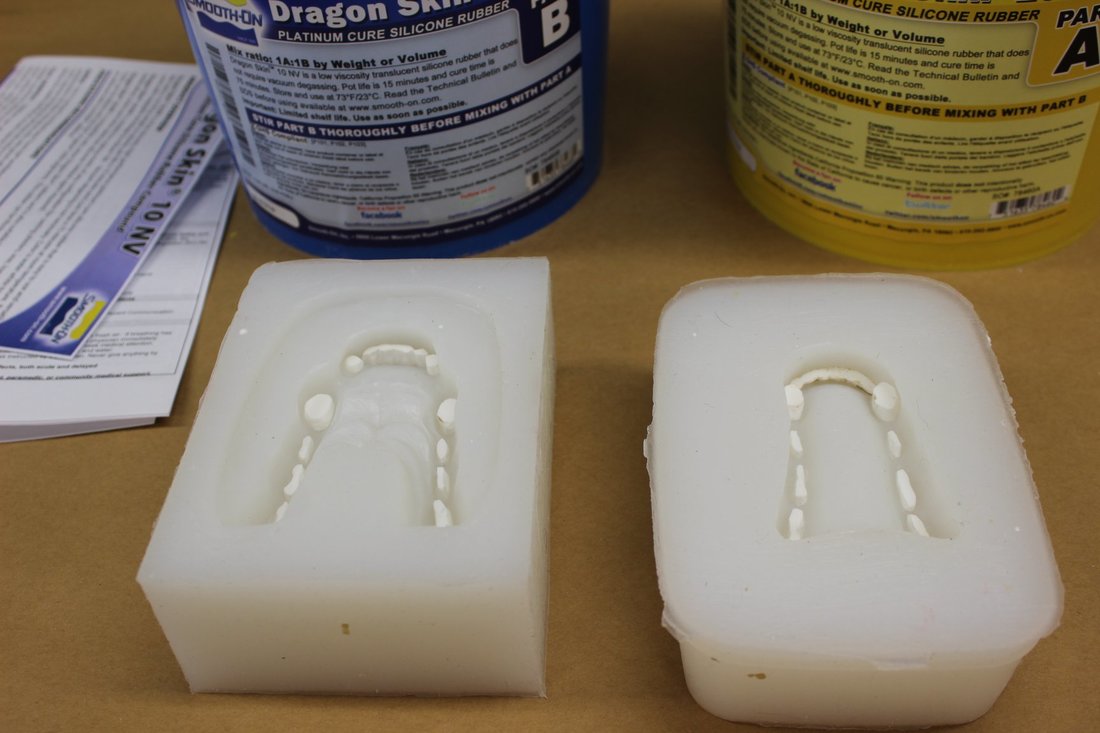
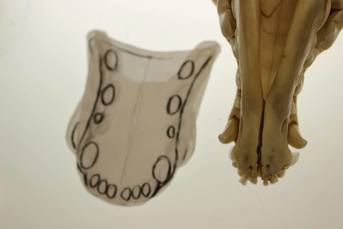
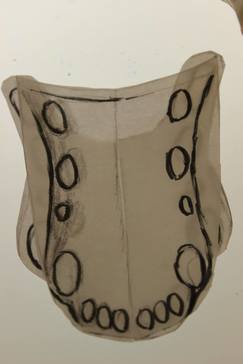
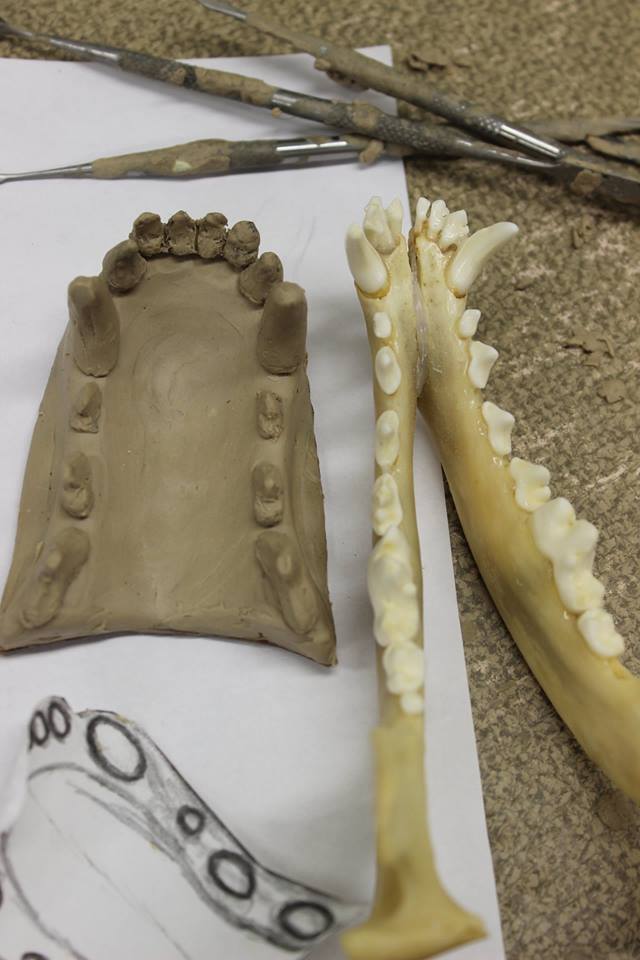
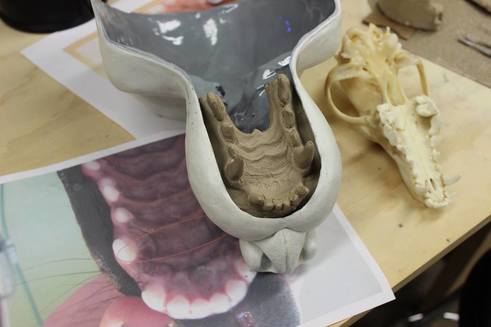
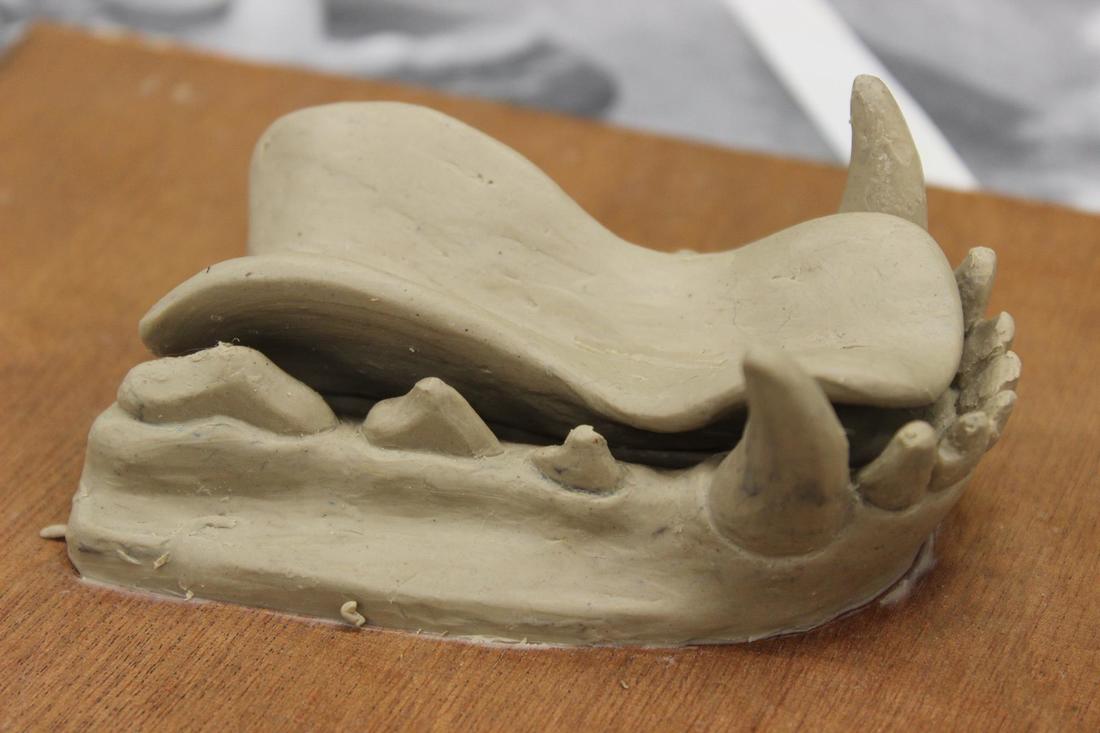
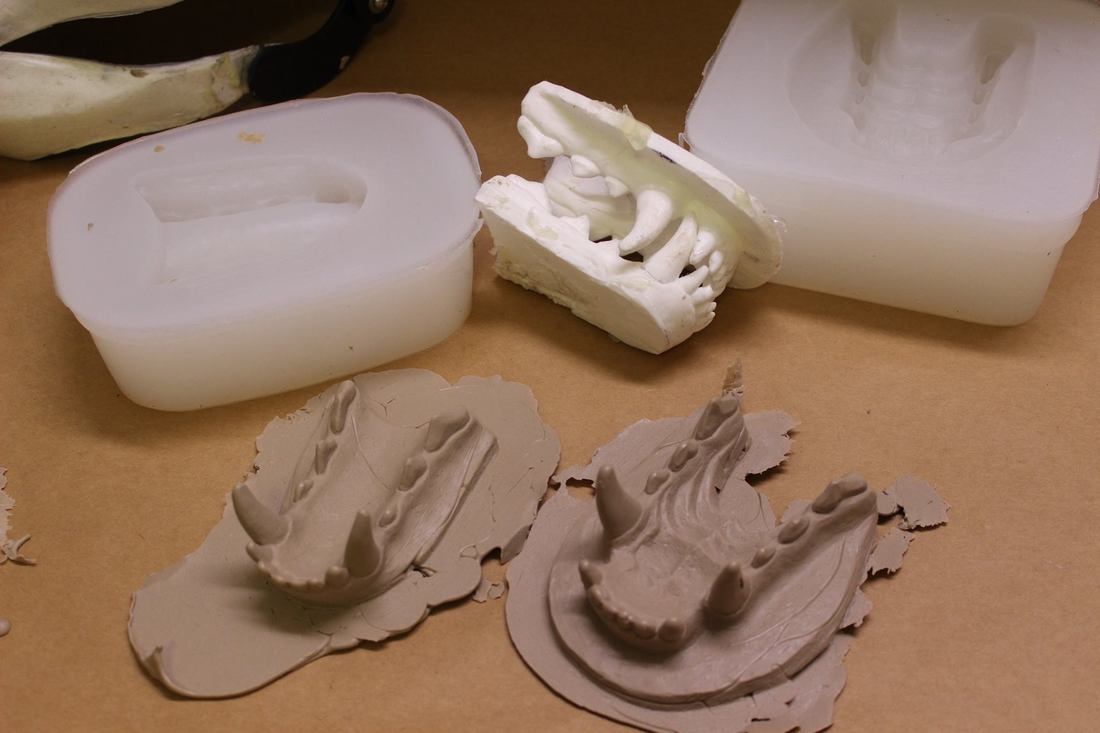
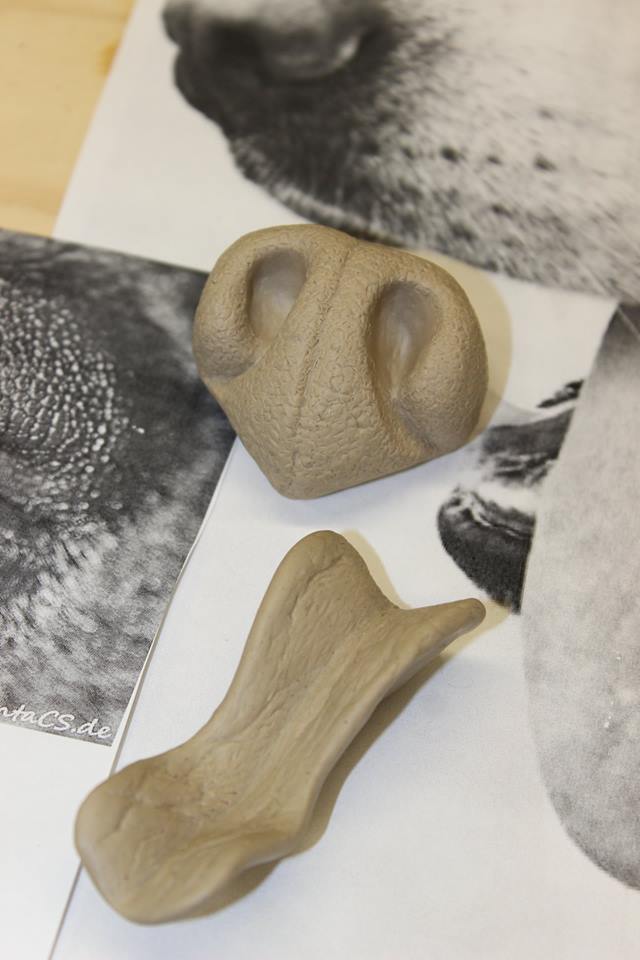
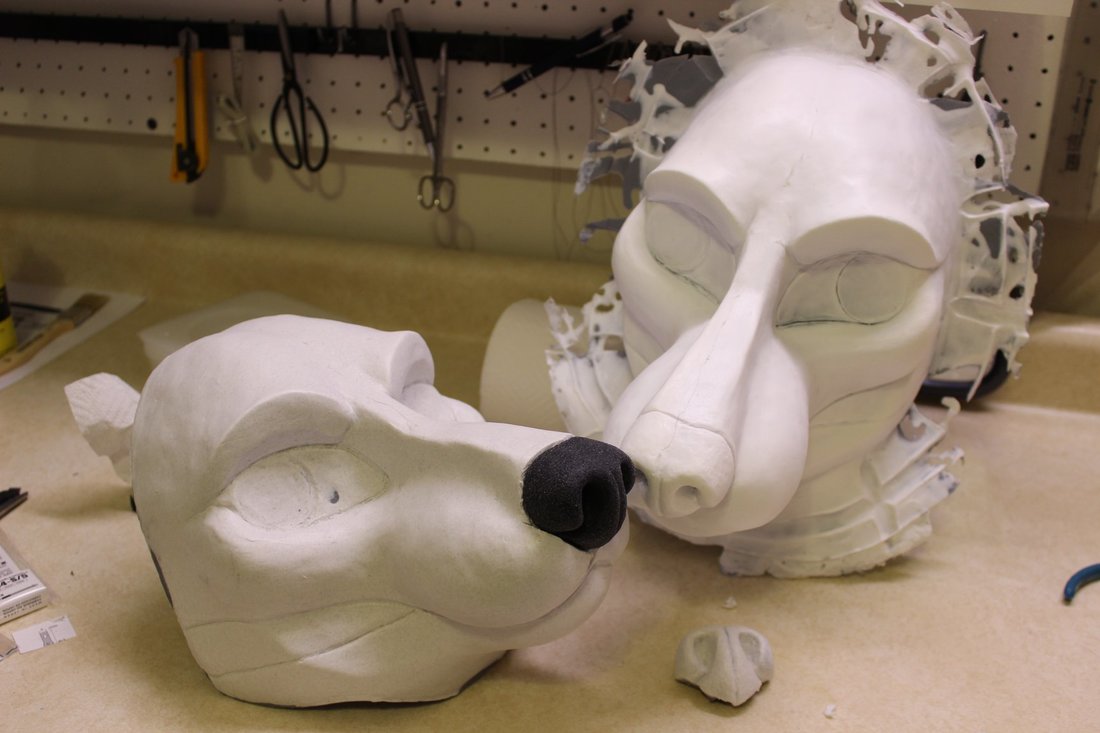
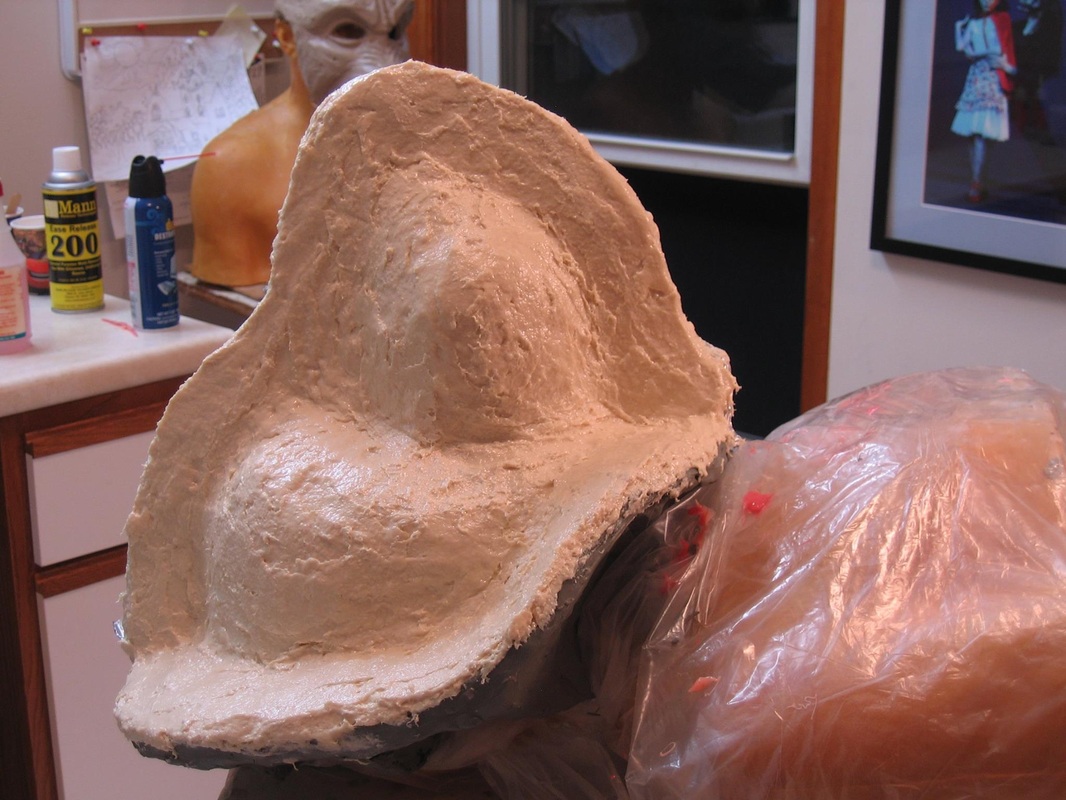
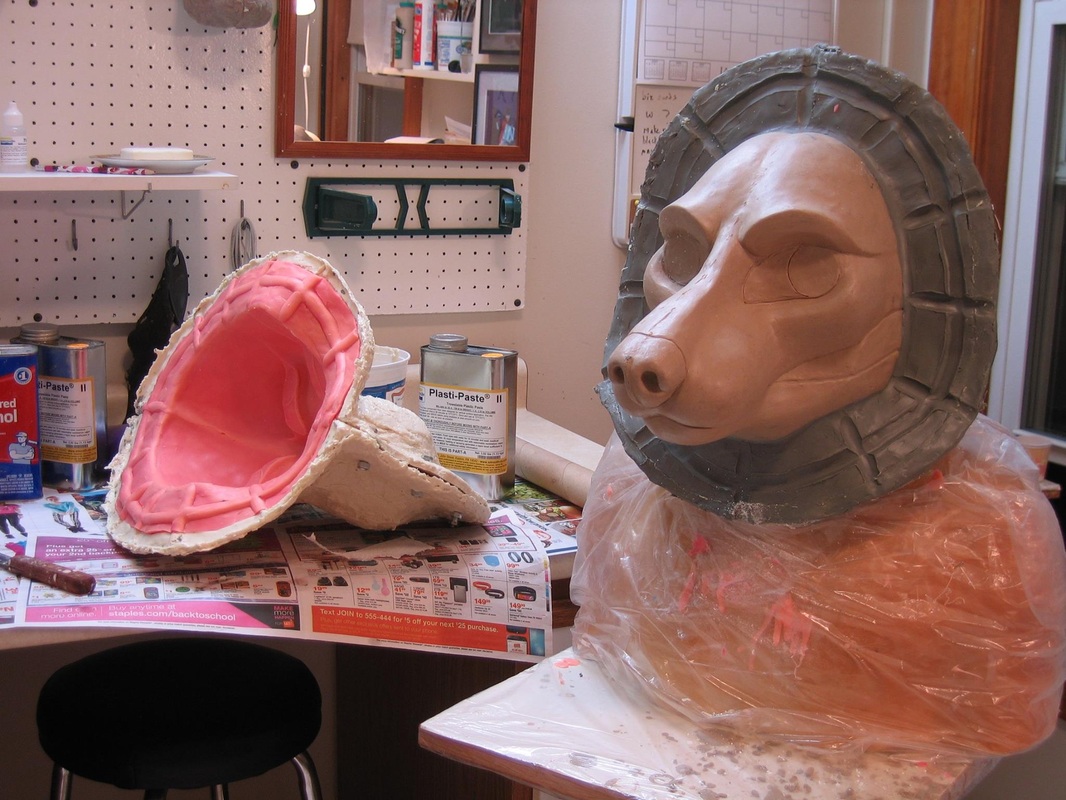
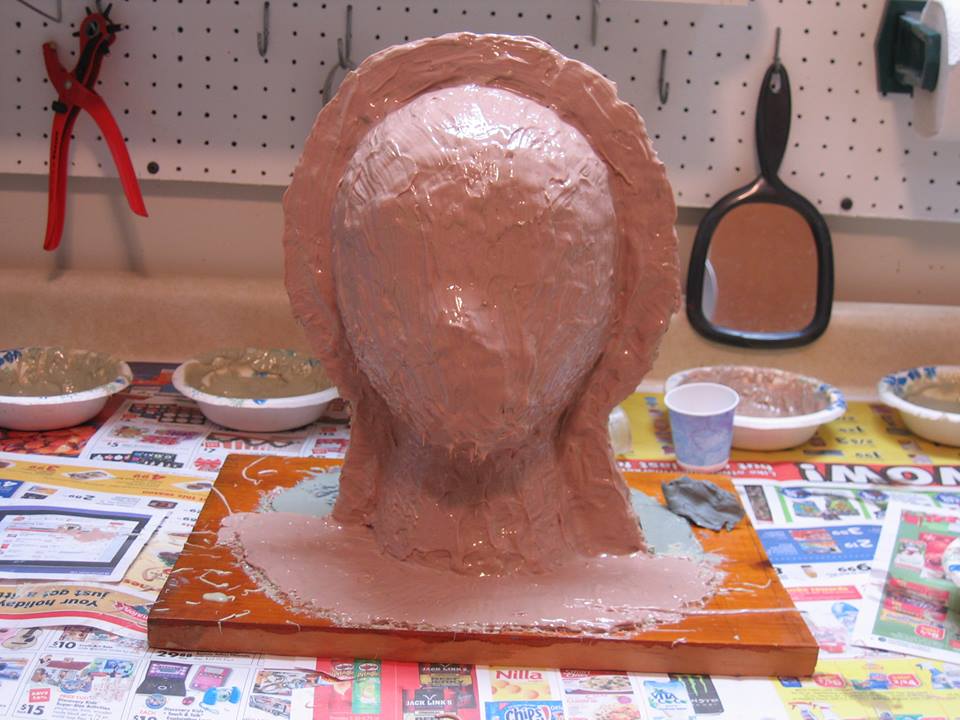
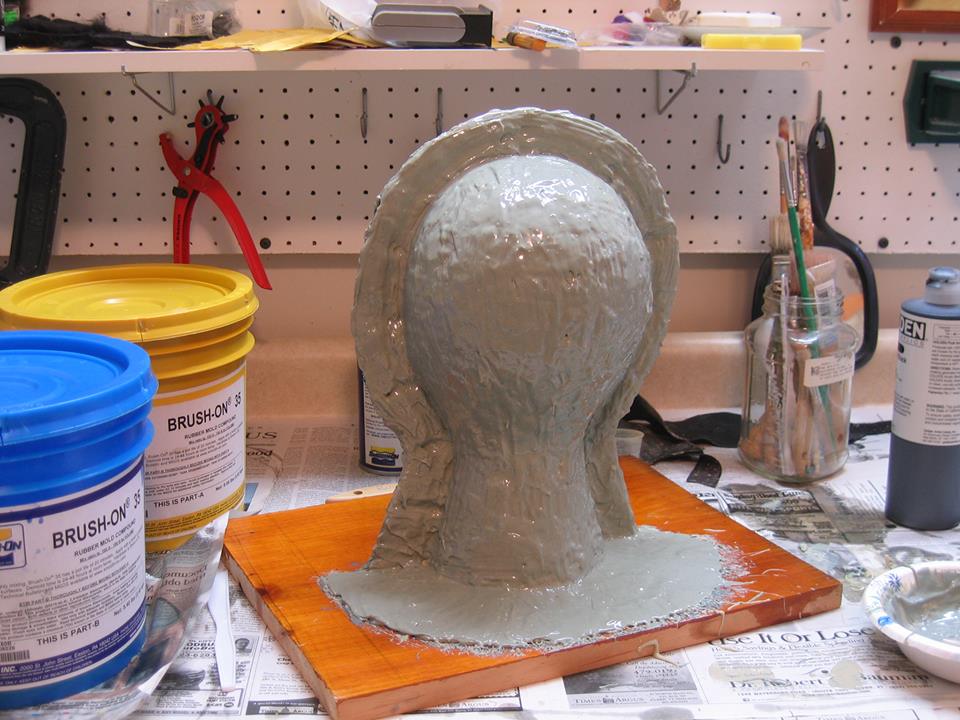
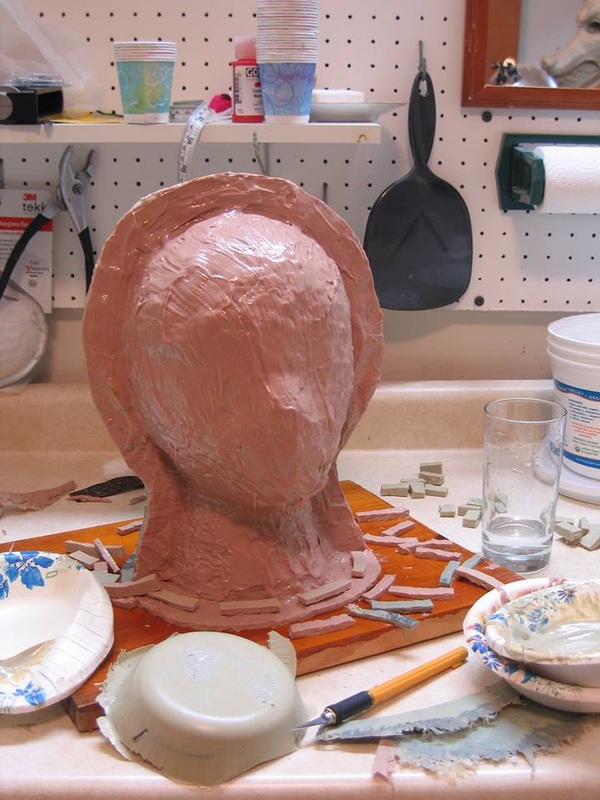
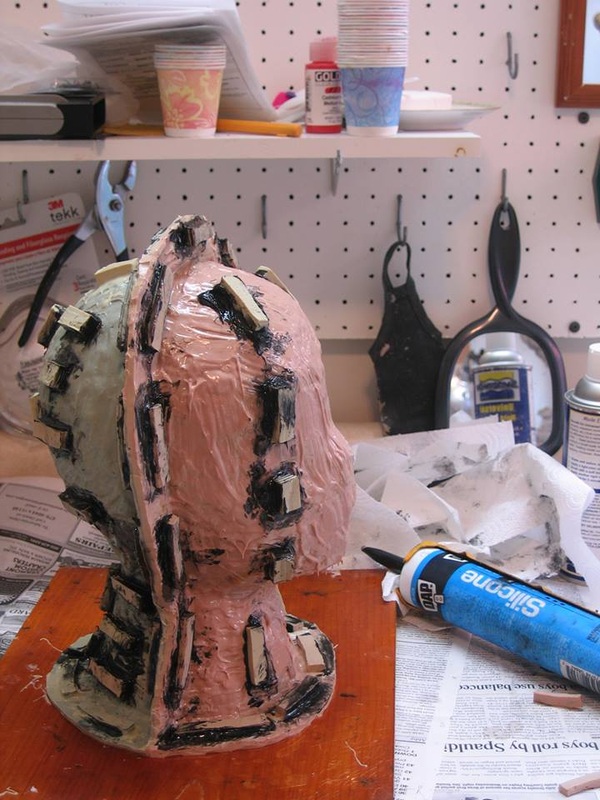
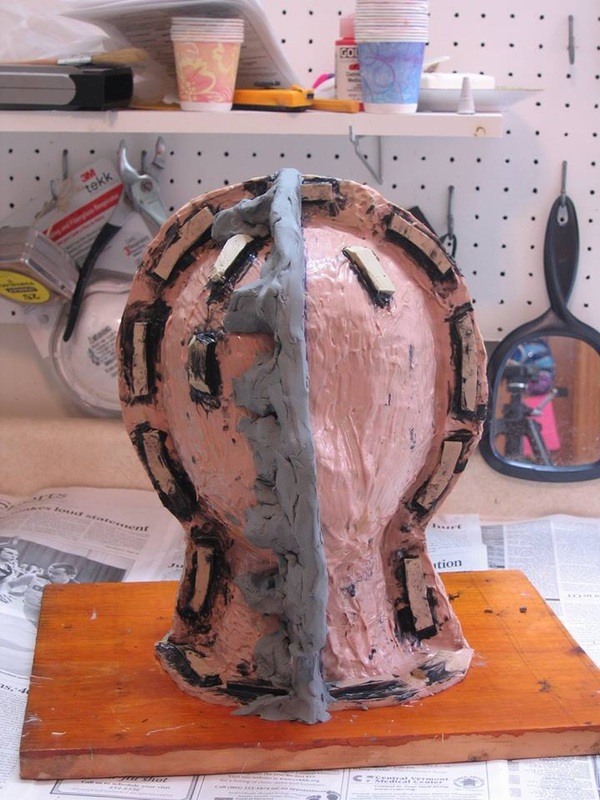
I decided to try a method I had thought about before but had dismissed as too difficult- making separate models of gums and teeth, making sure they fit well together beforehand, and then molding them. I knew that teeth and gum components carefully cut apart from a single a rubber jawset model and molded separately would make casts that would fit back together with no problem. However, as I wrote about in a previous blog post, the repeated  molding and casting in rubber that this method requires caused  bubbles to build up in the casts over time. Yuck!!

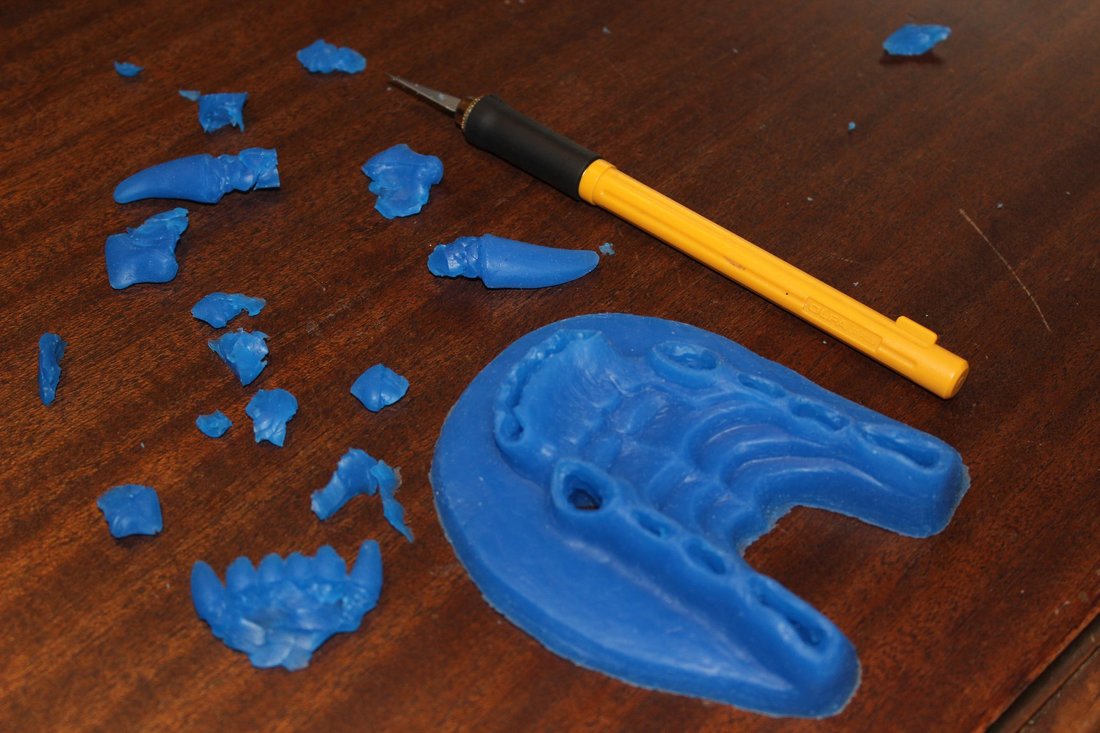
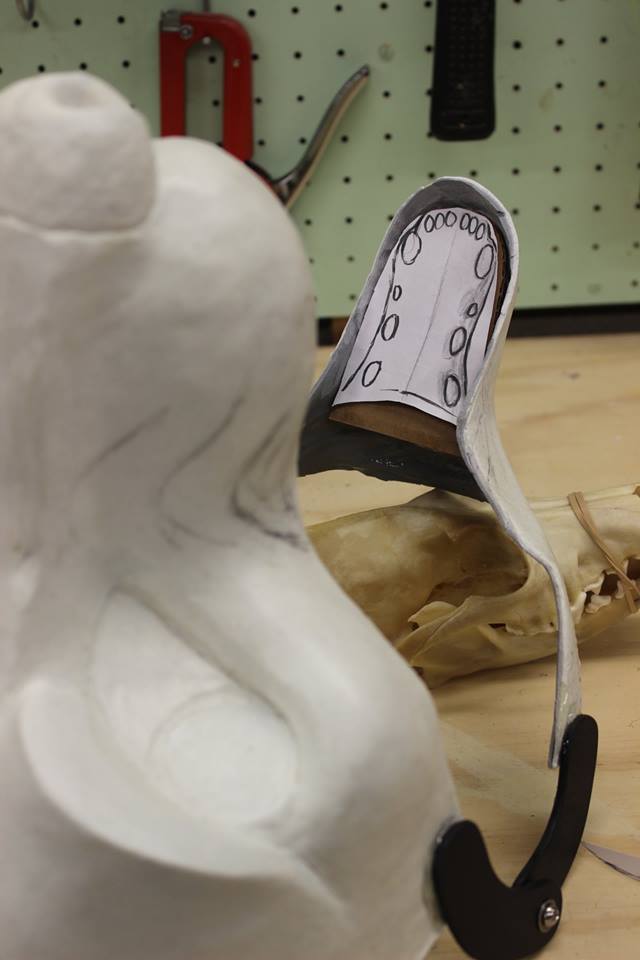
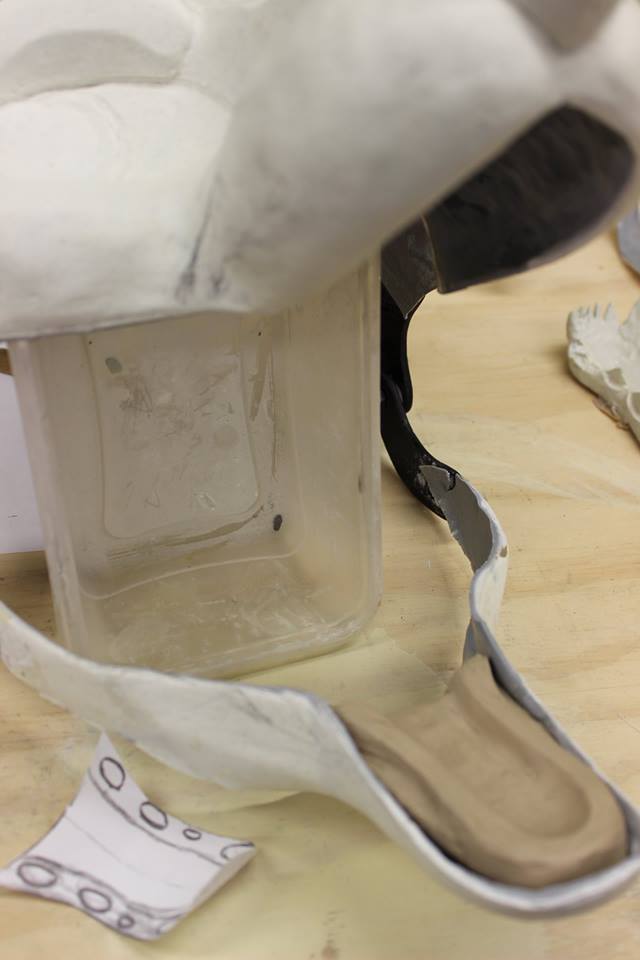
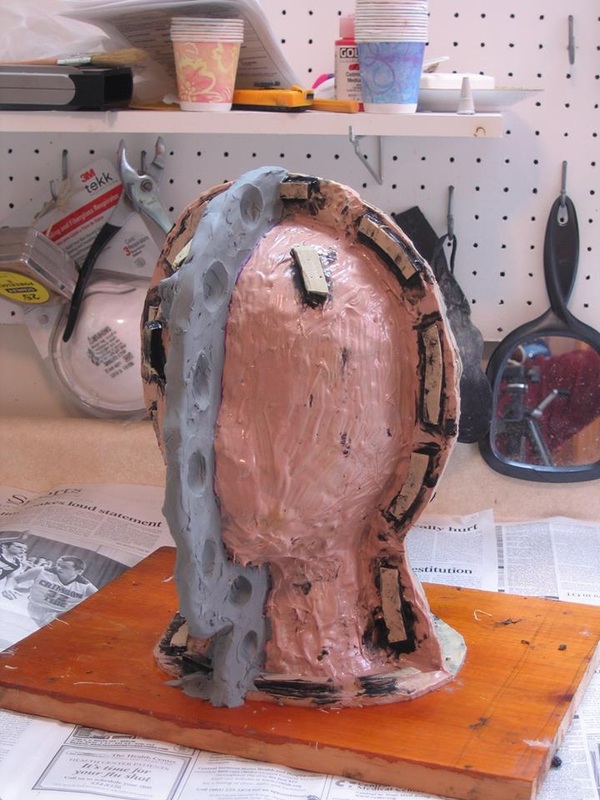
So I would use teeth I cut out of a resin cast to make that part of the mold. I would use a plasticine  "borrowed casting" of the gums (I talk more about this technique in this blog post), physically removing any bubbles before molding it. Bubbles can be removed from plasticine but not from rubber!  I would make sure the teeth and the gums fit very well together before making molds of either. The big challenge would be not squishing the models and ruining the fit during this process.


Jawset model in the freezer
 SIlicone rubber tipped clay shaping tools
​

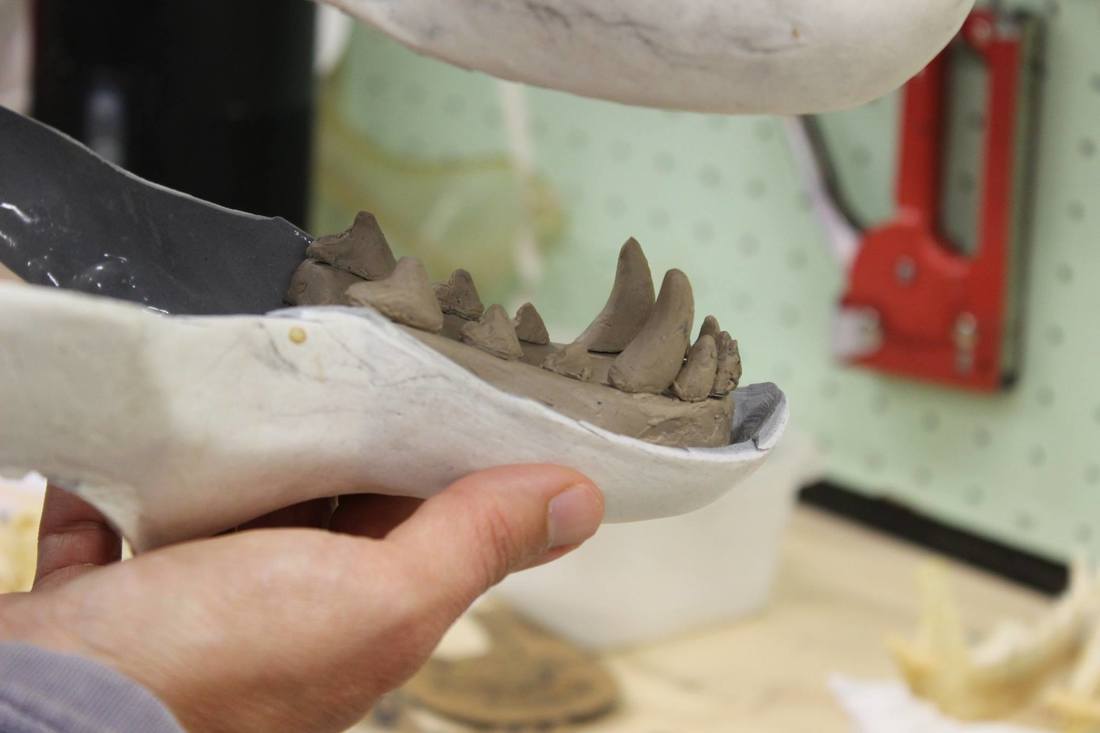
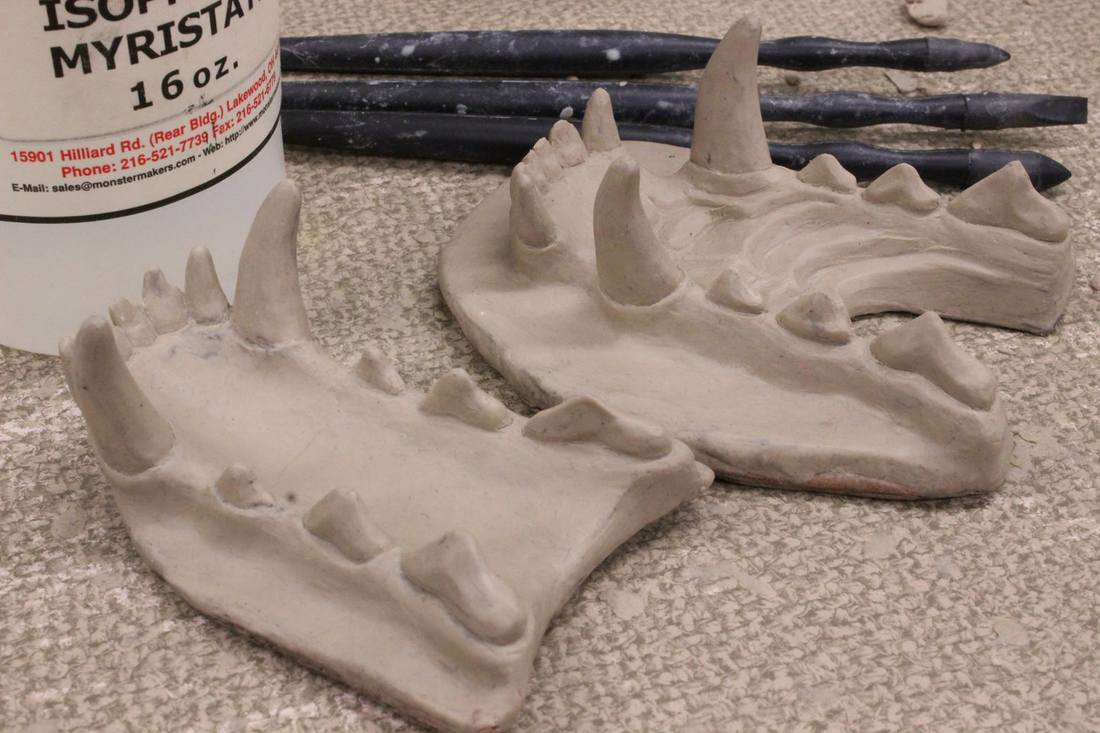
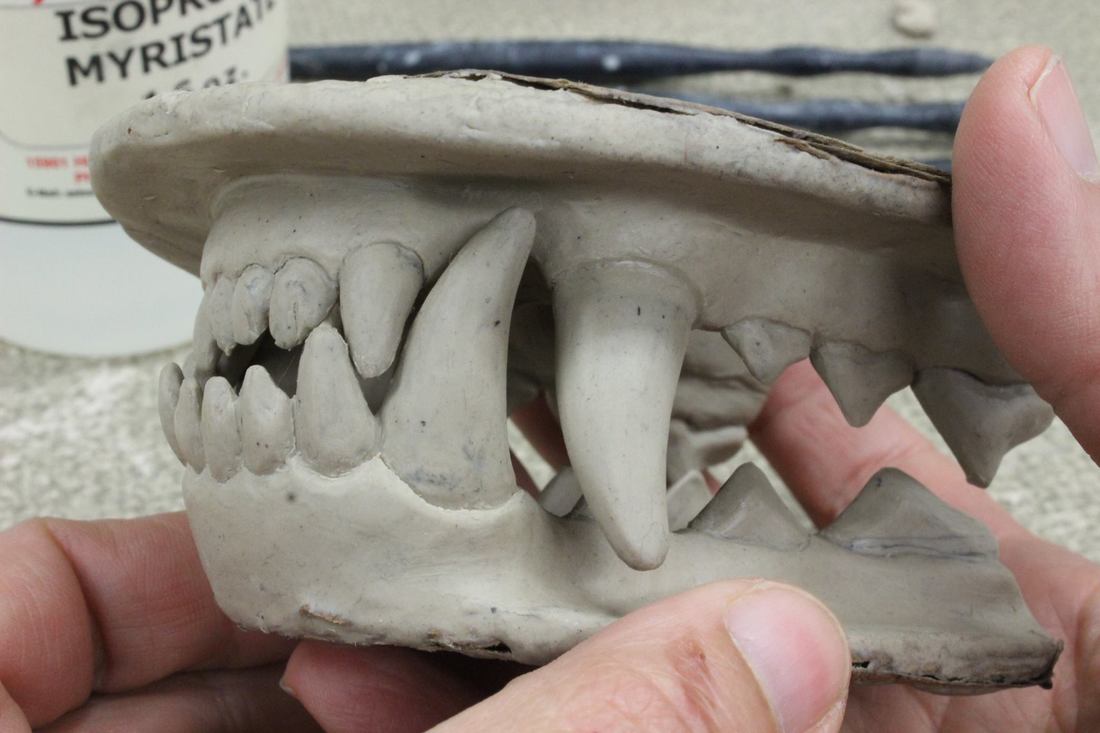
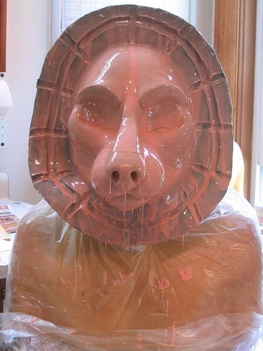
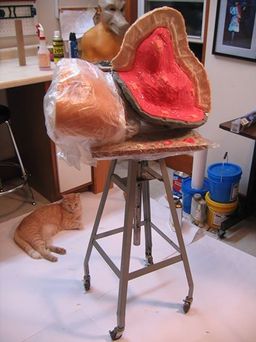
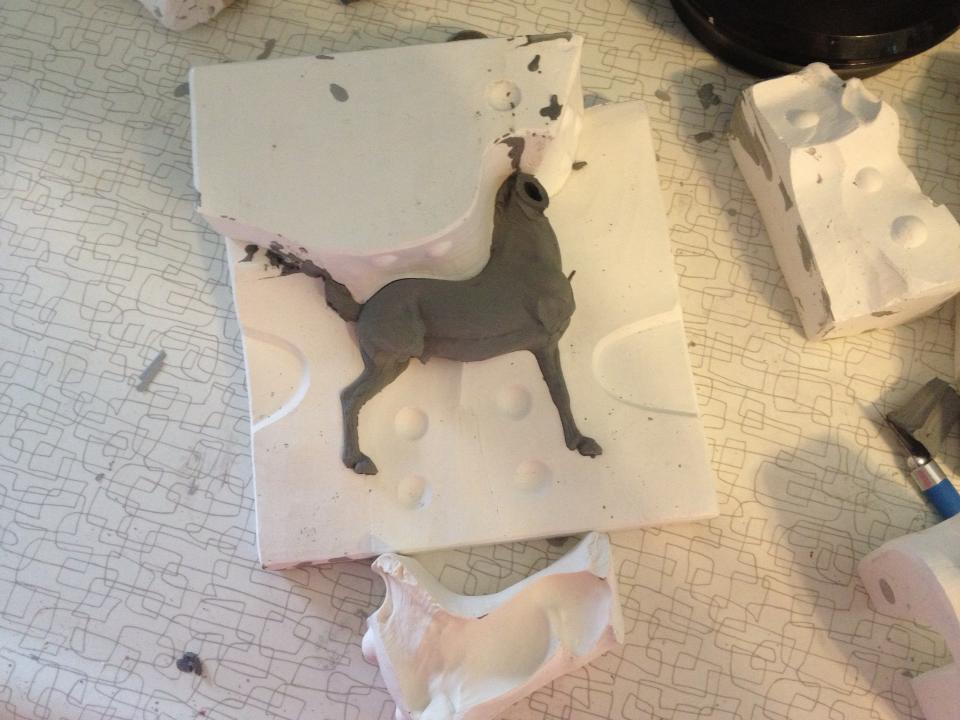
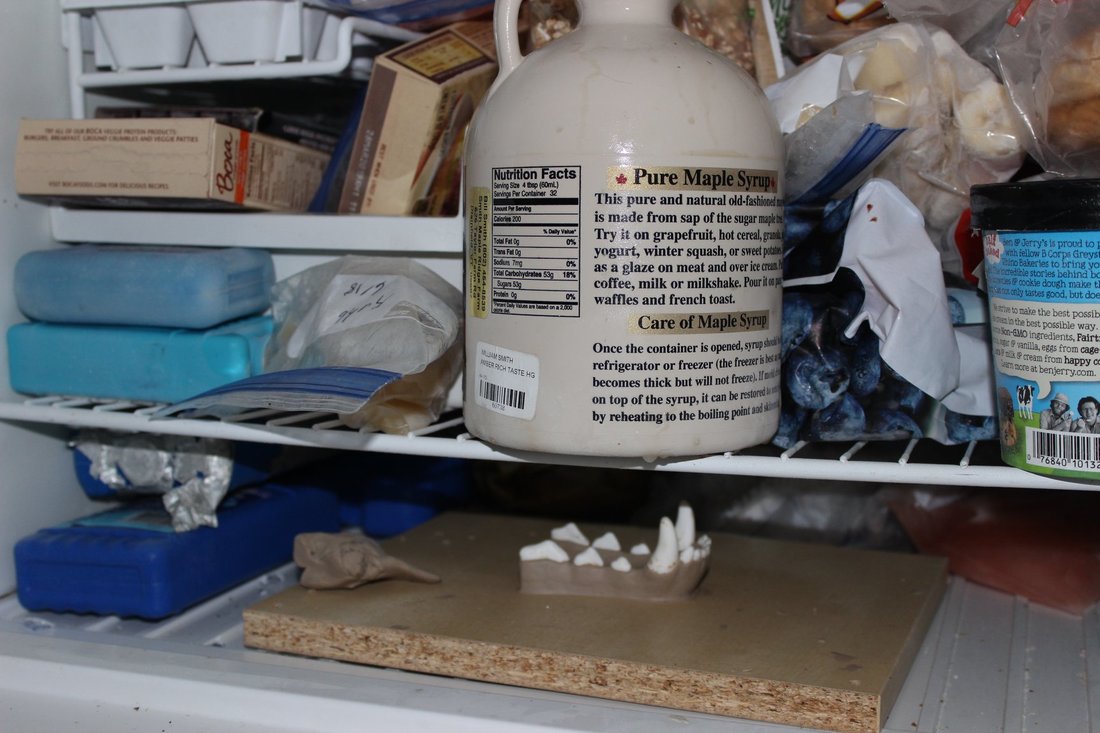
Which brings us to this picture. Why, you may reasonably ask, is there a jawset model in my freezer? Very simply, freezing the clay helps keep squishing to a minimum, so I can check the teeth and gums for fit and do as little damage as possible. This kind of plasticine, Monster Clay, contains a high amount of wax, so it freezes very well. 


Pictured here are another secret weapon in my arsenal, rubber tipped shaping tools. These also helped keep squishing to a minimum, as they made it possible to apply just the tiniest, most precise amount of pressure to only the areas it was needed. Unlike big fat fingers.


​
Clay gum models for resin canine jawset
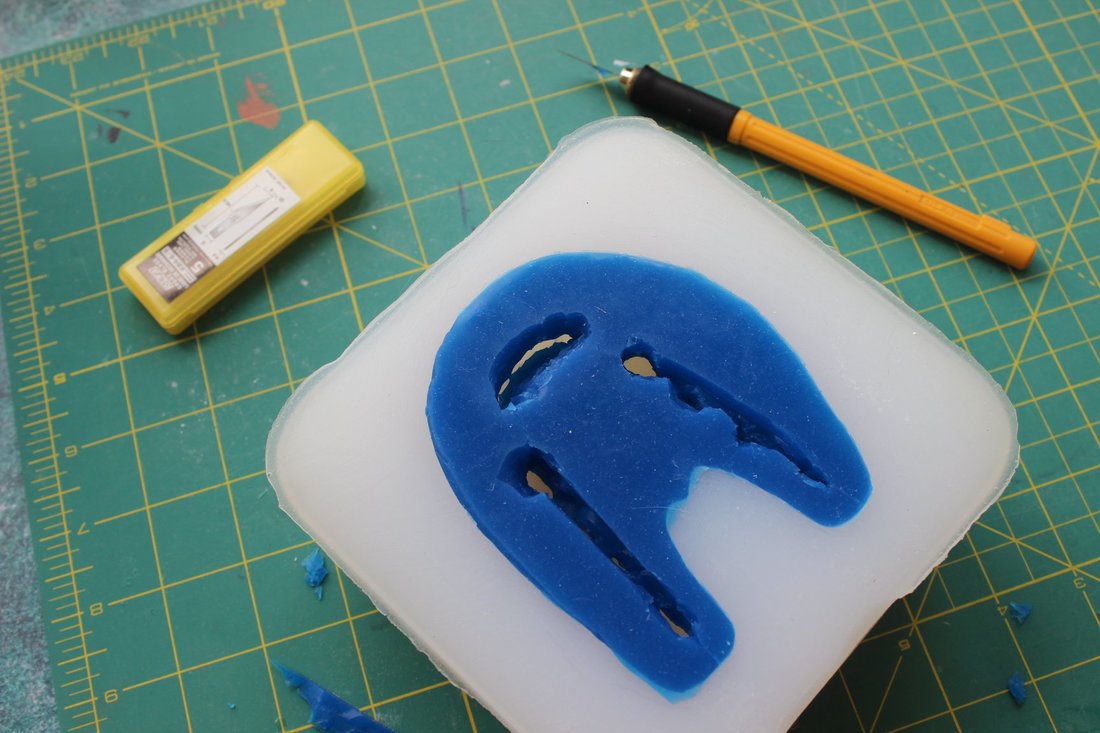
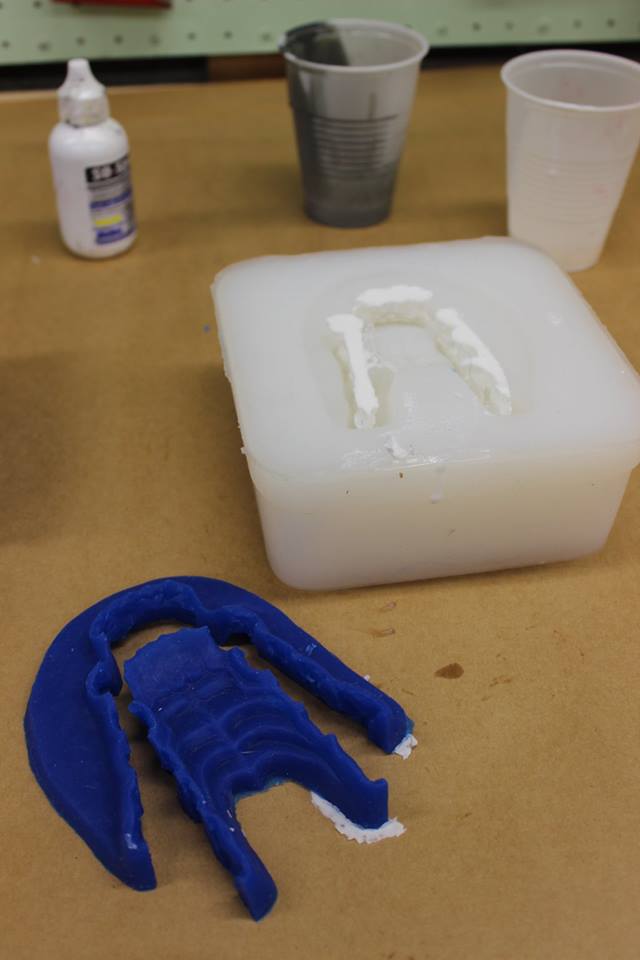
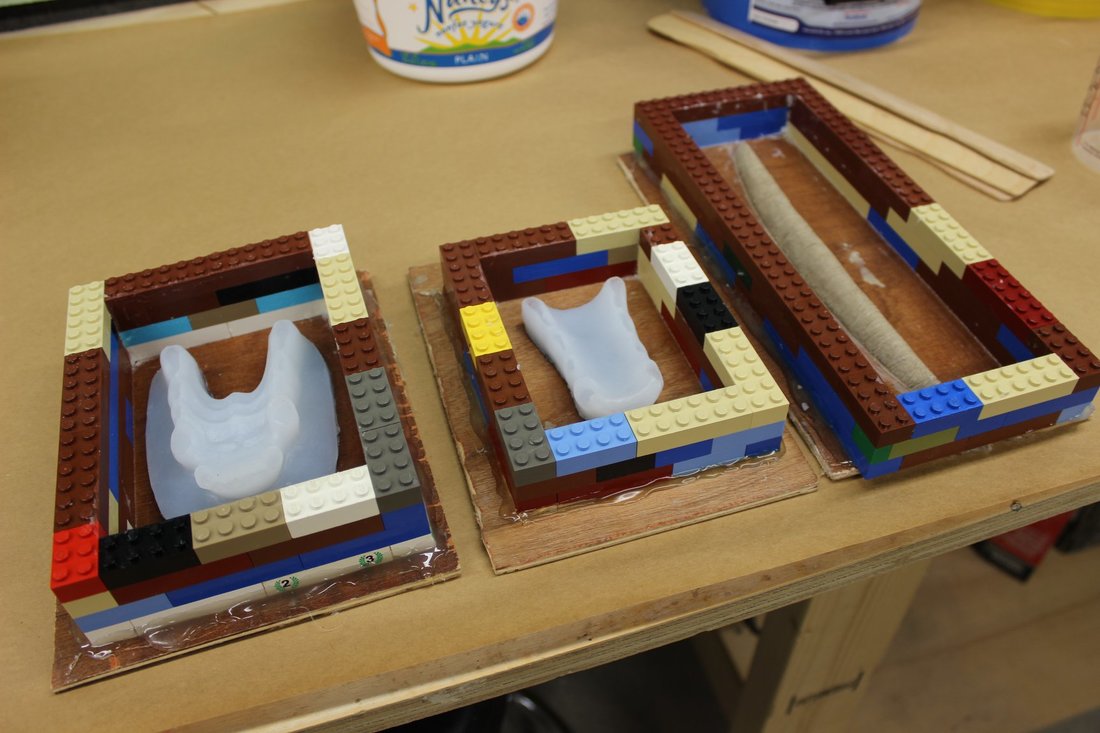
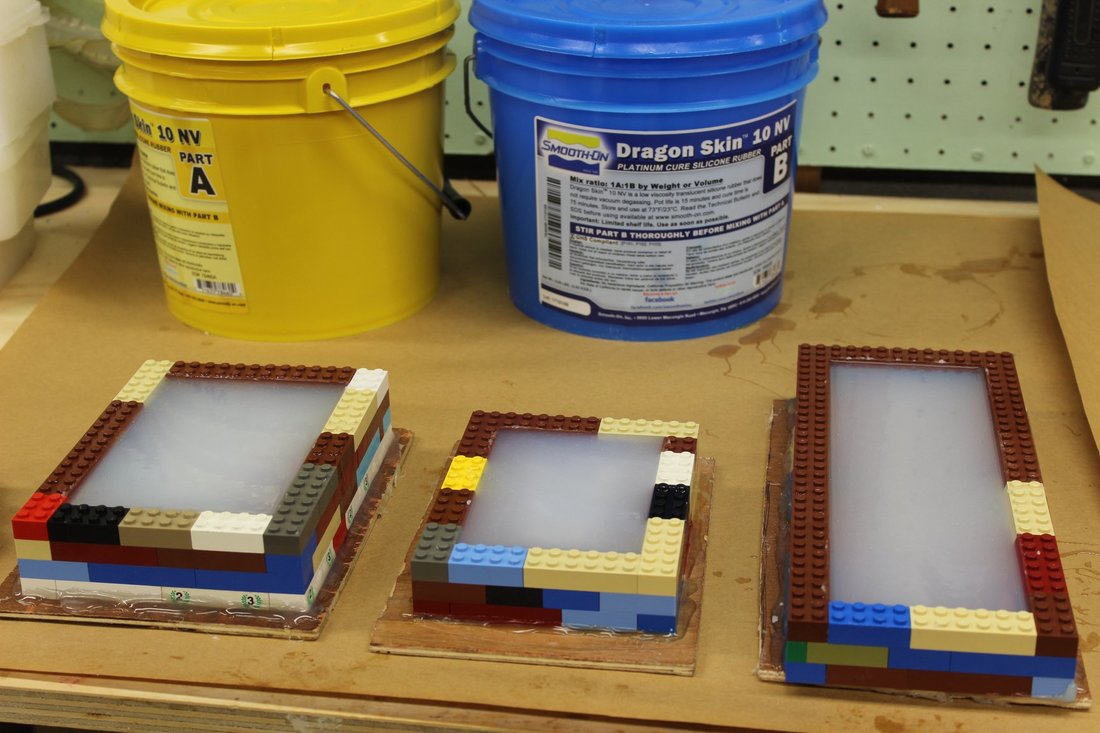
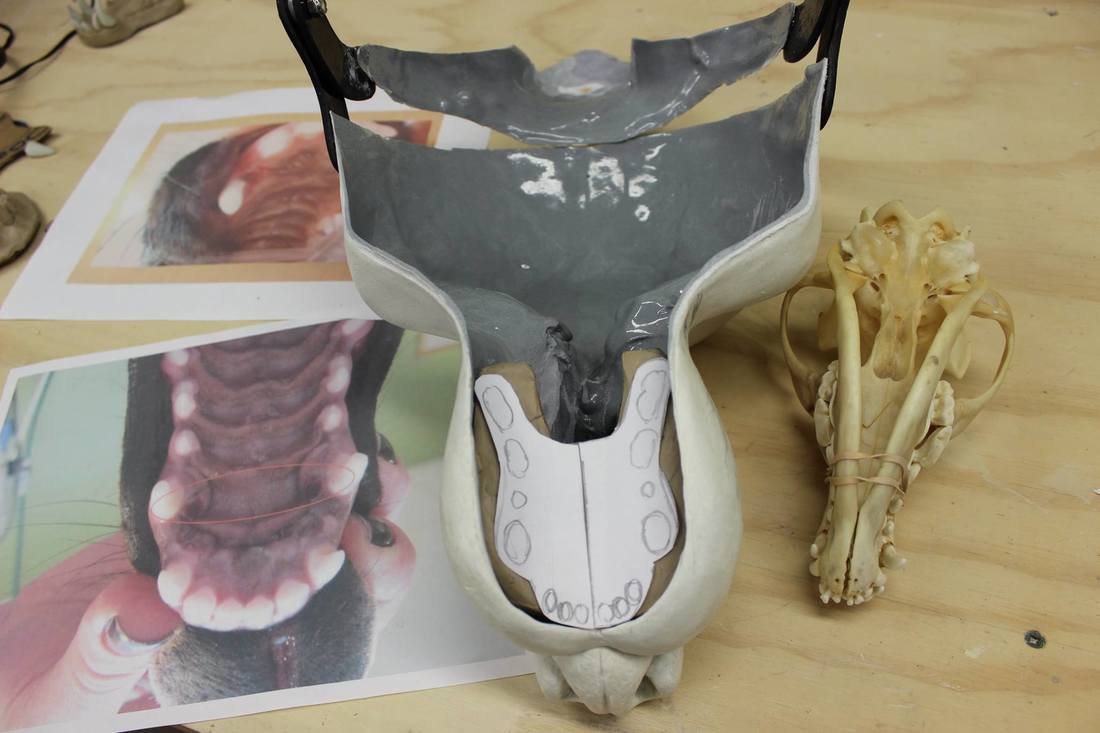
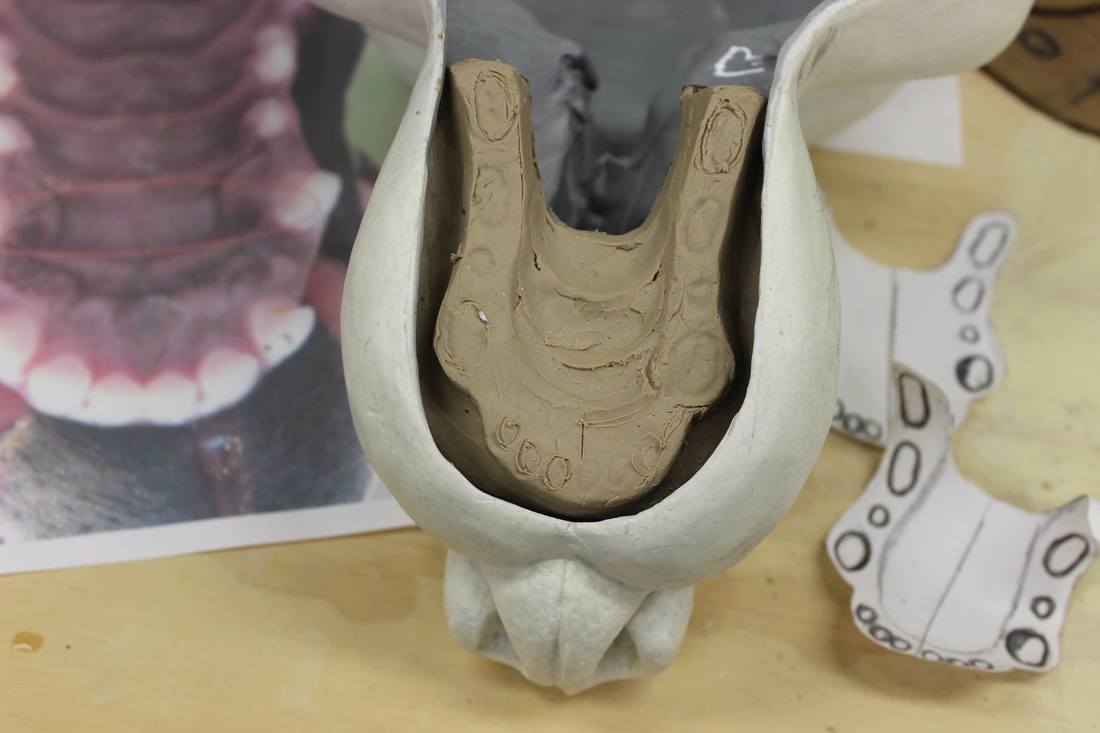
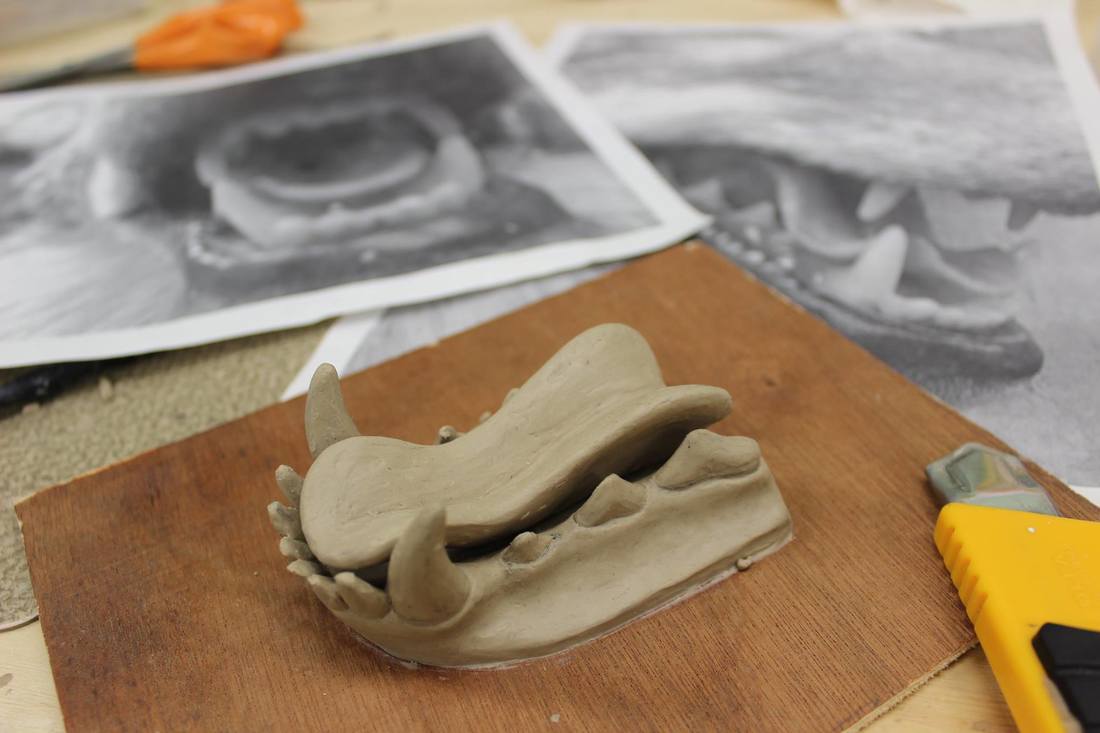
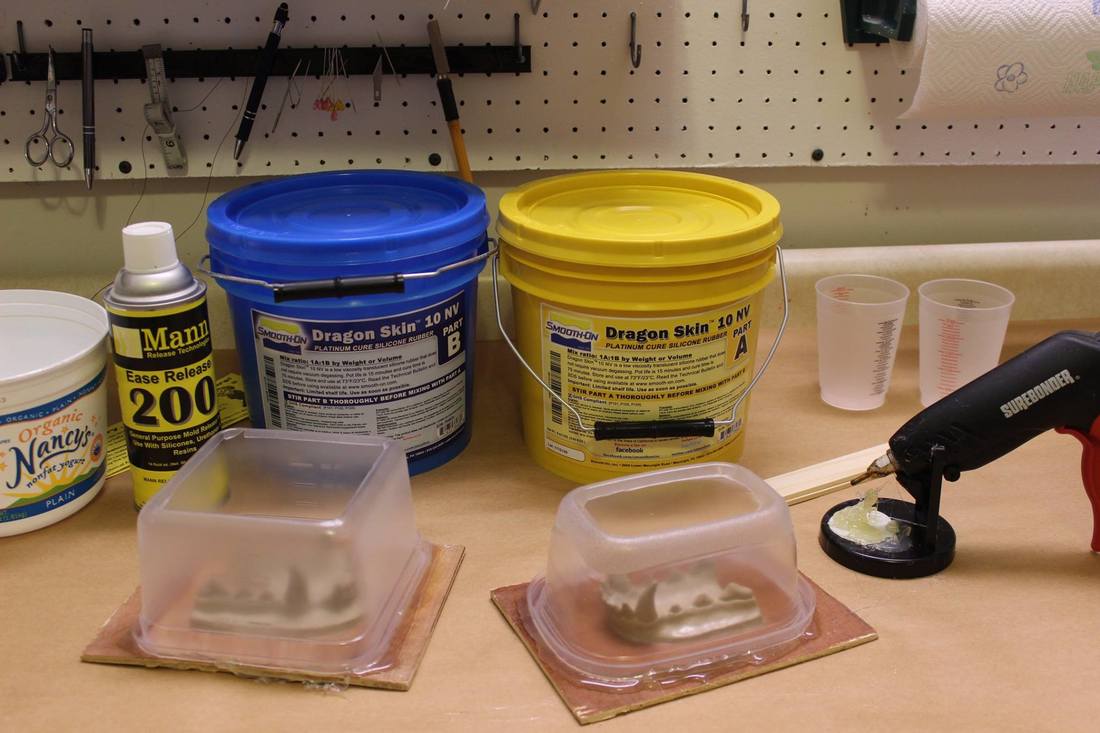
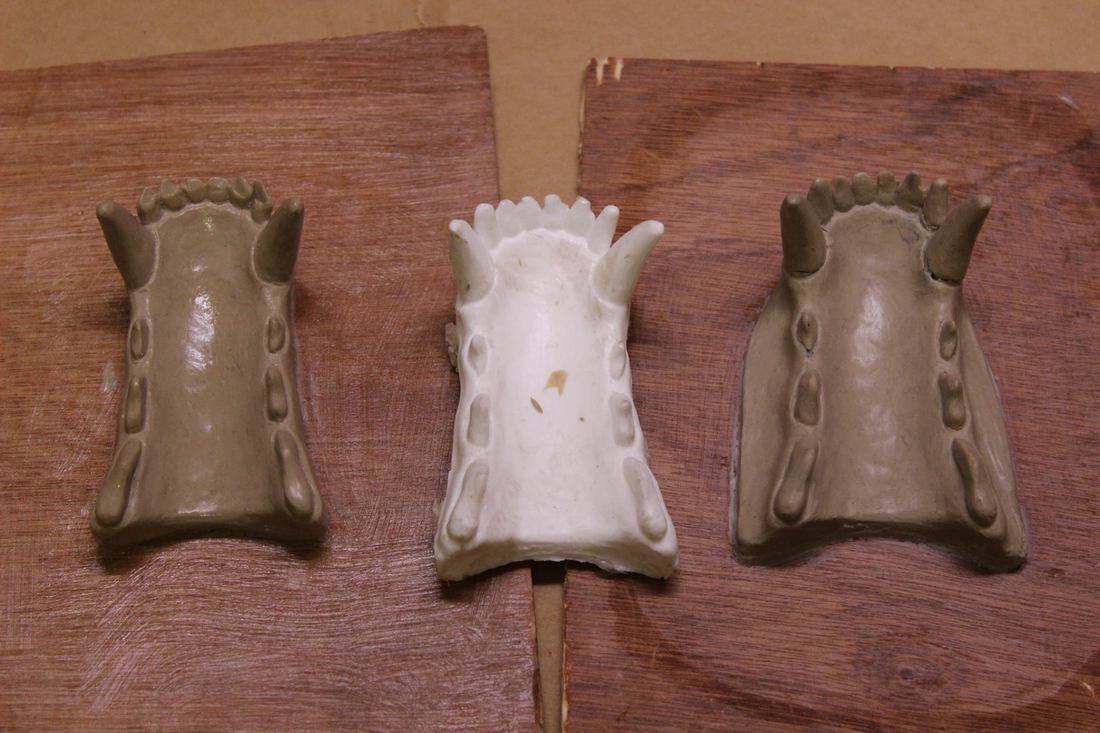
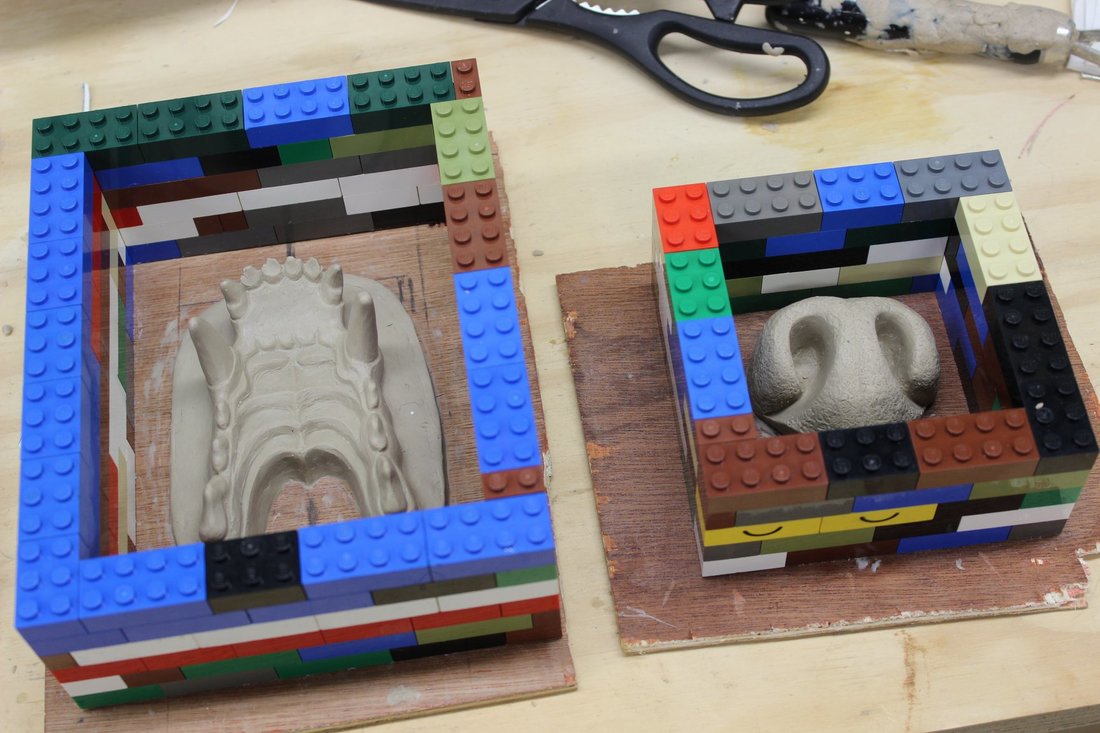
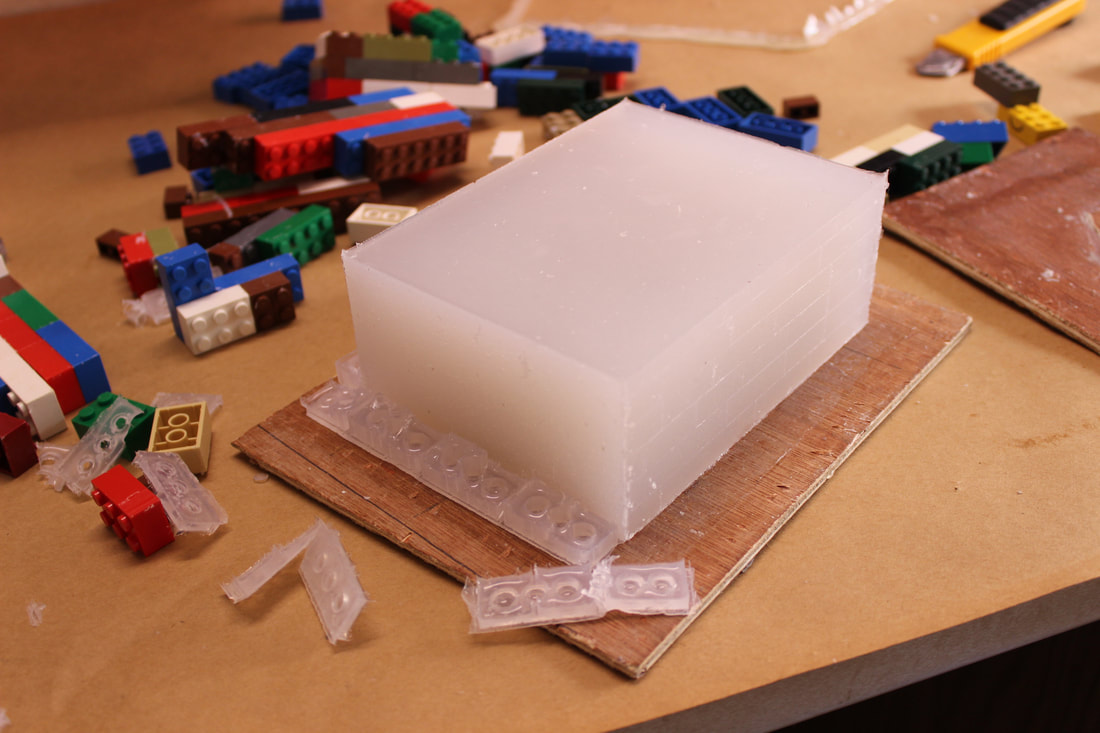
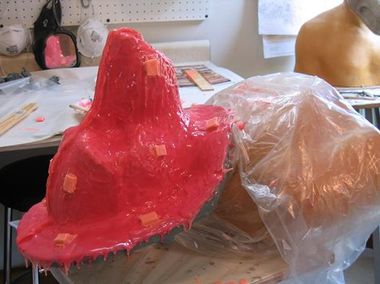
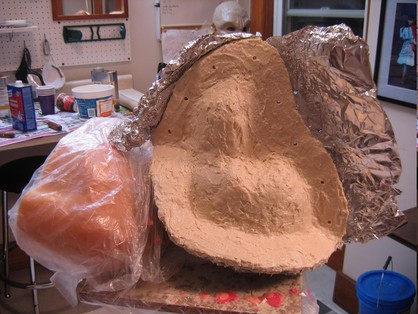
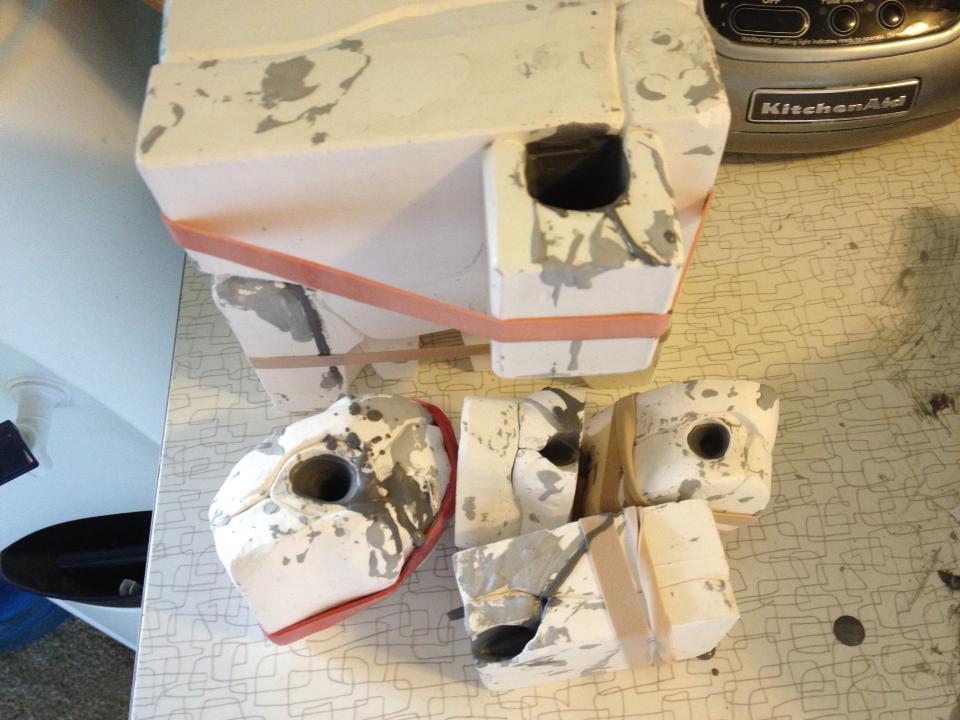
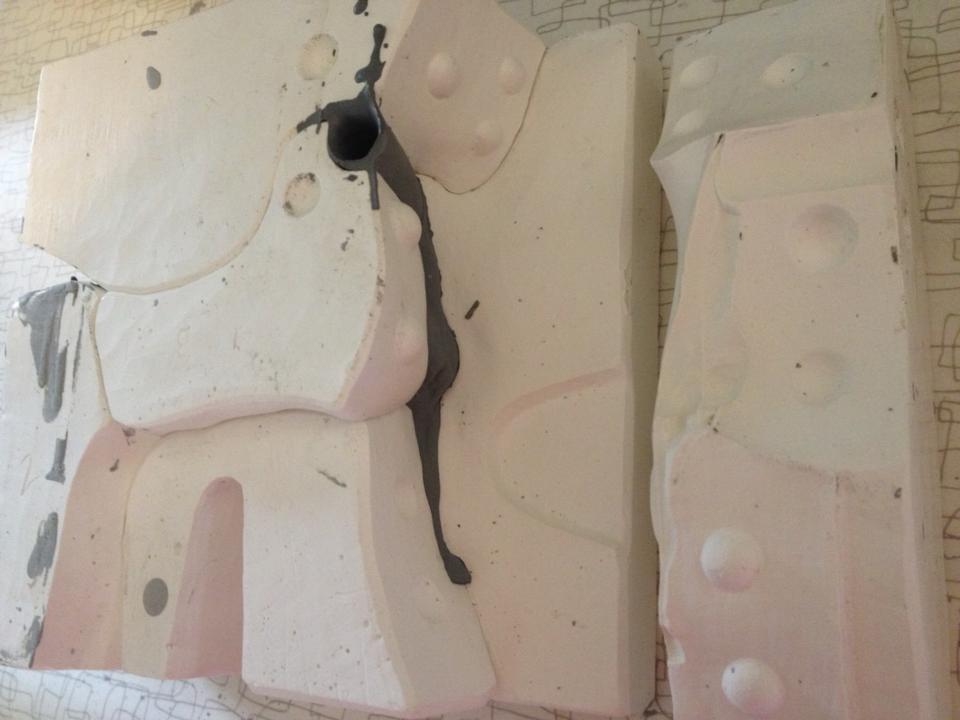
Above, the plasticine gum models in their Lego mold boxes, ready for rubber.

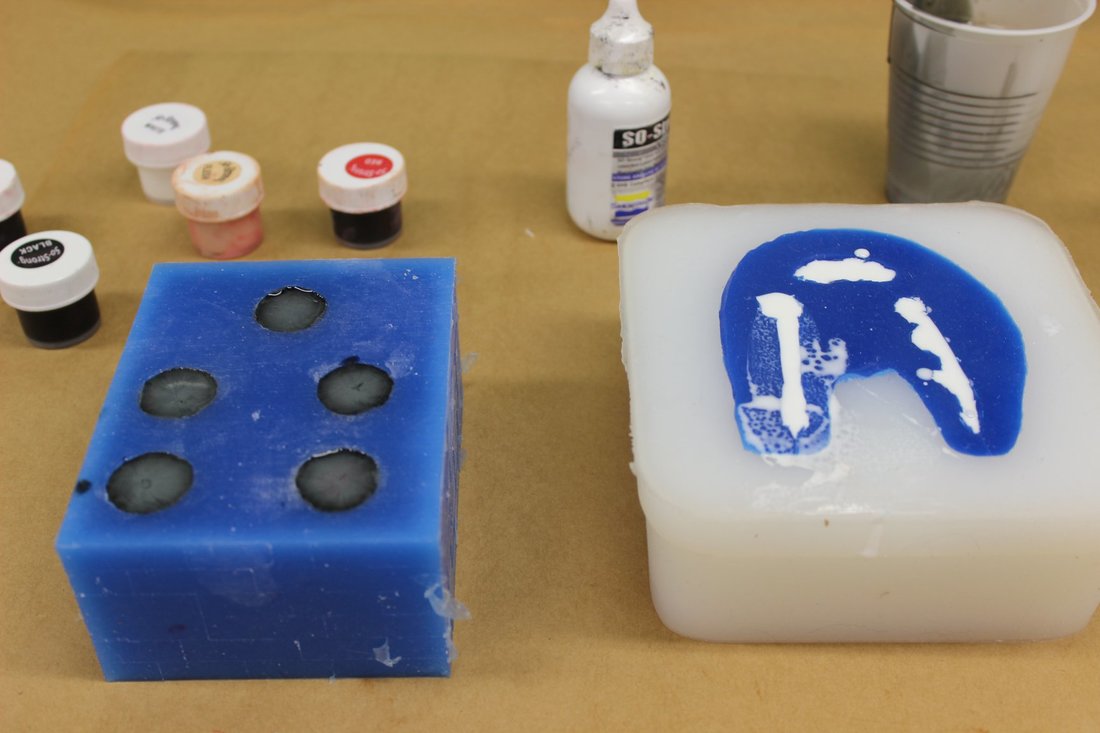
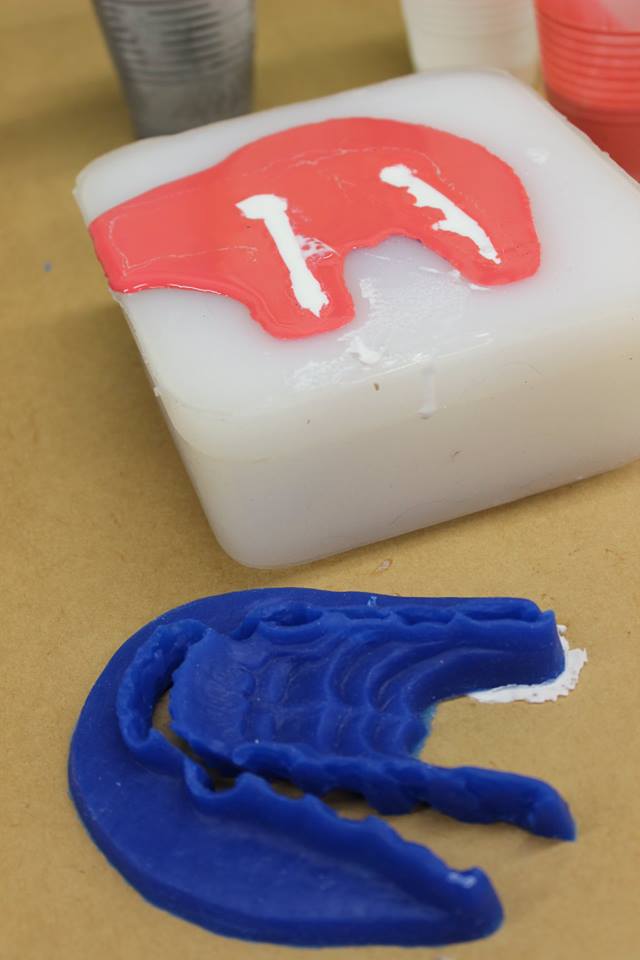
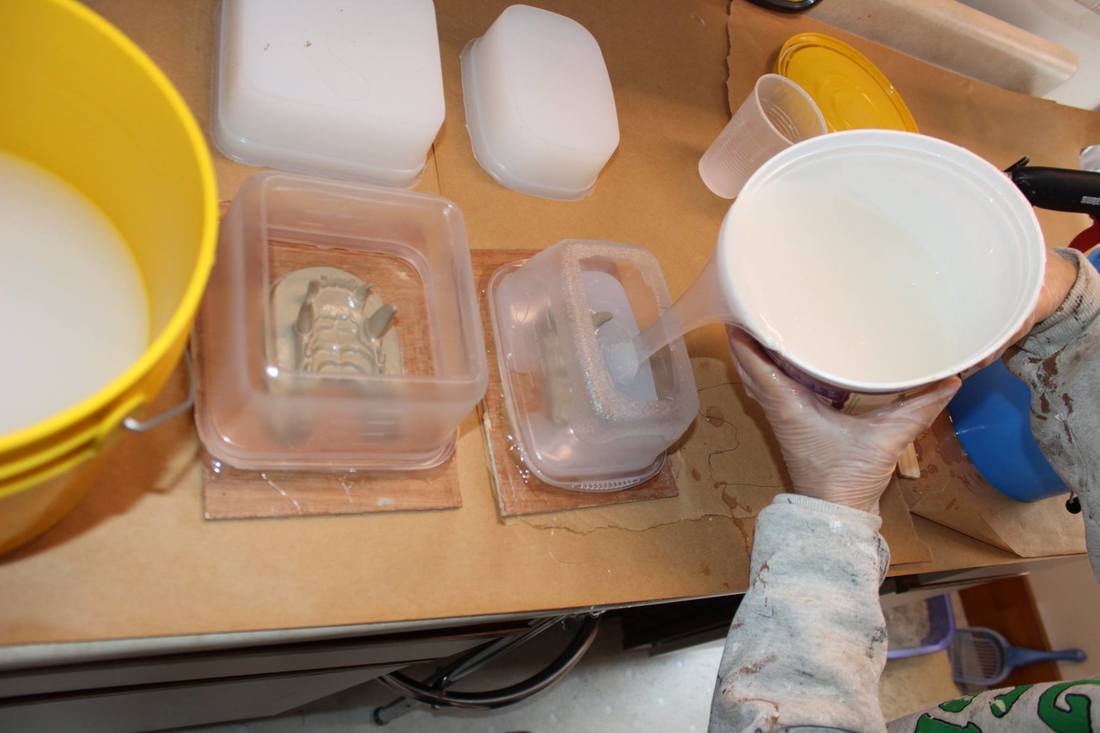
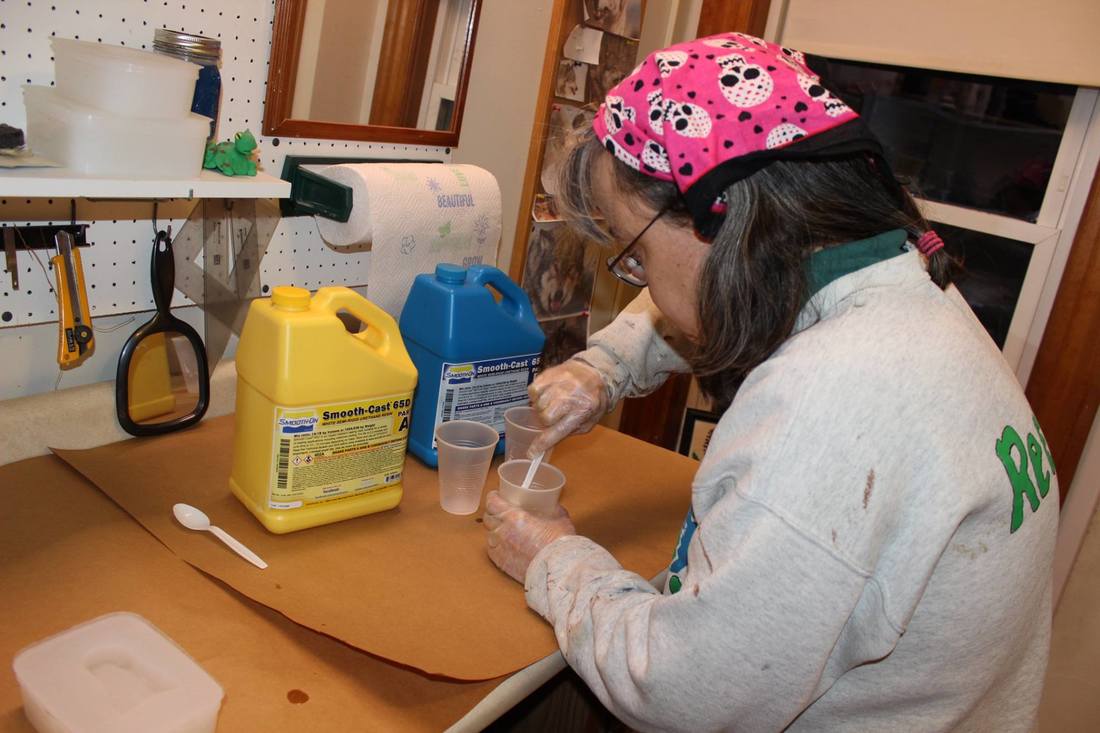
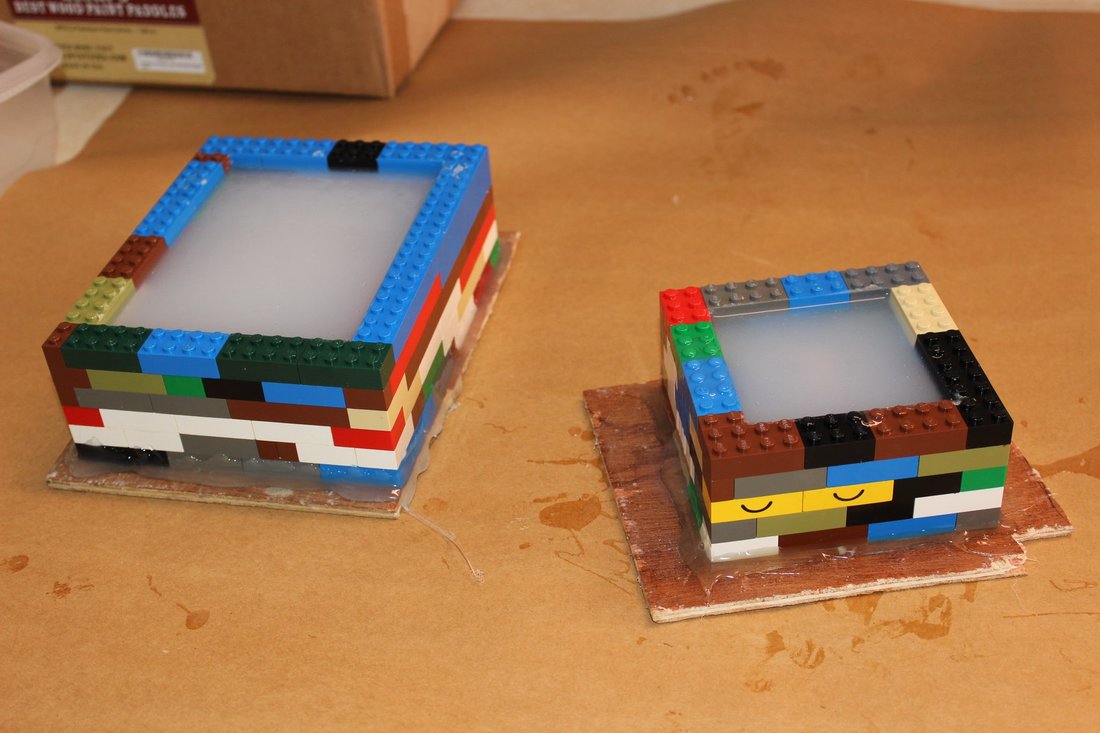
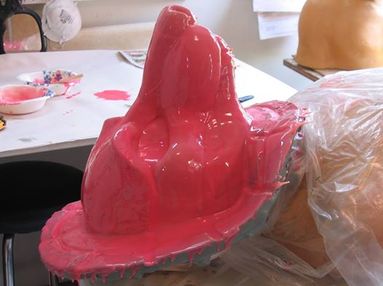
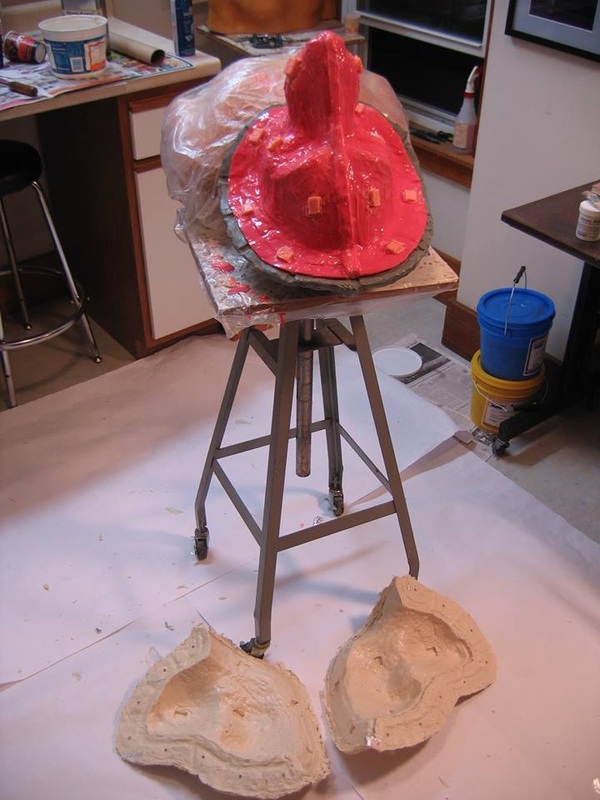
Right, rubber poured over the models. Coloring it like this helps to show when the two parts of the rubber are fully mixed, so that it can be stirred only as much as necessary, avoiding excess bubbles. Pouring the rubber into the molds from relatively high up, in a thin, slow stream, also helps to break bubbles that have formed while stirring. Brushing a thin coat of rubber over the model, letting it partly set, and then pouring the rest of the rubber in also helps, as bubbles trapped against the model can more easily rise to the surface and break that way.
 Pouring mold rubber for a canine resin jawset


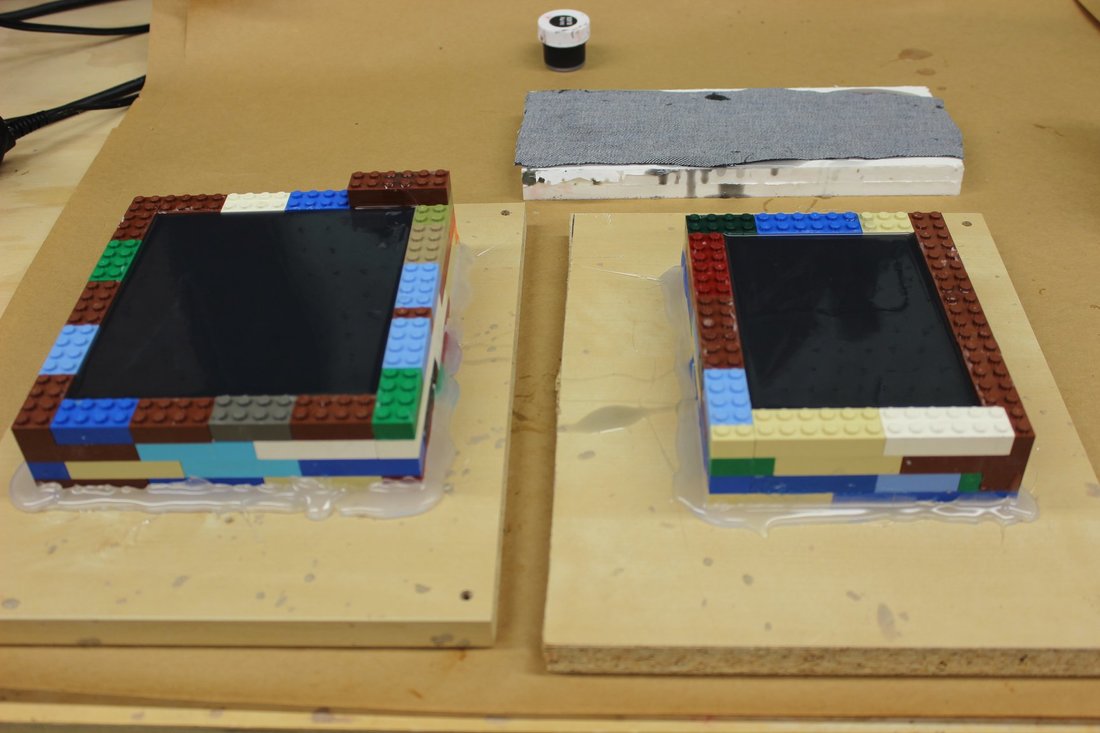
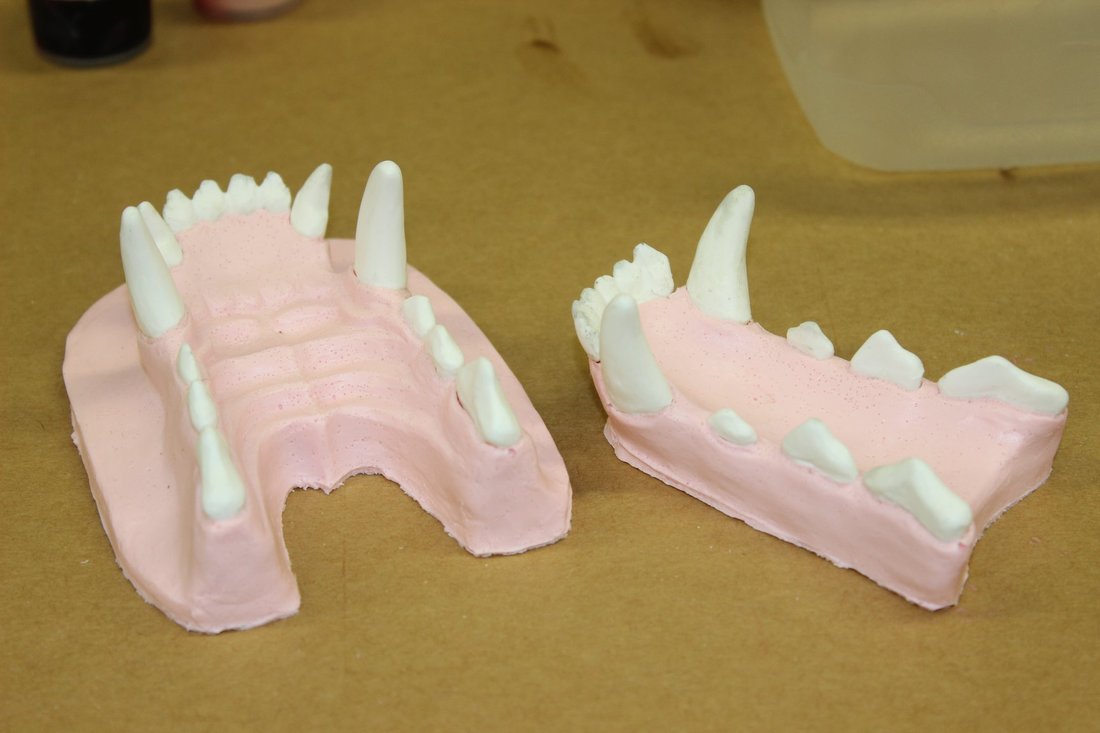
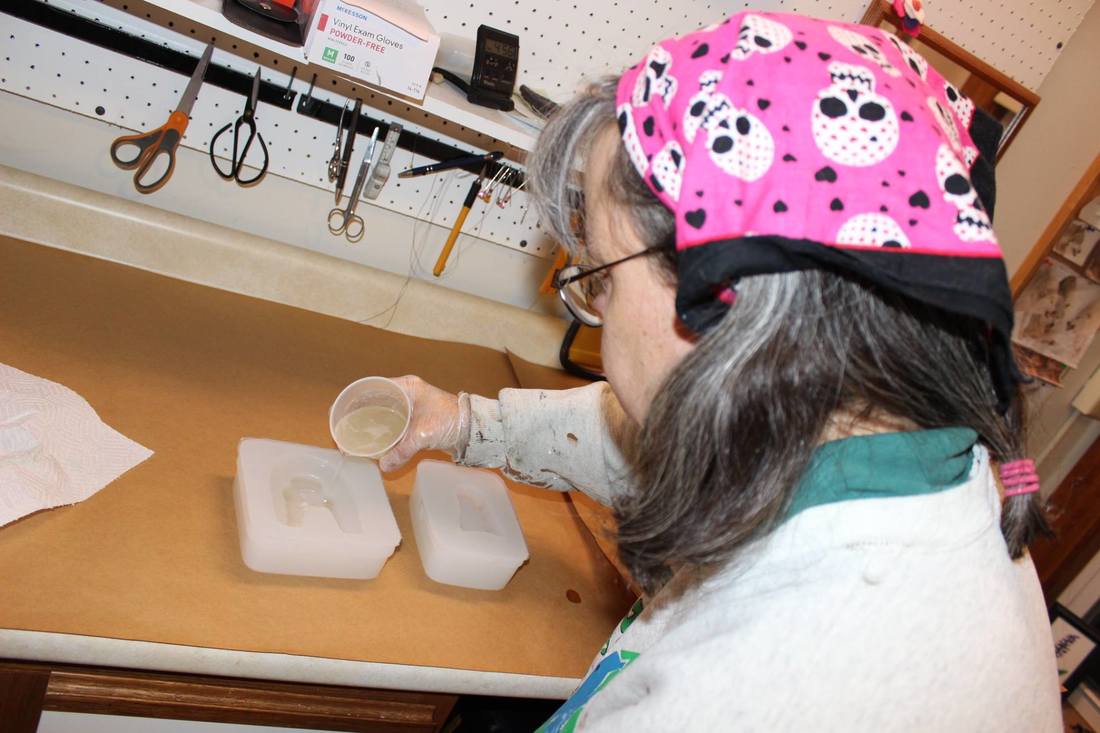
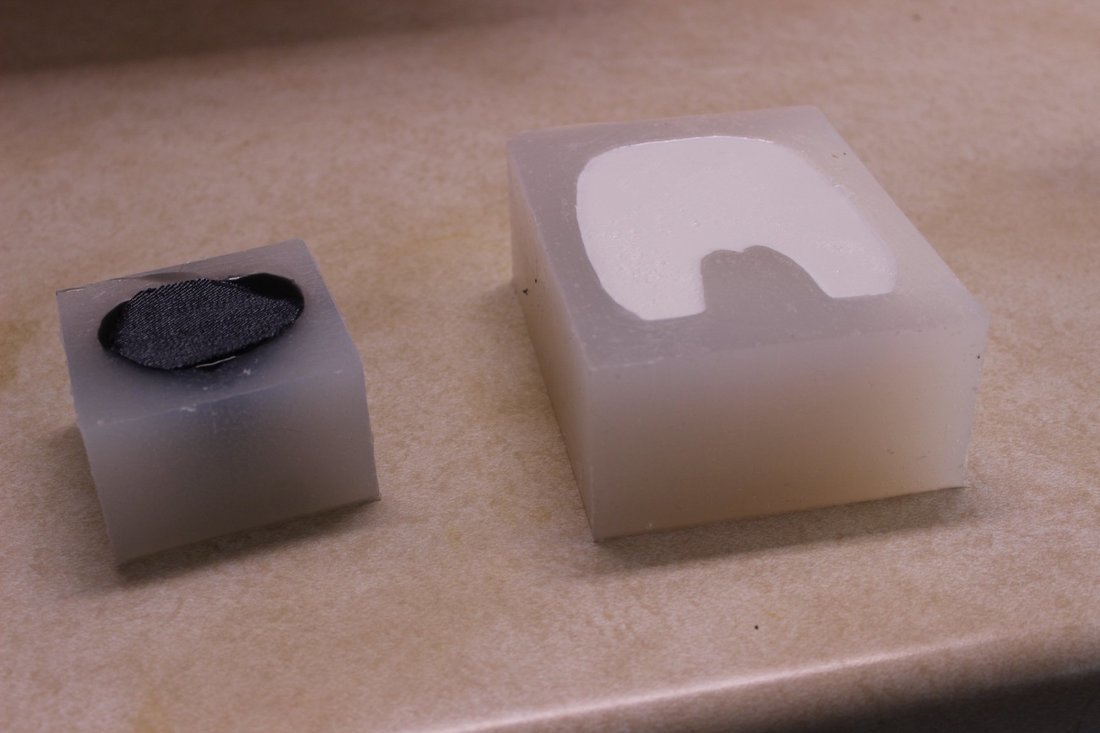
And, resin gums poured into the two new molds.
Casting resin gums for a canine resin jawset
 
Teeth waiting for mold rubber for a canine resin jawset


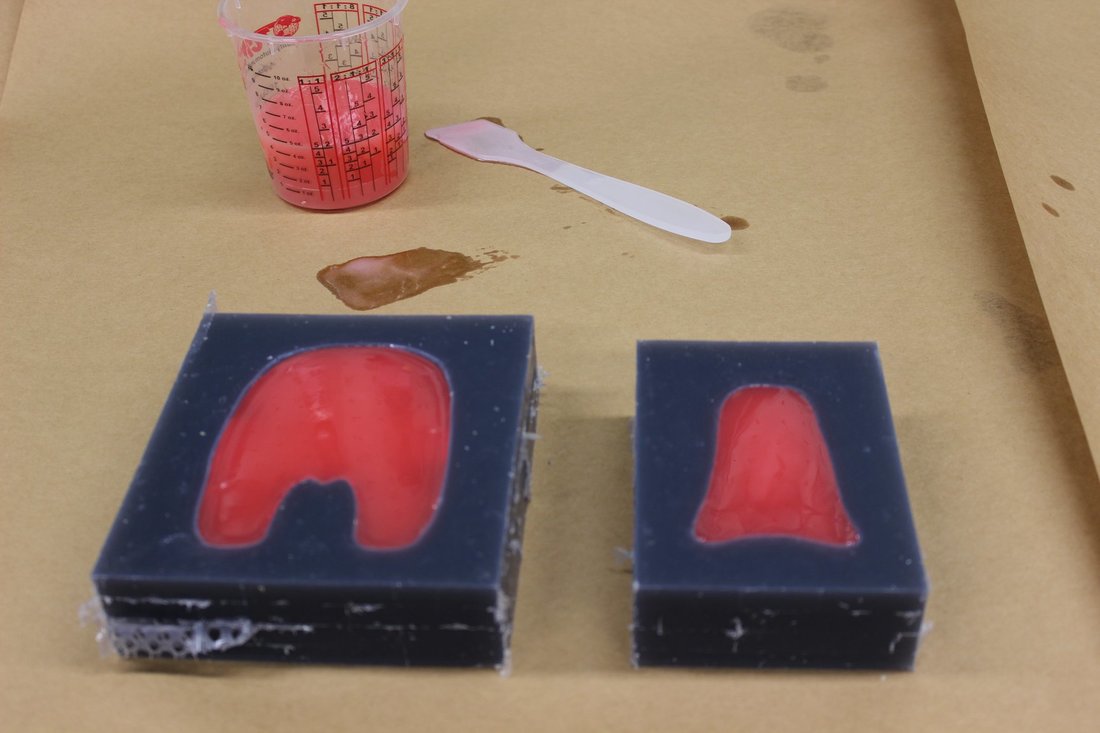
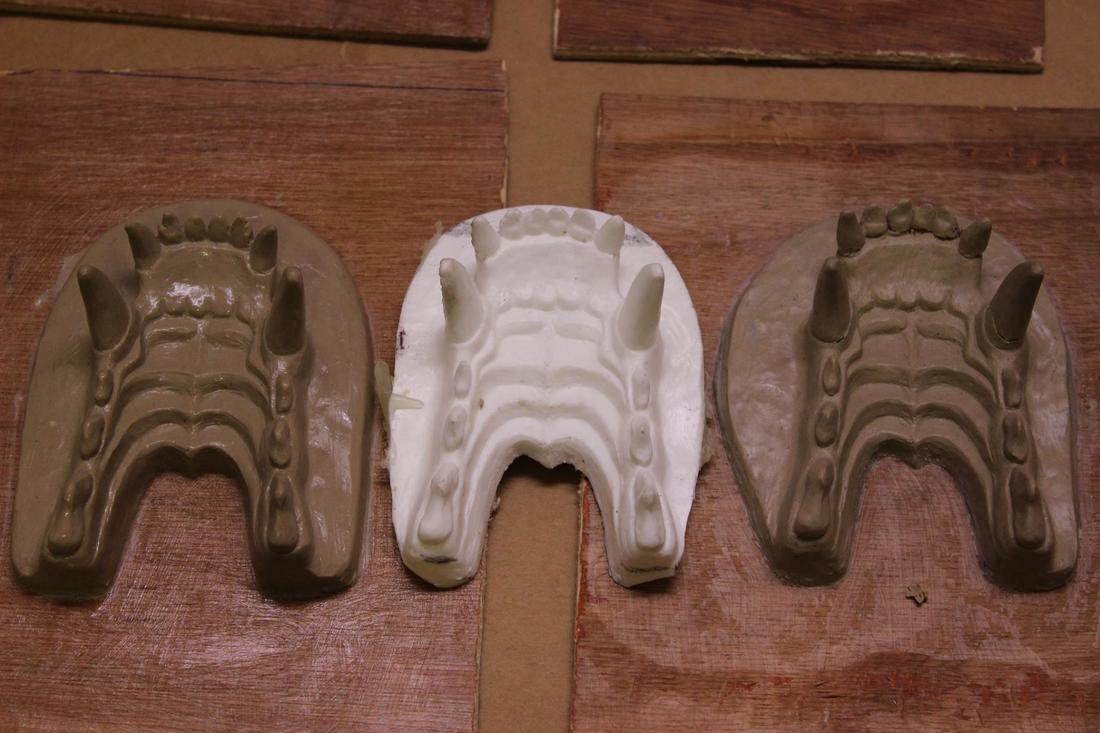
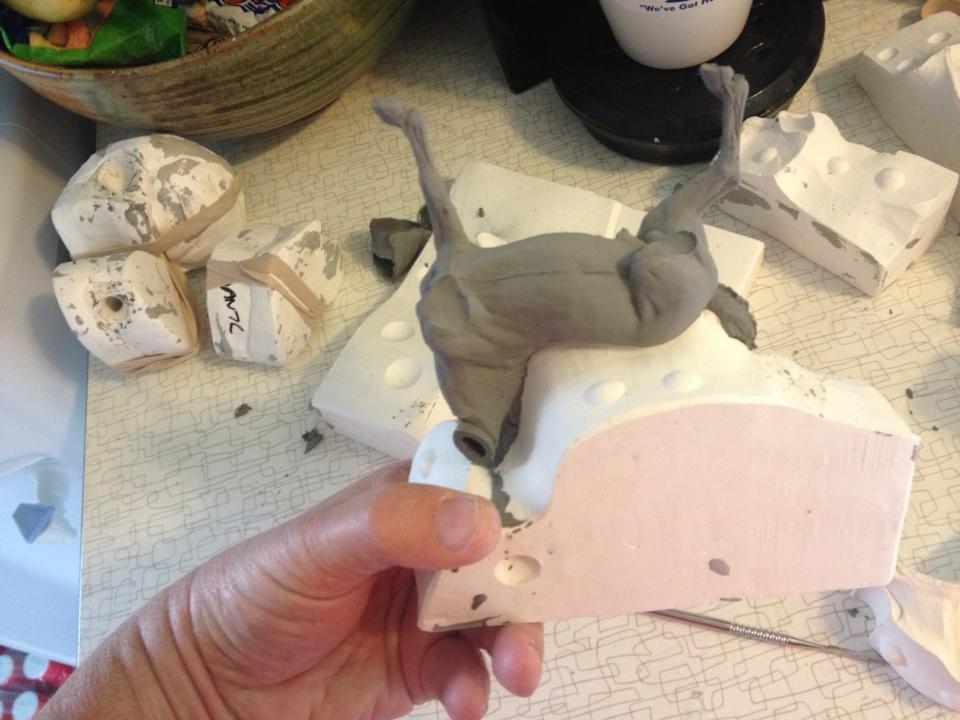
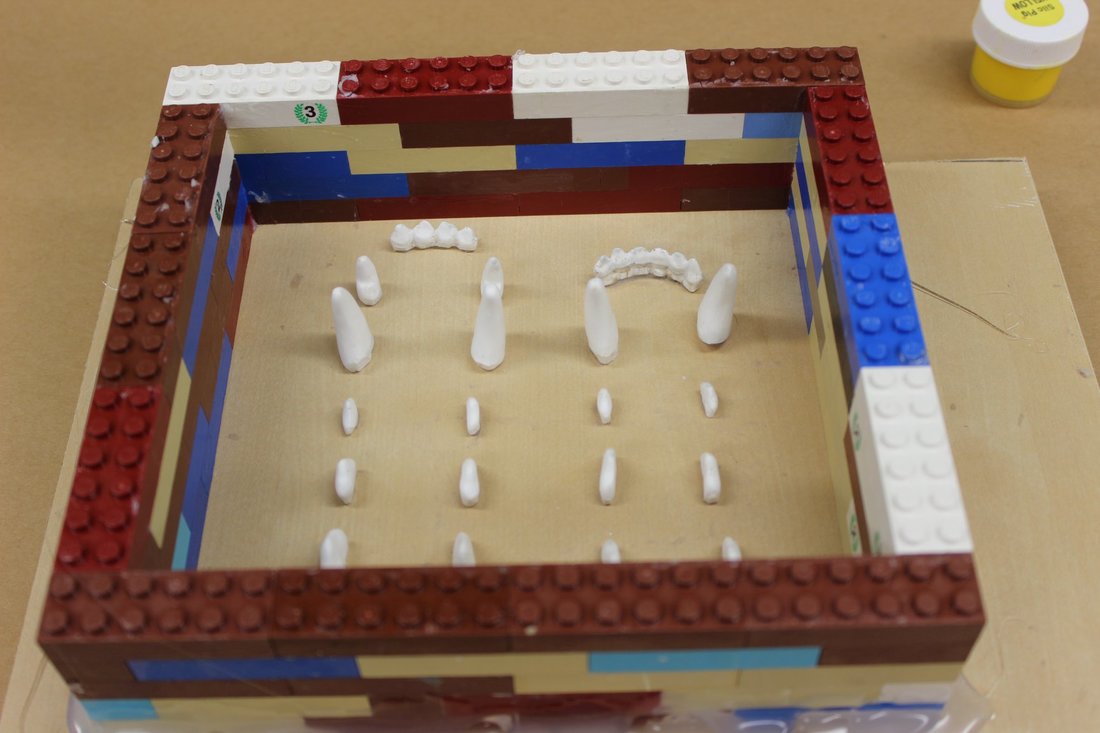
​Teeth waiting for rubber in their own Lego mold box...
Mold rubber poured over teeth for a canine resin jawset
Picture


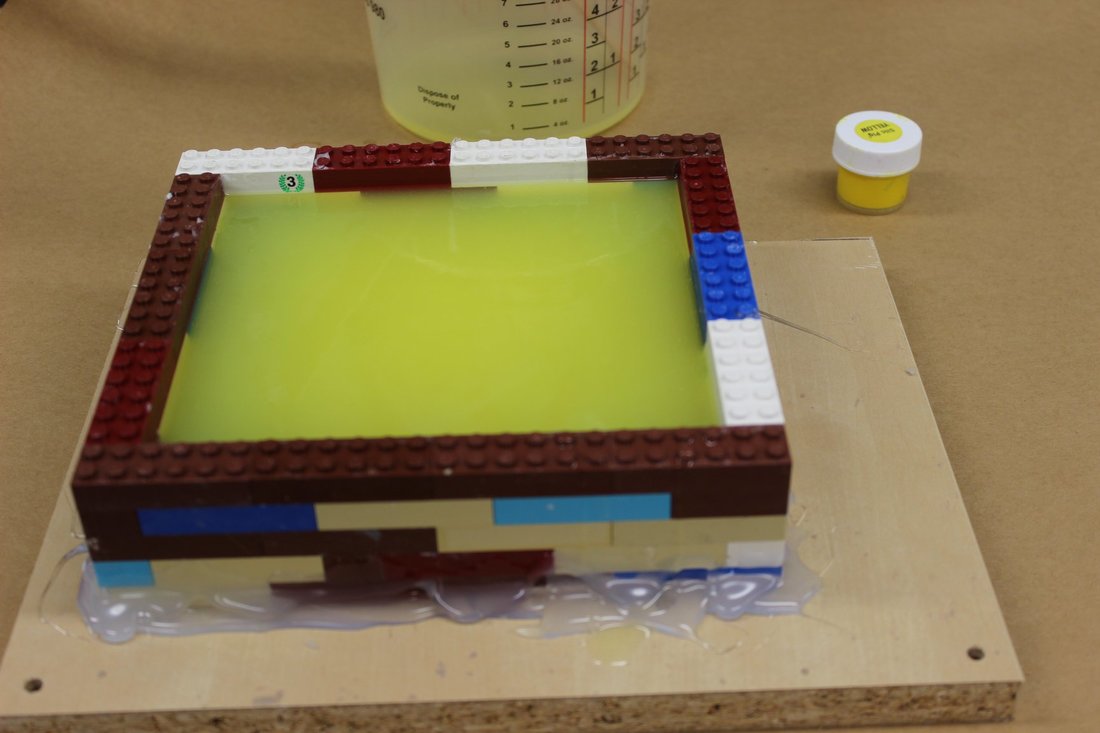
​And rubber poured. Another thing that helps eliminate bubbles is tapping the mold box on the work table after the rubber is poured, to help the bubbles rise up to the surface and break.


 (I found myself often thinking of this scene from Finding Nemo during this whole thing...)


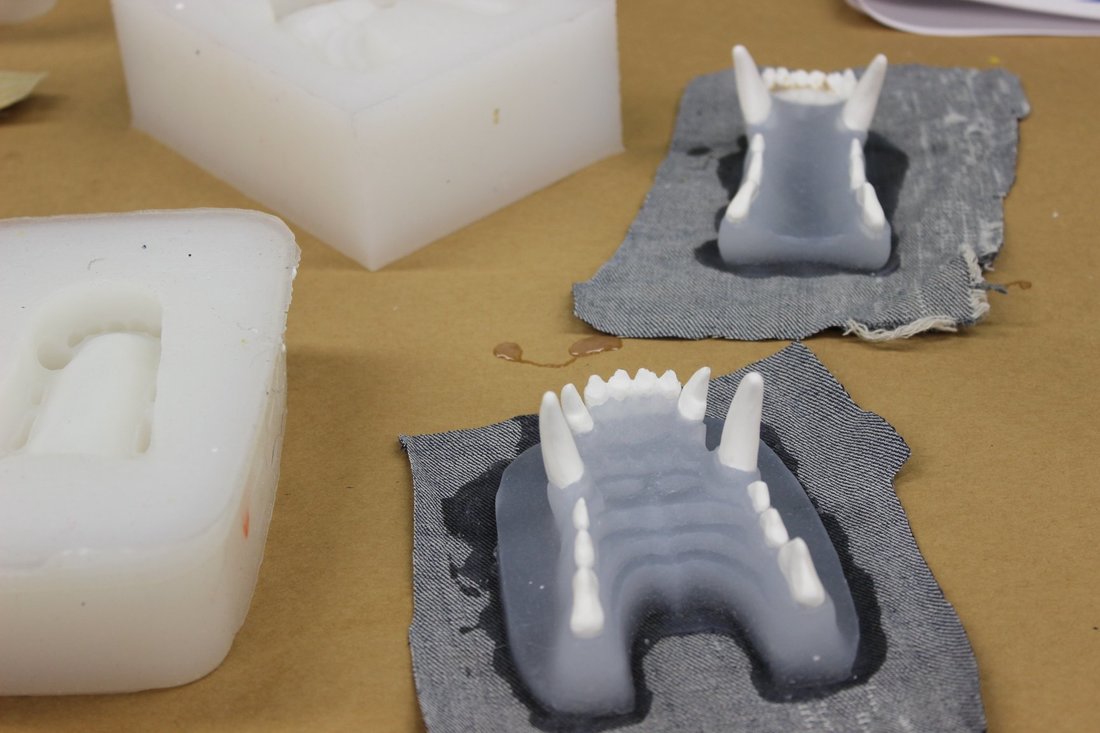
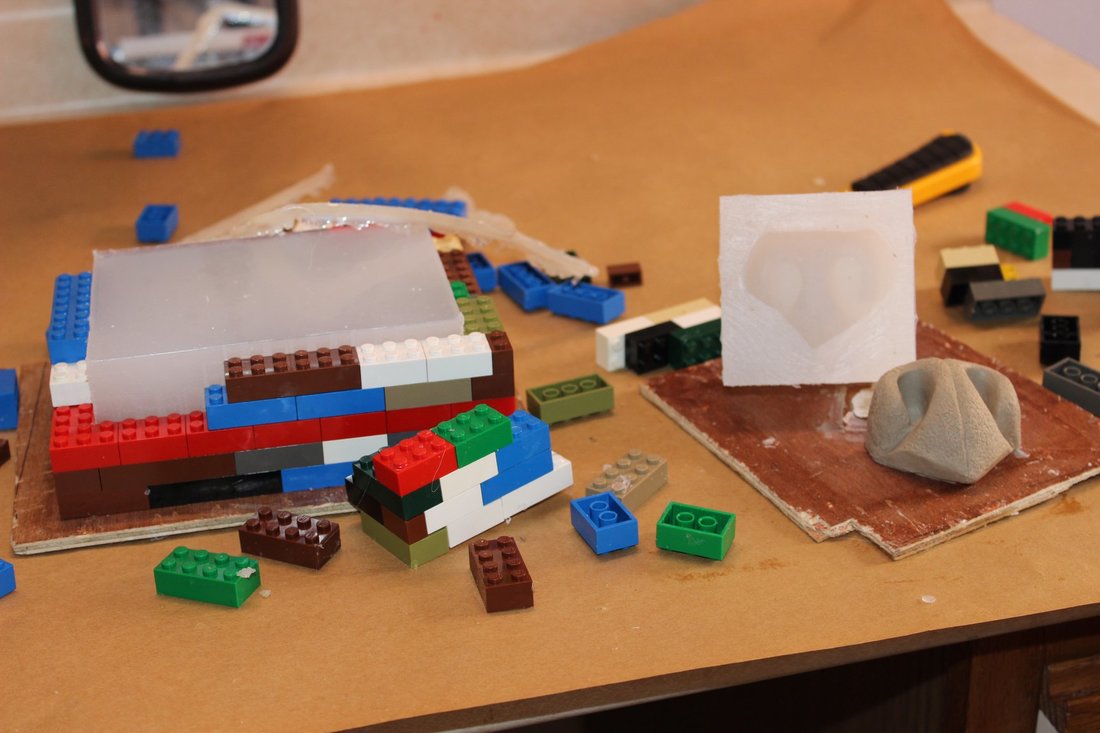
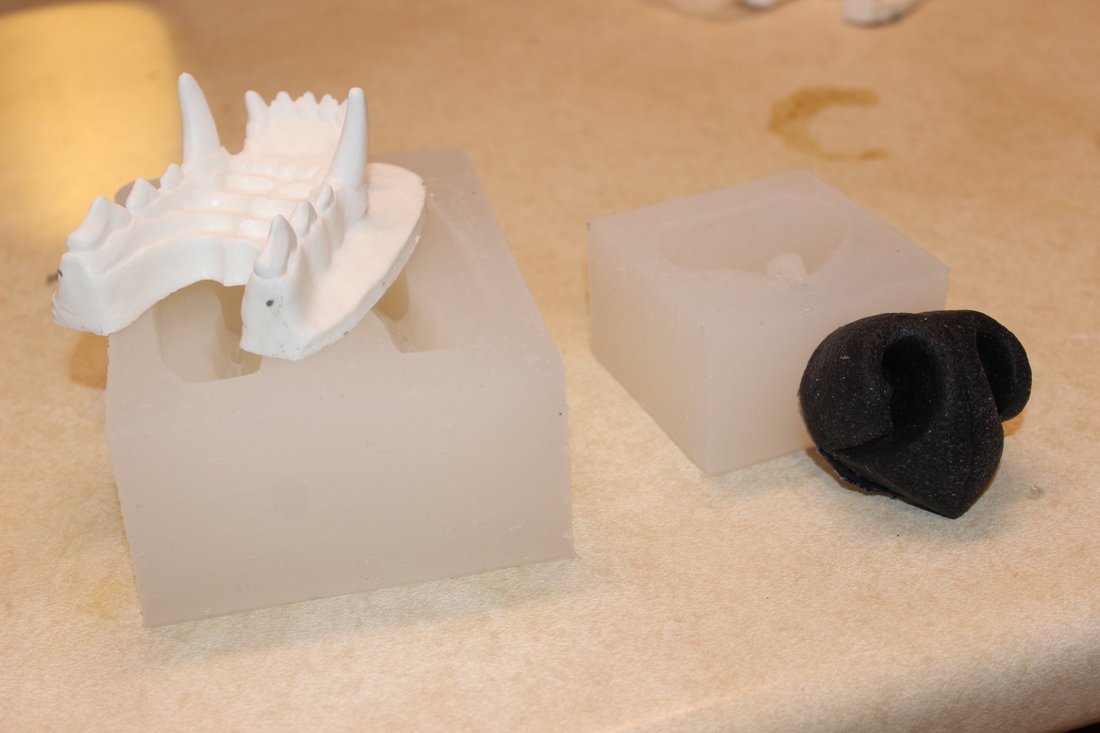
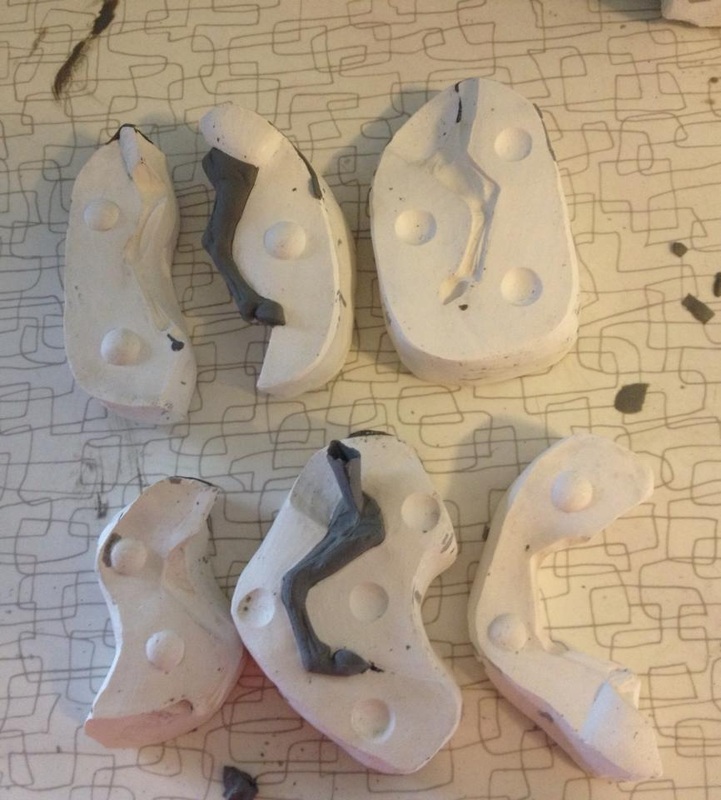
​Resin gums cast into one mold, teeth into the other...
Resin teeth and gums cast for a  canine jawset


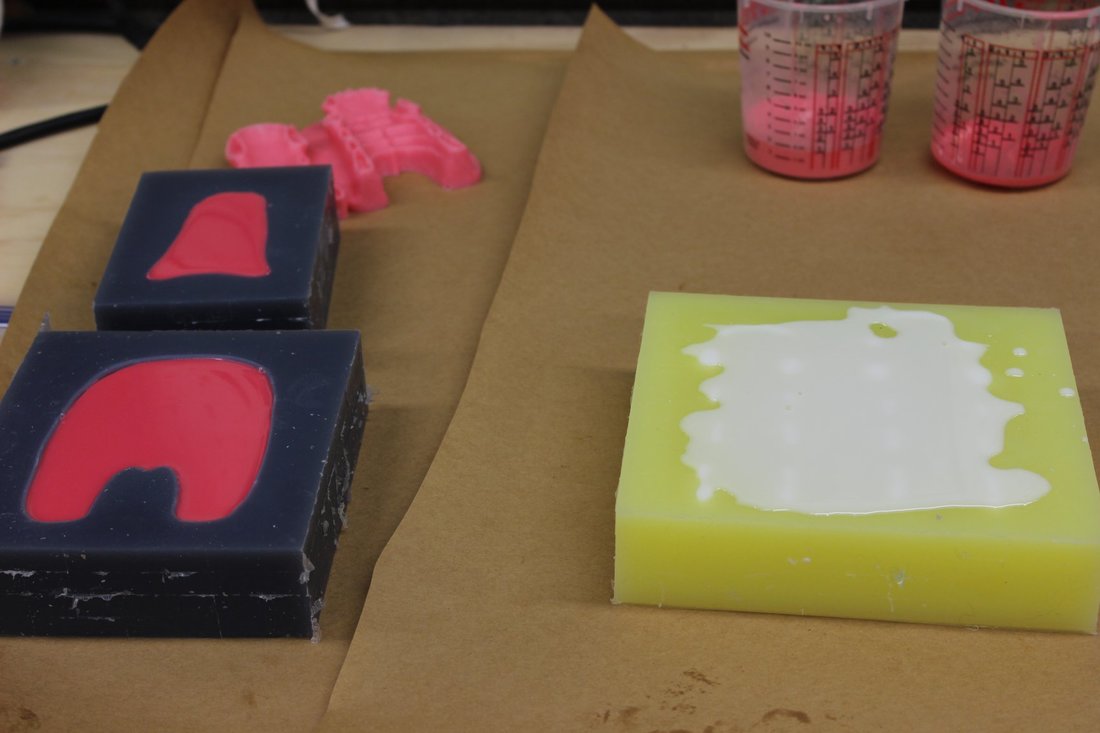
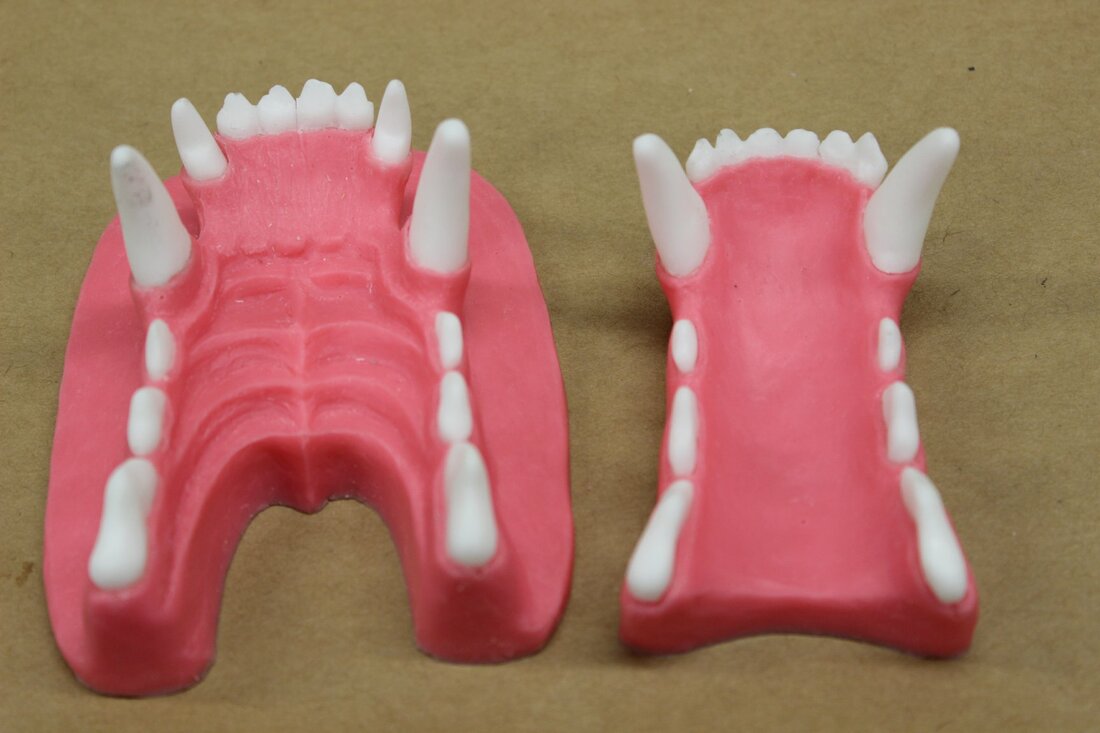
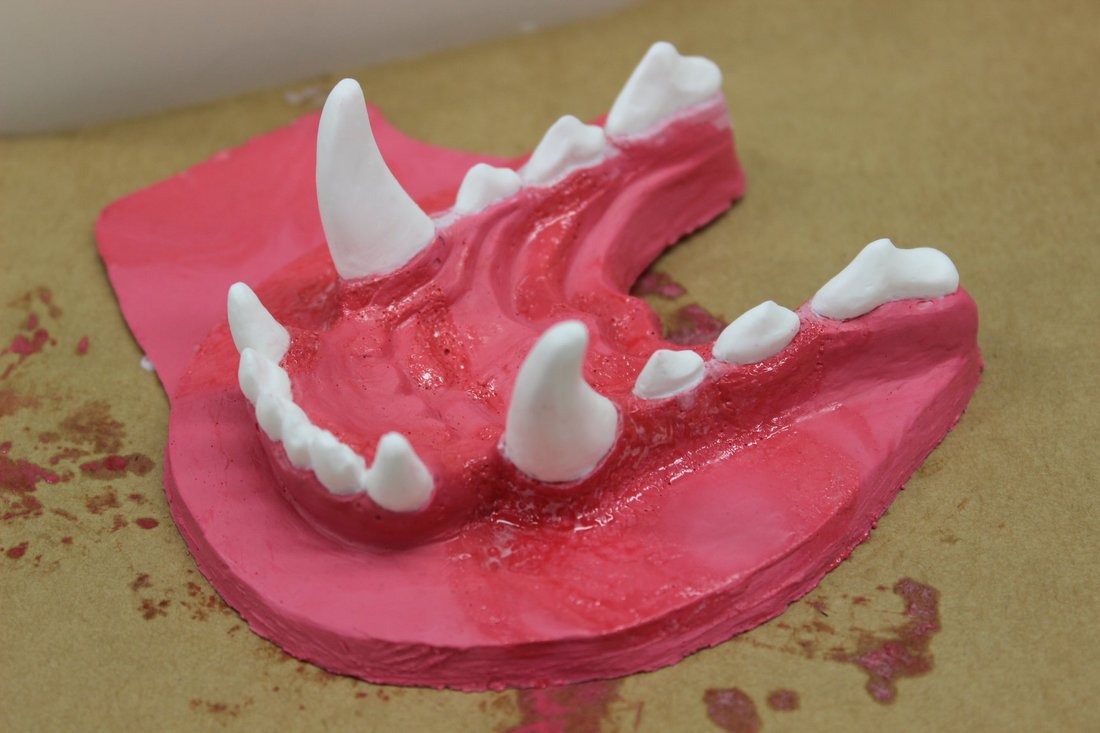
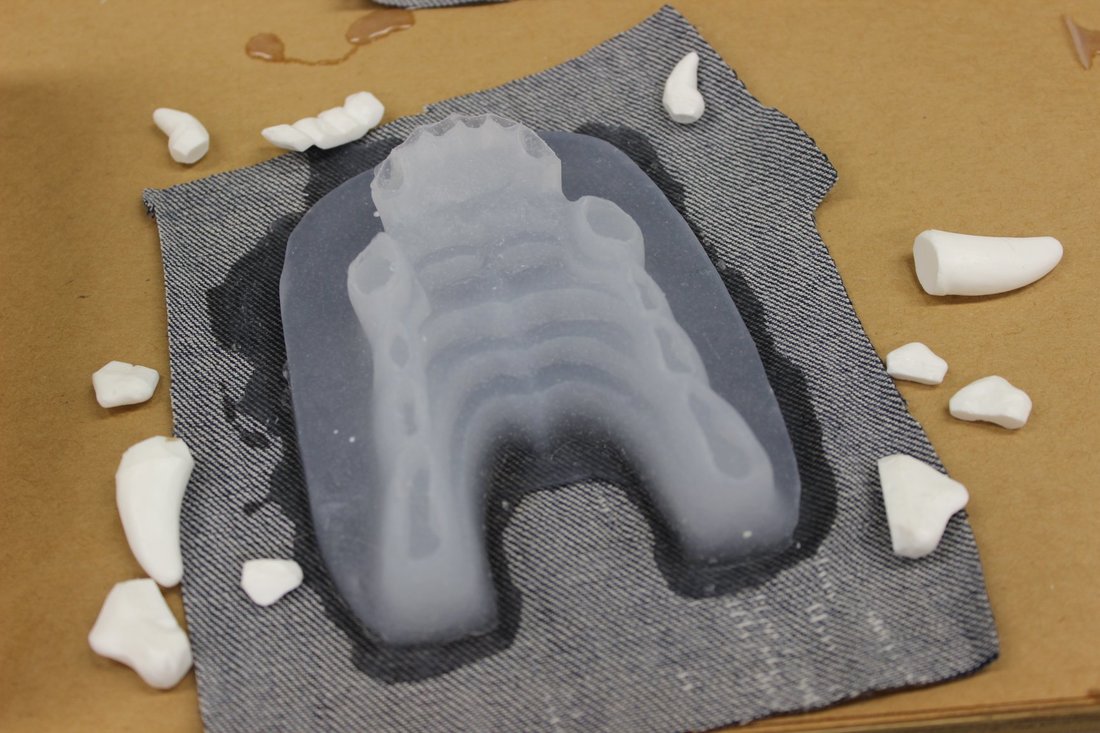
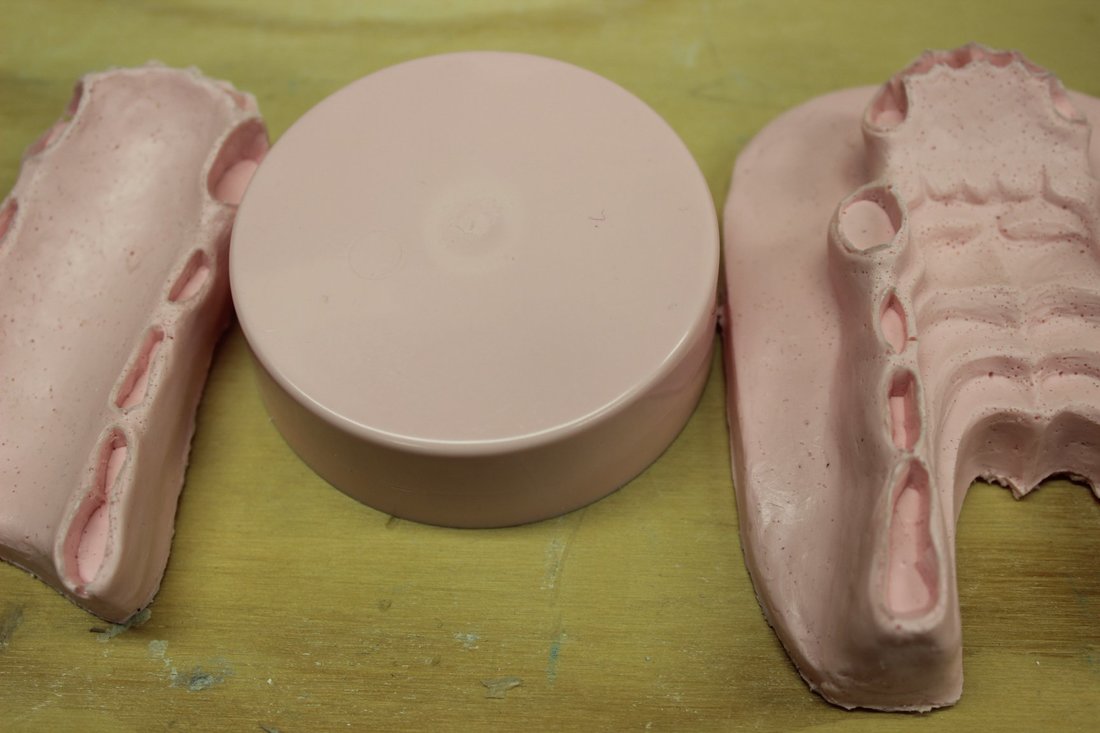
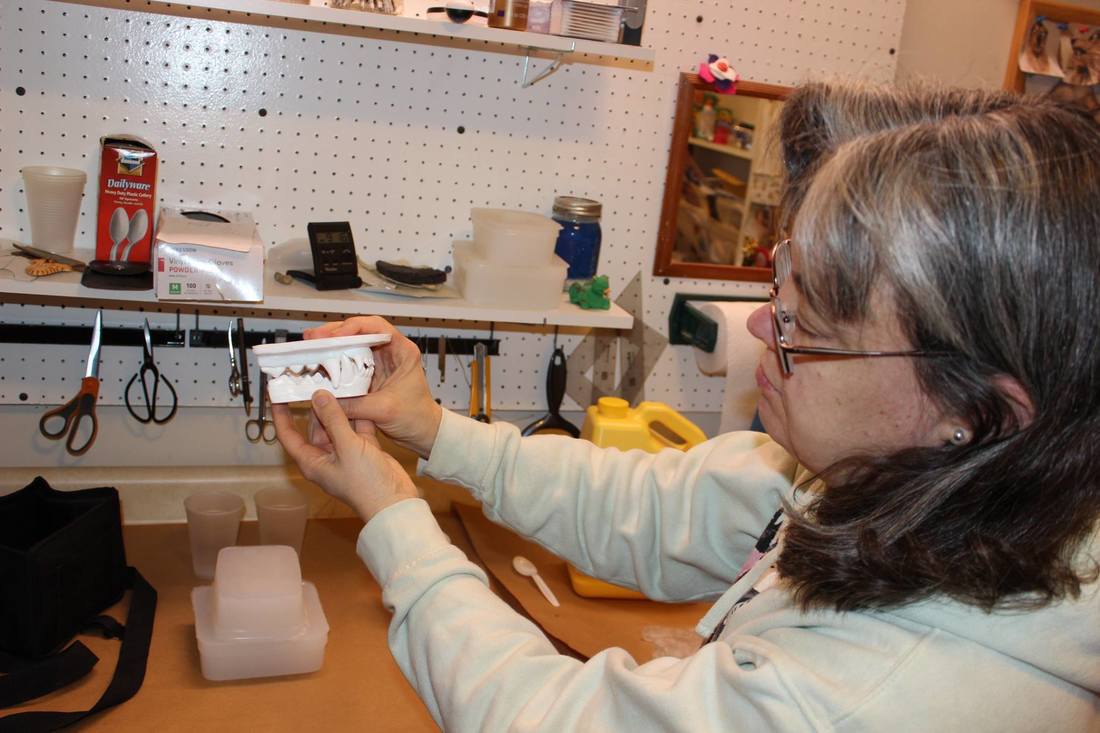
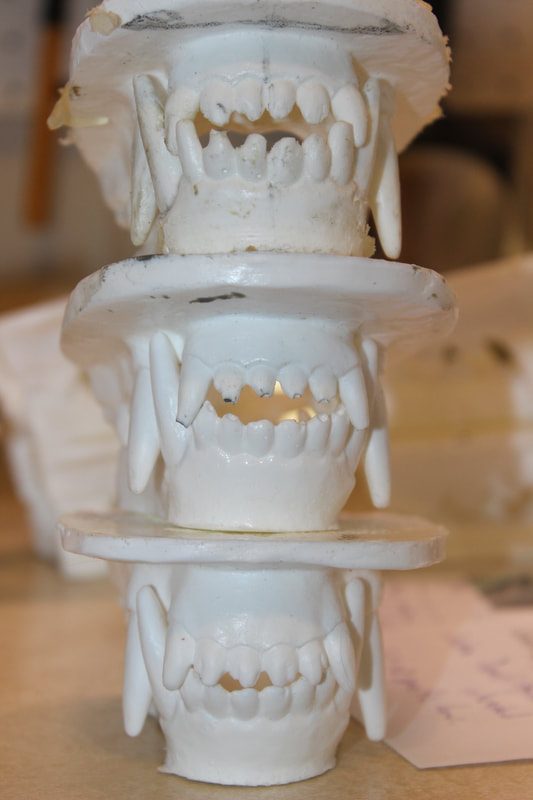
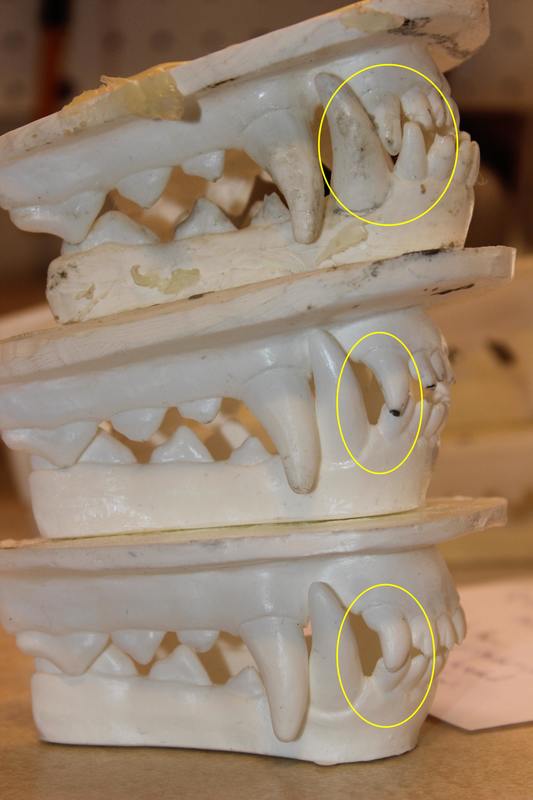
​And, teeth and gums removed from the molds, and... THEY FIT TOGETHER!!! YAAAAAYYYYY!!!!
Putting together teeth and gums for a resin canine jawset
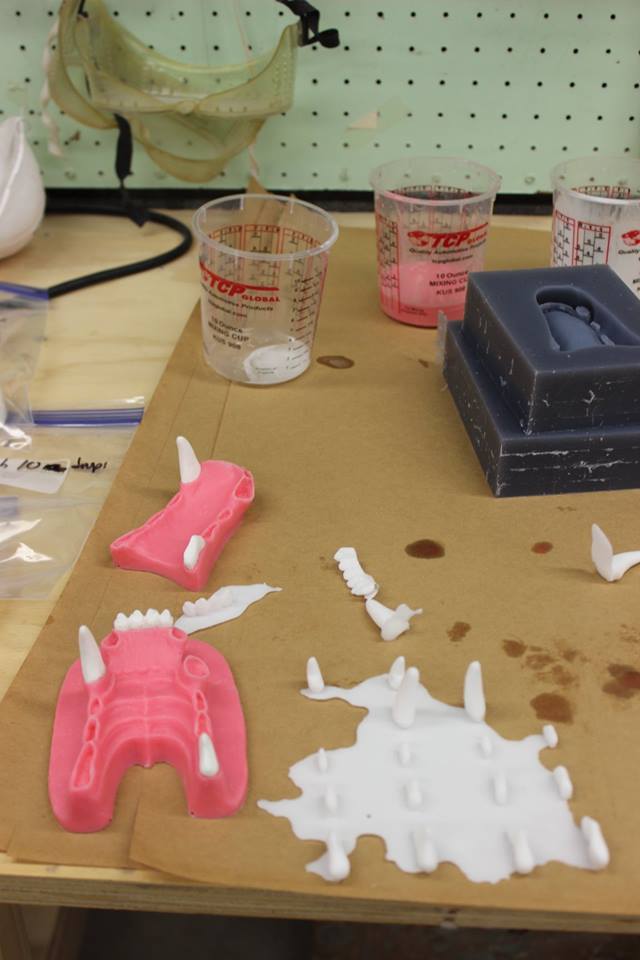
I said it before, and I'll say it again... aren't they bee-ootyful???!!!
Resin canine jawset  cast in two colors
Resin canine jawsets cast in two colors
0 Comments

Attempting casting resin in two colors, part two

12/30/2018

0 Comments

 
silicone rubber canine jawset


I don't remember what inspired me to make the upper half of a jawset out of blue silicone rubber, nor what inspired me to use it as a window cling in the dining room. However seeing it hanging there gave me a new idea to try for a two part mold. So here goes!
Below, cutting the teeth away from the rubber jawset as neatly and carefully as possible, and then cutting holes through the entire thickness of the piece. Then, inserting it back into the original mold. The idea is to pour white resin into the mold for teeth, remove the blue part, and then pour pink resin for the gums.
Making a mold for a resin canine jawset
Casting a resin canine jawset in two  colors


​Here goes nothing! The white resin is poured into the mold. (The mold on the left hand side is for claws.)

Casting a resin canine jawset in two colors


​The blue mold piece is removed, leaving the white teeth in the translucent mold piece.


Pouring the pink resin into the mold. It overflowed a little to one side, not a big deal as it can be trimmed off after it sets up.
Casting a resin canine jawset in two colors
Below, the final product. Not too bad. (Tangent alert- the stuff that looks like pink slime is in fact pink slime. When resin is overloaded with colorant it will not cure properly. I was using Smooth-Cast 65D here, a white resin, and I had to put in too much colorant in order to get a color other than very pale pink. The saints at the Smooth On tech support department recommended I switch to a transparent resin, Color Match 325, which I did.)
Resin canine jawset in two colors overloaded with pigment
After I made a bunch more of these I decided this method may  not  be everything I hoped it would be. Sometimes pink resin would leak down over the white teeth and while I could carefully scrape it off before the resin set completely, this was something I'd rather not spend my time doing. Also, I would  get thin spots or bubbles between the teeth and the gums at times, which would make for weak castings (I could crush in these spots with my fingers) which was definitely something I did not want. Time to try another method. Onwards!
0 Comments

Attempting casting resin in two colors, part one

12/29/2018

0 Comments

 
Resin canine  jawset cast in two colors


So I was unenamoured with airbrushing, at least when it came to painting jawsets, and I decided to attempt to cast them in two different colors of resin. The saints at the Smooth On tech support department recommended I pour one color of resin over the other before it had a chance to set up fully.To the left, the result. Um, no.
 Some sort of two part mold would seem to be the answer, one for the teeth and the other for the gums. My first thought was to cut the teeth out of a resin jawset with my Dremel, insert them back into the original mold, and make a model of just the gums from which to make a second mold. Below, getting ready to pour silicone for the model.
 Casting jawset parts in silicone rubber
 Casting jawset parts in silicone rubber
Casting a jawset model in silicone rubber


Removing the cured rubber from the mold, with the teeth still attached. It would appear I have my model from which to make a mold for the gums. (The fabric was added while the rubber was curing, so that I'd have something to glue the models down to the mold board with afterwards. It wouldn't work so well to just glue the silicone to the mold board, as cured silicone doesn't stick to much of anything.)


Here goes nothing! Pouring the silicone over the models for the new gum mold. (The snaky thing on the far right is an attempt at a lip.)
 Casting jawset parts in silicone rubber
Making molds for jawset parts from silicone rubber
Below, pink resin gums cast from these new molds, with teeth inserted temporarily. Looks pretty good but....
Resin canine jawset cast in two colors

Damn. The round thing in the middle is leftover resin that cured in the mixing cup. See how nice and smooth it is? See how full of bubbles the gums are? There's lots and lots of things that cause bubbles in castings but here it's due to replicative failure. Each time I demold rubber from rubber, microscopic layers peel away from the surface, creating these bubbles in the mold. (Even if I'm using plenty of release. Which can also cause bubbles, damn!!) Three times I poured rubber into rubber to make these, adding more bubbles with every step.
Bubbles in cast resin
What to do next? Maybe at some point in the future I could investigate stronger rubber, but in the meantime, maybe I should go back to making molds from original sculpts whenever possible. 
0 Comments

In Pursuit of Pointy, and In Search of Squishy

3/27/2018

1 Comment

 
To date I've purchased teeth from other craftspeople to use in my masks, but I've always really wanted to make my own. Below, a pile of attempts made over the past couple of years, made with Monster Clay (a kind of plasticine), Super Sculpey and Apoxie Sculpt.(Skully is supervising. He is a very helpful skull.) A whole lotta nope right here.
jawset sculpting teeth for fursuit wolf head mask
I finally settled on the Monster Clay for making the prototype teeth. I got tired of waiting for the other two to dry and/or set up in between sculpting sessions, and I got REALLY tired of trying to smooth out the hardened model with sandpaper or a Dremel. Monster Clay can be frozen to make it very hard and  can be softened with a hairdryer or microwave or such to make it very soft, so it is adaptable for a variety of sculpting situations. It also smooths beautifully using rubbing alcohol or its more powerful big brother, isopropyl myristate.
sculpting jawset teeth for fursuit wolf head mask
First, I made "plates" for both the upper and lower jaw, making sure they fit comfortably inside the resin head. Then, using Skully and reference pictures I found online, I sketched the placement of the teeth on the "plates". Using a lightbox, I then checked to see how the teeth on the upper and lower jaw would line up with each other (left). These would serve as "templates" for the jawset.
 
teeth for resin fursuit wolf head mask
sculpting jawset teeth for resin fursuit wolf head mask


Now it's time to start sculpting! Left, rechecking the template in the lower jaw.


​Gum line built up (and though it's hard to see) tooth placement traced in from the template.  
sculpting jawset teeth for resin fursuit wolf head mask
​


​Actual teeth taking shape. The whole thing is built on a thick piece of cardboard, so I can take it in and out of the mask's mouth without squishing it. Not too badly, anyway.
  
sculpting jawset teeth in resin wolf head fursuit mask
Above, looking to see how the lower part of the jawset is shaping up when viewed from the side. The teeth are just loosely stuck down to the gums at this point, so I can easily move them around if I need to.
sculpting jawset teeth in resin fursuit wolf head mask


​Now for the upper jaw. Left, checking the template for the upper teeth inside the resin head, using Skully and photos for reference.
sculpting jawset teeth for resin fursuit wolf head maskPicture


​Gumline built up, roof of mouth roughed out, and tooth placement traced in, using the template. 
sculpting jawset teeth for resin wolf head fursuit


​And, roof of the mouth more refined, and actual teeth taking shape.
 
sculpting jawset teeth for resin fursuit wolf head mask
sculpting jawset teeth for resin fursuit wolf head mask.
And tada! Above, a finished Monster Clay plasticine model, ready for molding. Silly me, little did I realize that this would be the first of three finished jawsets I would mold. Sucks being a perfectionist.
Sculpting tongue and jawset teeth for resin fursuit wolf head mask
sculpting tongue and jawset for resin fursuit wolf head mask
Above, beginning the molding process, and a tongue while I'm at it. The jawset has been firmly attached to a thin piece of plywood, which will serve as a mold board. Every little gap between the model and the mold board is filled in, as otherwise the mold rubber could find its way under the model, and float the model up on top of it while it's curing. Which would not make a very good mold at all.
making molds of jawset teeth for resin fursuit wolf head mask
mixing silicone mold rubber
Left, making molds! I've used cheap Tupperware type containers for the mold boxes, attaching them to the mold boards with hot glue and cutting openings out of the bottoms for pouring in the rubber. 
pouring silicone mold rubber over jawset teeth for fursuit wolf head mask
mixing resin for making jawset teeth for fursuit wolf head mask
​And, casting resin into the new molds to make teeth! Wheee!!! 
Picture
cast resin teeth jawset for fursuit wolf head mask
 

sculpting teeth jawset for resin wolf head fursuit mask

Above, getting ready to revise the jawset. Did I mention how I did this three times? Seriously though, it's easier to check the fit of the teeth in the head when they're in hard resin and not squishable clay. Above, a set of resin teeth that has been Dremelled down to fit the head better, and another set of clay teeth made by pouring melted Monster Clay into the mold, called a "borrowed casting". It's much easier to tweak the teeth from a borrowed casting than trying to make a whole new set from scratch. (If I wasn't such a chicken, I could have also resculpted my original set of clay teeth. But I wanted to keep them the way they were for extra insurance.) 
sculpting teeth jawset for resin fursuit wolf head mask
Above, revisions. To the right in both pictures is the original sculpt, still on the moldboard. In the middle is a modified resin casting, and to the left is the resculpted "borrowed casting". This first go round I removed the "flare" thingy from the bottom jaw, as it only really served to complicate fitting it into the resin head. I also made the plate for the upper jaw more symmetrical. You can see how the original sculpt has a bigger "bulge" on the left hand side than the right. Why did I do this, you may ask. Well, I was using a reject resin head casting to fit the teeth in, and I forgot that the resin on one side of the muzzle was much thicker than that on the other so.... in order to center the teeth in the opening, the plate had to be a lot wider on one side. Definitely not going to be the case with the average resin head! Fortunately I realized this before I got too much further into this process!  A great big duh, but could have been a much bigger duh.
resin teeth jawset for fursuit wolf head mask
resin jawsets teeth for fursuit wolf head mask
Above, showing all three sets of revised teeth. The top set is the first one, the middle is the second and the set on the bottom is the final version. Besides changing the "plate" as described earlier, I did a lot of playing with the front incisors. I refined them in the second set but then realized I had also made the top ones too small, so I made them bigger in the third set. After re-checking my reference pictures of real wolves I also decided the gum area above the front incisors also needed to be longer, so I also changed that in the third set. I also did a lot of fiddling with the area circled in yellow in the right hand picture, with the way those particular teeth came together. The top incisor right next to the large bottom canine also underwent a fair bit of refinement.
nose and tongue for fursuit wolf head resin mask


Last but not least, a freshly textured nose and tongue, ready for moldmaking.
molding nose and teeth jawset for resin fursuit wolf head mask with legos
And since I had spent so much time fiddling with the teeth, I decided to fiddle with the mold making method as well. At the suggestion of an acquaintance I made my next set of mold boxes out of Legos instead of Tupperware containers, so I could get the mold boxes precisely the size I needed them and save molding rubber. Molding rubber is expensive. They don't call it "platinum cure silicone" for nothing. (A good source of cheap used Legos is bricklink.com.)
making molds for fursuit parts with lego bricks
molding parts for fursuit heads using lego bricks
The rubber curing and then  being removed from the Lego mold boxes. I sealed all the little gaps between the bricks with Sonite Wax **except** the one between the first row and the mold board, with the results seen below on the left. Brain cramp!! Little rubber Lego bricks! Fortunately the hot glue attaching the Lego mold  box to the mold board kept the leak from getting out of hand, the worst effect being I didn't have quite the thickness of rubber I would have liked around the model at the top of the mold. 
molding parts for fursuit heads using lego bricks


​In the home stretch! Right, casting a nose and some teeth in the new molds.
casting parts for resin fursuit wolf head mask
casting parts for fursuit resin heads out of silicone and resin
silicone rubber fursuit nose and tongue parts for resin head
Above, the nose and tongue models with their squishy rubber counterparts. Wheee!!!
silicone rubber nose for fursuit wolf head
Checking out the fit of the rubber nose in a resin head. Lookin' good! The resin head on the right wants a rubber nose too. 
cast noses tongues teeth jawset parts for resin fursuit heads
fursuit head parts teeth jawset tonges noses silicone resin
And above, a pile o' puppy parts, ready for maskmaking!! I'm feeling good about the results of my endeavors here. Time to think about colors for fur!!
1 Comment

More Adventures in Moldmaking

8/3/2014

0 Comments

 
first layer of silicone for wolf head mold


And... on to a Mold That Matters. To the left and below is a sculpt that will ultimately be a base for a fursuit style head, with the first coat of rubber thinly brushed on. (The "halo" around its head is part of the mold, not part of the sculpt.)

This mold is made of silicone rubber, not urethane rubber as was my last mold. I want to cast resin into this mold, and urethane resin and urethane rubber, I've been told, do not Play Nice together. Among other things, a Runaway Exothermic Reaction may occur, which generates a lot of heat and results in the mold and the cast being irretrievably fused together. Not good.

More specifically, this mold is made of *platinum* cure silicone rubber, not *tin* cure silicone rubber. The former is much more expensive than the latter, but supposedly molds made with it will last a lot longer as well. 

Platinum cure rubber is also supposed to be more prone to reacting with the model material. Sealing the model is strongly recommended (the very nice tech support at Smooth-On recommended using Krylon Crystal Clear Acrylic Sealer)  and a small test on an inconspicuous area is also recommended. Silicone reacts with some kinds of wood, latex (wear vinyl gloves, not latex gloves, when using it) and most famously, sulfur. For this reason any modelling clay used to sculpt a model needs to be sulfur-free. 


Both silicone and urethane brush on molds need to be applied in layers, usually around four, to a total thickness of a quarter inch. One beauty of silicone rubber, as opposed to urethane rubber,  is that its' possible to apply additional coats anytime after the most recent coat is no longer sticky to the touch.  In contrast, once one layer of urethane rubber is no longer tacky, another layer will no longer stick, and once a section of a urethane rubber mold is started it must be finished. Stress!!! Working with the silicone is much more relaxed and easygoing on one's nerves.
first layer of silicone for wolf head mold
second layer of silicone for wolf head mold
To the left, the sculpt with the second coat of rubber brushed on. I've lain it down on its back to minimize the rubber "boogers" dripping off its nose that I got with the first coat. I've also dyed it a lovely shade of pink with Smooth On's Sil Pig, so I can tell more easily that I've covered the orange first coat thoroughly. 

In between coats, I mixed rubber thickened with Thi-Vex and trowelled it into undercuts, eye sockets, etc and built up a cut-seam ridge using a popsicle stick as an applicator. That's another advantage of silicone. Thi-Vex is relatively benign, while Cab-O-Sil, the thickener for urethane, is made of finely ground glass. It blows around very easily and you really, really don't want to breathe it.  
To the right, the rubber all but finished. The last step was to make keys to help the rubber mold register with the Plasti-Paste mother mold. I did this by mixing up a small batch of rubber, splatting it down between two paint sticks and then cutting it up into squares when it had cured. I then stuck the squares onto the mold using more thickened rubber.

Here I also learned that Smooth On's instructional videos do sometimes leave steps out of the process that would be useful to know. The particular video I'd been watching over and over again did not show keys at all, and I assumed for a long time it was due to some special property of the Plasti-Paste mother mold material. 


adding keys to silicone for mother mold
 When I called to double check on this, the support person said that no, it was just to make the instructions easier to follow. If anything, I really could have applied more keys than I did.  
building dividing walls for mother mold

To the left, getting ready to apply the Plasti Paste mother mold. I've trimmed the edge of the rubber, applied a dividing wall made of Klean Klay and covered the wall with tinfoil. I then applied Sonite Wax and Ease Release over the whole thing. 

There's another difference between urethane and silicone mold rubbers- they each need their own kind of release. The universal release spray used with urethane is made with silicone- if it's used with silicone rubber, it will act like a glue instead!
To the right and below right, half the Plasti Paste mother mold applied.

The chief advantage of a Plasti Paste mother mold over the traditional plaster is its much lighter weight. I was planning on hand-slushing resin in this mold, which means holding it and turning it for fifteen minutes while the resin sets up. Something not easily done with a 40# plus plaster mold!  

I was dreading using this material as the instructions said it was very sticky, set very fast, and got very hot, but all this turned out to be manageable. The trick was to learn to mix only what could be applied in ten minutes. A saving grace was that, like silicone, additional coats of Plasti Paste could be applied after previous coats are fully cured. Whatever didn't get covered in one pass would get covered in the next, no big panic. It should be built up to be about 1/4" thick; in larger molds such as this one it should be more like 1/2" thick. 

As an additional bonus, it wasn't as stinky as I feared it would be either.

  
first half of mother mold for wolf head

The instructions also said to smooth the Plasti Paste down with wet paper towels or denatured alcohol before it was fully cured to avoid "an aggressive surface". And when they say "aggressive surface", they mean it. This is one downside of this material- even smoothed down, it is fairly "toothy". I nick my fingers on the edges routinely, and rip my rubber gloves while casting. I need to find heavier gloves!

first half of mother mold for wolf head alternate view
clay dividing wall removed while making mother mold for wolf head

To the left, the clay dividing wall removed, under the careful supervision of the Feline Assistance Department.

Again I applied tinfoil over the Plasti Paste, and applied Sonite Wax and the release spray over that. Supposedly the tinfoil keeps the two Plasti Paste halves from sticking together, and helps to mark the parting line when separating them. The downside of the tinfoil is that it very badly wants to stick to the uncured Plasti Paste and pull away from the cured material, making a gap in between the two halves. Fortunately it did not turn out to be at all critical, especially since the halves were bolted together.

Below, holes drilled through the two mold halves so that they later can be bolted together.  And then, time to remove the mold from the sculpt- the moment of truth!
holes drilled for bolting together mother mold
Houston, we have liftoff!!!
mother mold removed from silicone inner mold for wolf head
finished mold for resin wolf head removed from sculpt
There is definitely room for improvement for next time. The "halo" could be about half the width it was, in order to save on both weight and cost of material. (I made it that wide because the video said to!) The Plasti Paste shell could be more uniform in thickness. Most importantly, the cut seam down the center of the sculpt's face is not really needed, the sculpt is fairly simple, the rubber is flexible enough it will just peel off like a glove, and it's nice not to have to worry about seam lines. But for right now, I am very excited to have a functional mold!
0 Comments

Plaster PS

6/13/2014

0 Comments

 
Shortly after I posted my blog regarding my first adventure in moldmaking http://www.sanssoucistudios.com/blog/adventures-in-moldmaking, to Facebook, the moldmaker extraordinaire Joanie Berkwitz responded that she had a few suggestions to help me out in my next attempts, which I have posted below.  One of her plaster molds is also pictured below.... it has no fewer than **twenty one** pieces!!  I would bet money that Joanie is one of the most gifted ceramicists in the US right now, and I am very fortunate to be able to own some of her equine figurines.
Joanie Berkwitz plaster mold of Sarah Minkiewicz-Breunigsculpt Dante
Joanie's "Dante" mold, body. All together this mold has 21 pieces.
Joanie Berkwitz plaster mold of Sarah Minkiewicz-Breunig sculpt Dante
Joanie's "Dante" mold: head, two legs, and tail.
Joanie Berkwitz plaster mold of Sarah Minkiewicz-Breunig sculpt Dante assembled clay poured
"Dante" mold assembled and clay poured.
Joanie Berkwitz plaster mold of Sarah Minkiewicz sculpt Dante head
"Dante" head mold opened.
Joanie Berkwitz plaster mold of Sarah Minkiewicz sculpt Dante tail
"Dante" tail mold opened.
Joanie Berkwitz plaster mold of Sarah Minkiewicz sculpt Dante leg
"Dante", two leg molds opened.
Joanie Berkwitz plaster mold of Sarah Minkiewicz sculpt Dante partly opened
"Dante", with one part of the body mold removed...
Joanie Berkwitz plaster mold of Sarah Minkiewicz-Breunig sculpt Dante half opened
"Dante" body mold half opened.
Joanie Berkwitz plaster mold of Sarah Minkiewicz-Breunig sculpt Dante opened
"Dante" body mold opened further.
cast of Sarah Minkiewicz sculpt Dante unassembled
"Dante" pieces fresh out of the mold....
Joanie Berkwitz plaster mold of Sarah Minkiewitz sculpt Dante
"Dante" assembled....
Finished Dante sculpted by Sarah Minkiewicz-Breunig finished by Joanie Berkwitz
"Dante", glazed and finished! I'm happy to say, that this particular Dante is mine, all mine. :-D (All pics in this post are by Joanie.)
 Joanie: There are a few things that might help you in your journey. The first thing that caught my attention is your mold keys. They look like they are good in theory, but not in practice. The mold keys need to be made along with your rubber mold piece, not attached to it afterward. In plaster mold making, you want your keys to be round (not squared off) and tapered, but in rubber you can be less finicky. Build the keys in as you paint on the rubber. You can glue them on between layers, then paint more over them maybe.  

Me: So it sounds like another approach I could use is to have the rubber snakies ready to go, but paint them in to the last coat of rubber as I'm applying it, not glue them on afterwards?

Joanie: That would work better. Depending on layer thickness, one or two layers need to be applied over the top.

Think I would consider one long ridge down the rubber where the plaster goes. Like a short separating wall. Then painted with rubber. Would make a fine key. The wormies could be made of clay. Or whatever. Or just build up as you paint. 
 
Me: What about Cabosil? It's used to thicken rubber, it's made of ground glass.

Joanie: Oh that crap. Stay away from it. Moon dust. Tried it once. It's not safe, and not good. Try laying a strip of oil clay then painting over it with the rubber. Doesn't need much ridge, just something to 'register'.

Me: Is it OK for the clay to stay inside the rubber after the mold is made? Or do I need to get it out somehow?

Joanie: Should be okay. As long as it isn't too close to the inner surface. Might bulge inward if so. But won't hurt the mold long term. I think that I would try a long strip of something. Rope? Glue it on, paint over it well. Ponder that. :-)

Joanie: My other concern is how you have been told to mix the plaster. I find that method to be variable in the extreme. It's okay for art class, but not good enough for long term plaster strength. It's easier to do that method **if you already know how plaster is supposed to feel** LOL. In other words, it's okay if you have experience, but not if you don't.  

Plaster strength depends on three elements: 1. Ratio of plaster to water 2. Temperature of the water 3. Mixing time.

The ratio between plaster and water is 70:100 by weight. 70 parts water to 100 parts plaster. You can get away with 1 part water to 1 1/2 parts plaster if it's easier. I've started using grams because the math is easier. 700 grams water, plus 1000 grams plaster, equals 1700 grams total. You need a scale that does grams or ounces. It needs to go up to maybe five pounds? They're cheap and very useful. Slip a big ziplock bag over the scale, so that it stays clean and dry. Make sure to zero out your bowl first.

Water needs to be very warm, 100 or so degrees. Warmer water kicks it faster. Cooler water kicks it slower.

Slaking and mixing time is crucial. Slake for two minutes, before you mix. The most mixing in the least time will give you the strongest plaster.

Me: Question... do you mix the plaster and water with your hands (as it was suggested to me to do) or do you use a mixer? I'm guessing if speed is of the essence, you might use a mixer.

Joanie: Anything under 10# can be hand mixed. Main thing is keeping your hand down in it, and moving as briskly as possible without making bubbles. Wrist action. Knock the container against the table to raise the bubbles. Plaster is ready when a finger drawn across the surface leaves a wake.

Joanie: After you have slathered, glopped, and oozed the plaster onto the rubber mold, run a flat thing over the seam line to expose where the two plaster pieces meet. You can tell the different colors... you shouldn't have to attack the mold with a knife and hammer. 

Going back a little more, when you are pouring plaster against plaster, first make sure that your plaster is smooth. Make sure that your keys are smooth, round, and tapered. 

Then use mold soap as a separator. You can use Murphy's Oil Soap too but it has detergent in it. Vaseline will hurt the long term strength of your plaster. Rots it. Mold soap will make it stronger. Wipe on a coat of soap, let set a minute, wipe off with a barely damp sponge. Repeat three times.  You can see the satin sheen if it's right. Also, when soaping, use good sponges. You know the kind. Natural. One for soap, one for water. Wax on, wax off, Mr Myogi says. Never put the water sponge in the soap. Dilutes it. 

Me: How do you get the plaster smooth if it is already set? Or do you take down the divider while the plaster is still soft?

Joanie: You smooth the plaster with a tool. Take off the divider, then take a tool (such as a dental tool) and scrape it. That is the first thing I learned that set a light bulb off in my head when first learning to make molds. You **work the plaster** after it starts to set. If the plaster that you are pouring against is rough, or not well sealed, you're going to fight it. It doesn't have to be smooth smooth.... it only has to offer no resistance to being separated. Tool marks are okay, little indents are okay, but big bumps, holes, or wacky keys are not okay. 

Me: How do you fill any air holes in the plaster?

Joanie: If you have holes in the plaster, fill them with whatever. Clay, oil clay, whatever. You don't care if the oil clay stays in there. Makes no difference. But you DO care if the plaster breaks while you are trying to separate it. LOL

Joanie: I prefer to make my keys into my plaster after it has set. You can carve keys faster and better than you can sculpt them. Use a nickel, or a washer like you put on a bolt and nut. Turn it sideways and carve in with a twisting motion. Twist, twist, twist. You'll make a perfect, smooth key in no time. So for the plaster, don't be afraid to work it. Learn to love it in all of its loveliness.  

Me: When would you remove the clay dividing wall? I was told to remove it after the plaster started to cool. Would this allow me to work the plaster as you suggest, or should I remove the clay wall earlier?

Joanie:  When the chemical reaction starts, the plaster gets warm. It will still be soft enough to scrape with your fingernail, but it will be firm enough to stand on its own. Remove the clay dividing wall then. Usually, by the time I clean the bucket and my hands, take a sip of iced tea, and sit down again, I can start removing clay from the plaster. Depends on ambient temp of course, and thickness of casting. Thicker castings kick off faster and get warmer. The warmth (exotherm) keeps the cure going. But there is no rush. If it feels too soft yet, wait.

Carve your keys into it. Then let it cool for a while before doing the next one. If you are doing four plaster mold pieces total, you could do two that don't connect, first. Then the two that are between those other two. 

When you do those second two, you are pouring plaster against plaster. Use the soap. Wipe on, let set, wipe off. Three times. Then test with a fingertip of water. The water should sit on the surface and not penetrate at all. More soaping is always better if in doubt.   

When pouring plaster against rubber, plaster will not stick to silicone anyway, no need for a separator if what you are using is silicone or rubber. If you want to feel better about it, wipe one coat of soap over it.  

Joanie: This clean hands-and-buckets business with the plaster is nonsense. Plaster is made in a way that drives off one of the two chemically bonded water molecules, and by mixing water back in, you start a chemical reaction that rebonds. Now, if you have a sloppy, uncleaned bowl you will have bits of already catalyzed plaster floating around, but there isn't any sympathy between the plaster that has already started to kick, and the plaster that has not yet kicked.  

Joanie  If the plaster doesn't kick, its old. Throw it out. If it feels gritty, throw it out.

Plaster absorbs atmospheric moisture then is bad. It must be kept dry, sealed if possible. Just bought some plastic kibble bins with rubber seals around lid. Keeps it longer. 

Problem is that if plaster's old, you can't seal it and pour against it. Never could figure out why, but old plaster sticks to the next pour no matter how much soap you put in it. Ruin a few molds and you learn. Nothing like chiseling it all apart and losing everything.

Me: Ugh! So if it's bad, it can still set, but it won't seal?

Joanie: Yes. And you don't know for sure until your mold is made.

Me: That's good to know.... I guess... Is it better to use fresh plaster on a project just in case?

Joanie: Always. It's cheap. Time is more expensive.

0 Comments

Adventures In Moldmaking

2/11/2014

0 Comments

 
I've decided I need to learn moldmaking. I've been having my molds made at Campbell Plaster and Iron in Rutland, VT http://www.cpisculpture.com/ and while I've been very happy with their work, I feel my anxiety around the cost threatens to discourage experimentation, tighten up my sculpting and cause fuss and worry about every little detail of a finished mask. Not to mention that the need to have a durable object to transport back and forth across the state for the process makes it difficult to make originals out of Plasticene, which is so much more flexible and fun to work with than Celluclay, which is what all my originals are now made of.
simple sculpt from which to make a urethane rubber mold
clay dividing wall on sculpt prior to making urethane rubber mold
And here we have the awe inspiring object for our first attempt, a Celluclay head meant to be a stand for my finished masks. I figure I'm not emotionally attached to it, so if I botch it nothing is lost, but if I can pull it off I will hopefully have a mold to make the stands a little bit easier to make. I've sanded the head down to smooth it out, glued it onto a piece of scrap lumber, sealed the whole arrangement with shellac and Johnson's paste wax, and then sprayed the whole thing with a light coat of Smooth On Universal Mold Release.

The next order of business is to make the rubber inner mold. It is what gives the cast its detail, and it is also flexible for easy removal from the cast after it has set.

In this pic the clay dividing wall has been applied, which will split the rubber mold in half from front to back. A key is also carved in to the dividing wall register the two halves of the mold together, and release applied to it as well.

Here we also have a gallon of fresh new mold rubber, Smooth On Brush On 35, which costs a cool hundred bucks and has a shelf life of six months at best after opening. Stress!! Part A looks like meringue gone  wrong, and Part B looks like drooling florescent green alien slime. And while this stuff is relatively benign for moldmaking material, Part A is one of those things to which one can easily become allergic (what's that called? A hypersensitizer?) so it's important to wear goggles, gloves and long sleeves while handling it.
first layer of an urethane rubber mold
second layer of an urethane rubber mold
Here we have the finished rubber on the front part of the head (pink) and the back part (grey.)

I watched and rewatched this video http://www.smooth-on.com/video_play.php?video_id=sOyBawt1-Ec&autoplay=1 , read and re read these instructions http://www.smooth-on.com/tb/files/Brush-On_Series.pdf and then I was ready to go.

Once the rubber starts going on, the clock starts ticking... after it's mixed, the rubber stays brushable for about twenty minutes, more or less, and then it turns into a solid mass. It's a trick not to mix more than is needed- this stuff is expensive!- or less- don't want to worry about a layer setting up too much while more is mixed.  About four to six layers need to be brushed on, each one right when the layer before it has set to the point where it is still tacky. Not runny, or the brush will just pick up and stir around the layer of rubber underneath the new layer, and not dry, or the layers risk delaminating later. 

I also added a few drops of paint to every other layer of rubber, so that I could tell more easily if I had covered the layer underneath adequately. Which is also why the two sides of the mold are different colors.
The rubber needs to be used in a warm, dry room so that it will set properly. And wouldn't you know, right in the middle of the project, the furnace decided to go on the blink, when it was something like twenty below zero out. I made frantic phone calls to the repairman, and then to my brother up the street for an emergency loan of an electric space heater until the repairman got here! As you can see, the project was saved.
making keys on rubber mold for plaster mother mold
making keys on the urethane rubber mold for the plaster mother mold
After the rubber inner mold is finished, it's time to make the plaster mother mold. The plaster mother mold is rigid and helps the rubber mold, and the cast setting up inside of it, keep its shape.

The two pics above show registration keys (ie, the little wormy things) I made out of leftover cured rubber. In the left hand pic they're around the base of the head and in the right hand pic they're glued on with silicone adhesive (aka the black goop), which unfortunately didn't work. Either I got release on the rubber, so that nothing wanted to stick to it, or I used the wrong type of glue, perhaps silicone caulk instead of silicone adhesive. ( Though I swear the tube I bought said adhesive, but you know how sometimes things are labelled in ways that aren't necessarily consistent with their purpose.) Hopefully the shape is simple enough and the use will be gentle enough that the rubber will stay in the plaster anyway when a head is being cast.
clay dividing wall for making the plaster mother mold
The two pics above show another clay dividing wall, this time to divide the front of the mother mold into left and right sides and  prevent it from locking on under the chin when removed.  I've made registration marks on the right hand side of the wall and supporting clay gussets to the left, and put copious amounts of Vaseline over the whole thing. The pics also show how the registration keys didn't waste any time in falling off.

I confess that I have never used plaster before, except in Girl Scouts in fourth grade. Glenn from Campbell Plaster and Iron patiently gave me the low down: 1) fill a plastic container 1/2 full of warm water; 2) sift #1 pottery plaster into the water until certifiable islands appear (not just lumps floating on the top, but certifiable islands) and then stir everything together with your hands; 3) keep hands and containers clean, as half set plaster on these things will accelerate the unset plaster too much; 4) cut burlap into 6" x 6" squares, fold in half to make 3" x 6" strips, and dip in plaster; 5) apply two layers of strips over the main part of the mold, and four or more along clamping edges. He said it's best to do each piece of the plaster mother mold all in one go, but if it's necessary to stop in the middle, smooth out the surface of the mold before leaving it so it doesn't get too toothy and wet the partially finished mold down before starting again. 
clay dividing wall removed from the plaster mother mold


Once the plaster has started to cool down, the clay dividing wall can be removed, as shown here. Vaseline is applied to the exposed new plaster  and the last part of the mother mold applied. 

Good thing I had dutifully saved so many of my Nancy's Organic Yogurt containers as Nancy had instructed on the label. The plaster sets too fast to wash buckets in between batches, so it was very helpful just to have loads of clean buckets on hand.
making the last piece of the plaster mother mold


Here the last part of the mother mold has been applied and allowed to set.

Now it's time to play hide and seek with the dividing line. I worked on gently finding the line (often betrayed by a little bit of Vaseline oozing out) and prying the pieces apart with craft knife, screwdriver, and tack hammer. I felt like I was an archaeologist on an archaeological dig.
finished urethane rubber mold with plaster mother mold
And finally, TA DAAAAA!!! It's done!!! Not perfect, room for improvement, but definitely usable. YAY!!!

0 Comments

    Author

    I make masks. Because art is more fun when you put it on your head.

    Categories

    All
    A Day In The Life
    Airbrushing
    Artemis
    Casting
    Cat Masks
    Color Design
    Deer Mask
    Ears
    Eyes
    Fur
    Garm
    Handpaws
    Head Base
    Horse/unicorn Masks
    Jawsets
    Lips
    Maxine
    Methods And Materials
    Moldmaking
    Moving Jaw
    Noses
    Painting
    Paper Mache
    Patterning
    Photography
    Rabbit Masks
    Resin
    Rip
    Sculpting
    Sewing
    Shaving And Trimming
    Silas
    Silicone
    Strapping
    Studio Announcements
    Tails
    Tongues
    Videos
    Wolf Masks

    Archives

    October 2021
    September 2021
    May 2021
    March 2021
    July 2020
    November 2019
    March 2019
    January 2019
    December 2018
    June 2018
    April 2018
    March 2018
    December 2017
    June 2017
    May 2017
    April 2017
    February 2017
    January 2017
    December 2016
    November 2016
    October 2016
    July 2016
    August 2014
    June 2014
    February 2014
    November 2013
    October 2013
    March 2012
    October 2011
    September 2011
    March 2011
    November 2010
    September 2010
    August 2010
    June 2010
    October 2009
    September 2009
    March 2009
    February 2009
    February 2008
    June 2007
    April 2007

    Enter your email address:

    Delivered by FeedBurner

    RSS Feed

Proudly powered by Weebly