Sans Souci Studios
Follow us on Facebook!
  • Home
  • Gallery
    • Fursuit Heads and Partials
    • Paper Mache Masks 2000- 2014
  • Blog
  • About
    • About
    • Embarking on the Road to Furry Fandom
  • Contact
  • Thanks to Our Supporters!

Adventures in Resin Casting

8/24/2014

0 Comments

 
Smooth On Smooth Cast 65S curing inside silicone mold
resin wolf head base pulled out of silicone mold
I feel like a traitor. After all these years of casting in paper mache, I am seriously considering switching to resin.

I confess, I have no love of paper mache as a thing in and of itself, although I have come to appreciate its many qualities- strength, light weight, safety, low cost, and a long and interesting history. When I started out maskmaking I investigated many material possibilities but found none could match the qualities of paper mache.(Check out my earlier blog for the gory details.) The downside of paper mache, however, is how long it takes to cast anything with it-  up to a week for one of my larger masks. That's a lot of time not spent sculpting or painting.

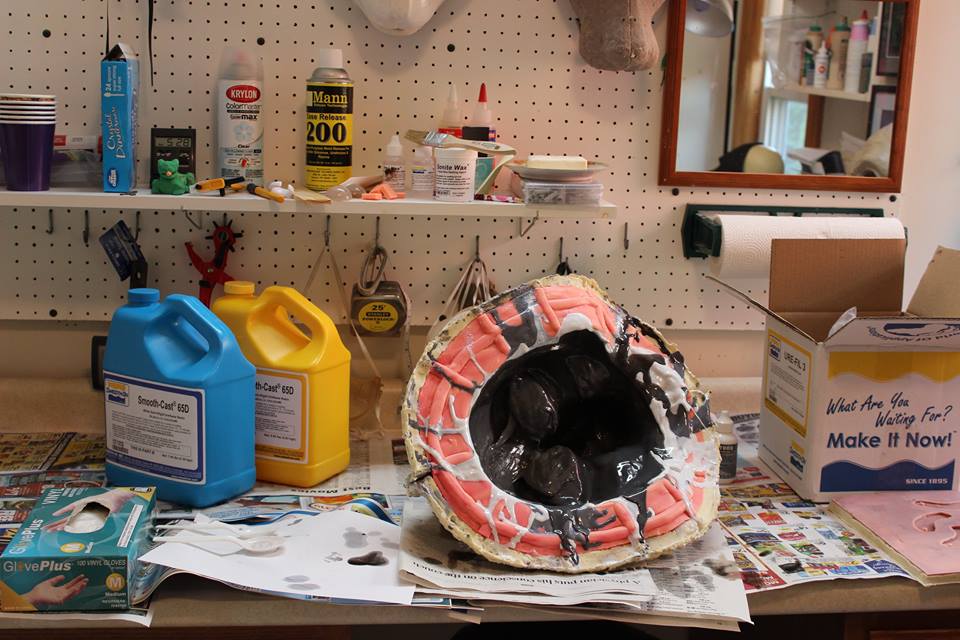
Either a lot of things have changed or I've been living under a rock for the past eight years, but when I discovered fursuiting (and just how far ahead of  me the furries were materials wise) I learned of a new material, Smooth-Cast 65D, that could be slushed into molds to make masks.
Instead of taking a week, I could cast a mask in.... fifteen minutes.

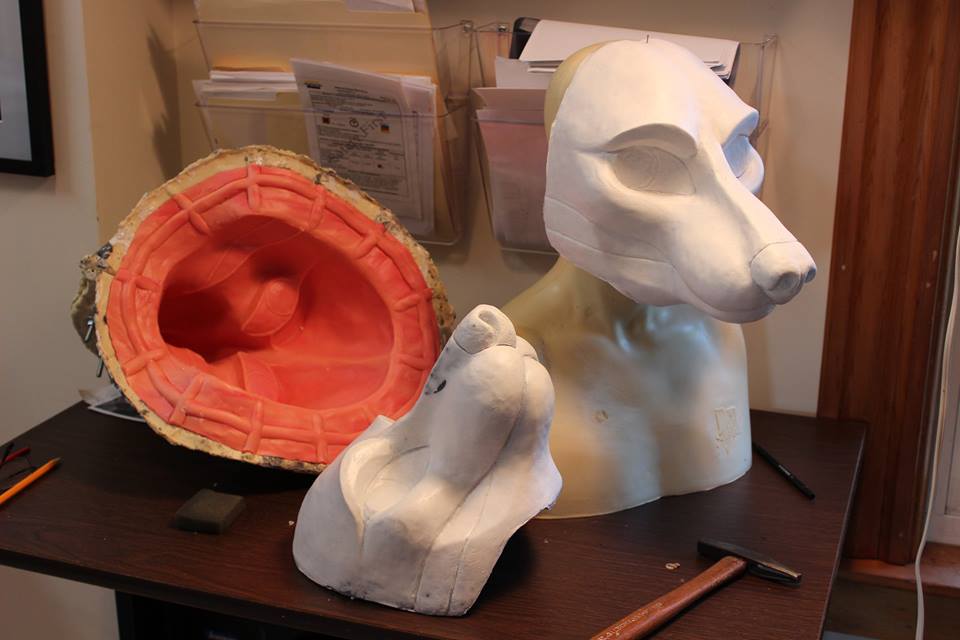
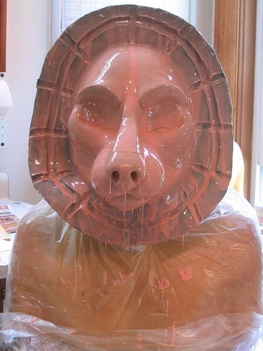
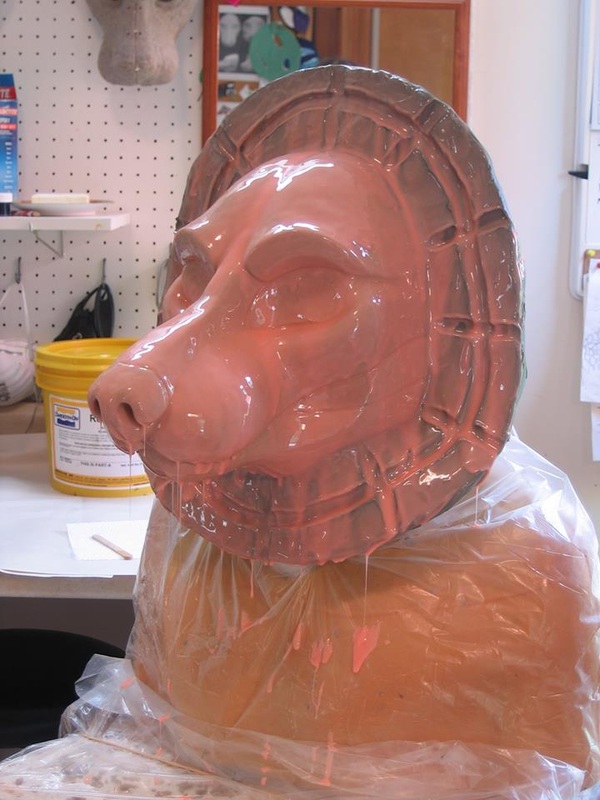
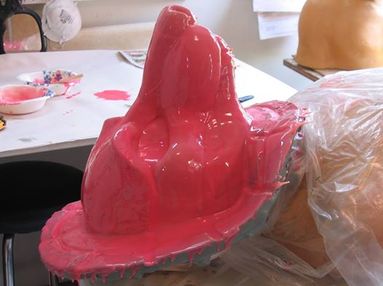
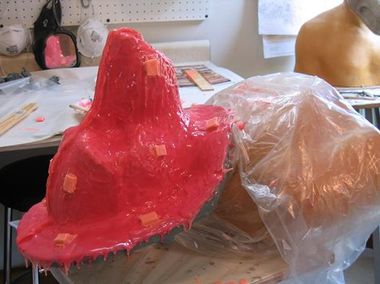
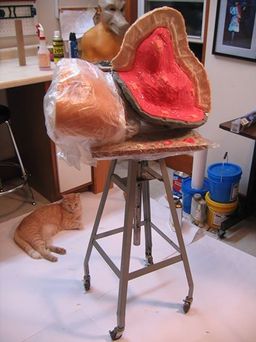
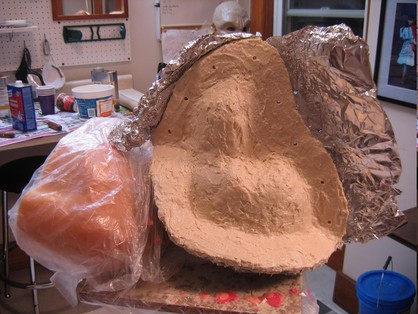
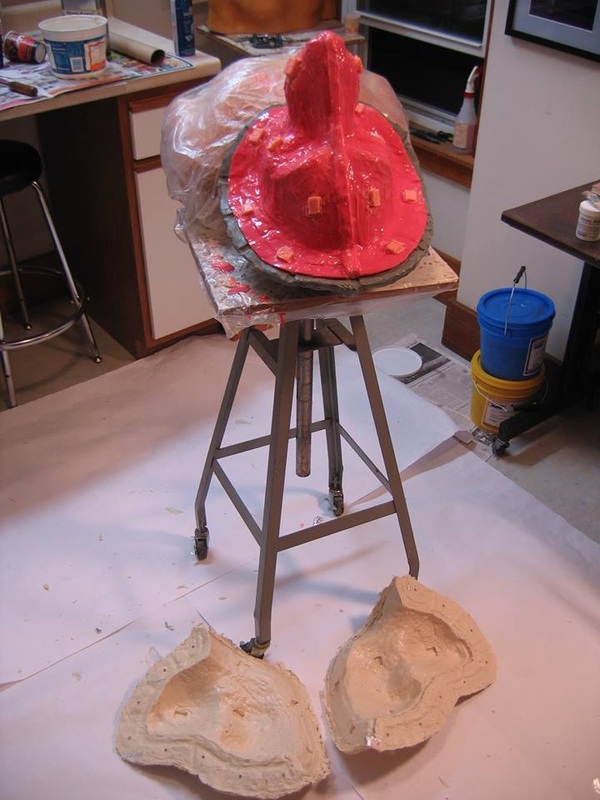
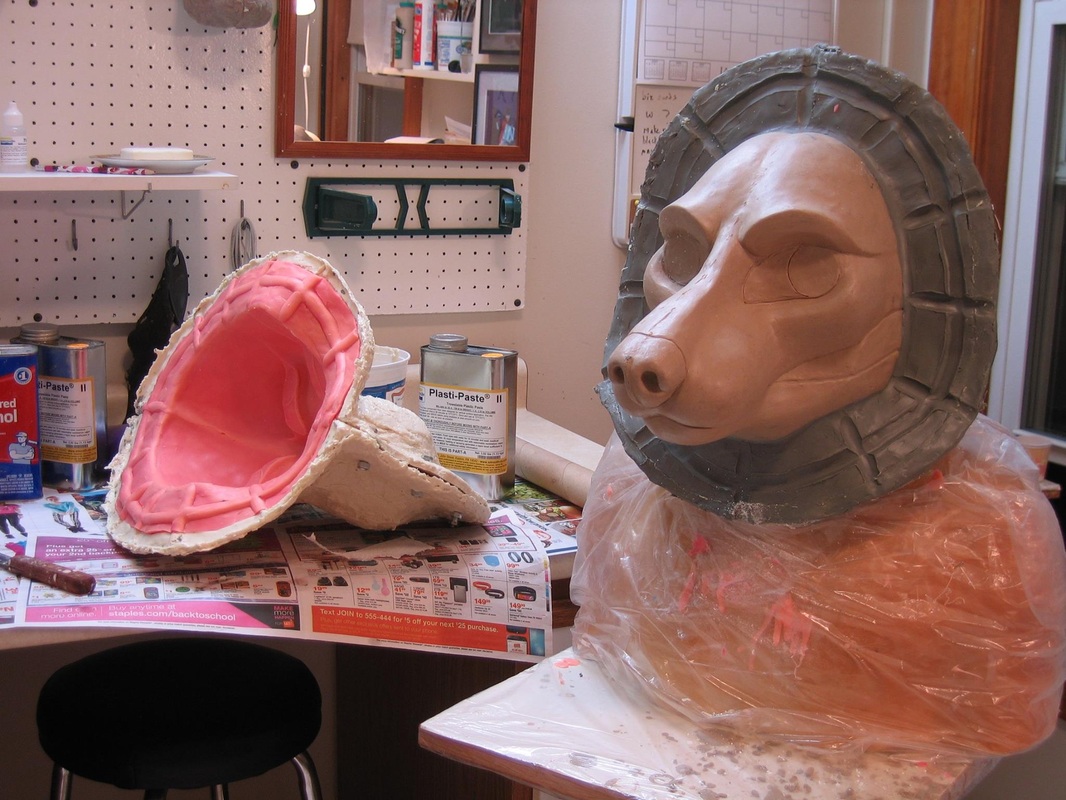
Above are pics of my first couple of attempts, using the silicone mold I made in my last post.

Some finer points I learned during my experiments:

The temperature makes a *huge* difference in how fast the material sets up. My first couple of attempts were done on a sunny porch on an 80+ degree day, and the material set up way too fast, as in I was happily slushing along, turning the mold this way and that, and the resin just set instantly in a huge gloppy wave in the middle of the mask's forehead or someplace equally inconvenient. The instructions say to cast at about 75 degrees F, and they mean it.

It's OK to use a plastic spoon to help distribute the material around the mold for the first few minutes after it is poured in, but the spoon should be set aside once the material sets up enough to start to stick to it. Otherwise the curing resin may grab onto the spoon more tightly than to previous layers of resin, which can cause the new layer to delaminate.

It really makes a difference to measure out Part A and Part B in two cups and then to use a third cup to mix them together. Otherwise, the mix ratio can be thrown off by material left behind on the inside of the cup that was poured from and/or extra material inside the cup that was mixed in, and result in an improperly cured cast, one which is very sticky and gooey with uncured leftover material. I found this out the hard way on my second cast. I was able to salvage it somewhat after a call to the Smooth-On tech department and much cleaning and scrubbing with rubbing alcohol, but it would still be something I would not want to sell.


I have to say, I'm struck by how *similar* the resin and the paper mache masks look like each other (at least from the outside) when they are finished- same color, same weight, same feel. They even warp the same way if they're not cast thick enough. I'm looking forward to learning what other experiments will bring.
0 Comments

More Adventures in Moldmaking

8/3/2014

0 Comments

 
first layer of silicone for wolf head mold


And... on to a Mold That Matters. To the left and below is a sculpt that will ultimately be a base for a fursuit style head, with the first coat of rubber thinly brushed on. (The "halo" around its head is part of the mold, not part of the sculpt.)

This mold is made of silicone rubber, not urethane rubber as was my last mold. I want to cast resin into this mold, and urethane resin and urethane rubber, I've been told, do not Play Nice together. Among other things, a Runaway Exothermic Reaction may occur, which generates a lot of heat and results in the mold and the cast being irretrievably fused together. Not good.

More specifically, this mold is made of *platinum* cure silicone rubber, not *tin* cure silicone rubber. The former is much more expensive than the latter, but supposedly molds made with it will last a lot longer as well. 

Platinum cure rubber is also supposed to be more prone to reacting with the model material. Sealing the model is strongly recommended (the very nice tech support at Smooth-On recommended using Krylon Crystal Clear Acrylic Sealer)  and a small test on an inconspicuous area is also recommended. Silicone reacts with some kinds of wood, latex (wear vinyl gloves, not latex gloves, when using it) and most famously, sulfur. For this reason any modelling clay used to sculpt a model needs to be sulfur-free. 


Both silicone and urethane brush on molds need to be applied in layers, usually around four, to a total thickness of a quarter inch. One beauty of silicone rubber, as opposed to urethane rubber,  is that its' possible to apply additional coats anytime after the most recent coat is no longer sticky to the touch.  In contrast, once one layer of urethane rubber is no longer tacky, another layer will no longer stick, and once a section of a urethane rubber mold is started it must be finished. Stress!!! Working with the silicone is much more relaxed and easygoing on one's nerves.
first layer of silicone for wolf head mold
second layer of silicone for wolf head mold
To the left, the sculpt with the second coat of rubber brushed on. I've lain it down on its back to minimize the rubber "boogers" dripping off its nose that I got with the first coat. I've also dyed it a lovely shade of pink with Smooth On's Sil Pig, so I can tell more easily that I've covered the orange first coat thoroughly. 

In between coats, I mixed rubber thickened with Thi-Vex and trowelled it into undercuts, eye sockets, etc and built up a cut-seam ridge using a popsicle stick as an applicator. That's another advantage of silicone. Thi-Vex is relatively benign, while Cab-O-Sil, the thickener for urethane, is made of finely ground glass. It blows around very easily and you really, really don't want to breathe it.  
To the right, the rubber all but finished. The last step was to make keys to help the rubber mold register with the Plasti-Paste mother mold. I did this by mixing up a small batch of rubber, splatting it down between two paint sticks and then cutting it up into squares when it had cured. I then stuck the squares onto the mold using more thickened rubber.

Here I also learned that Smooth On's instructional videos do sometimes leave steps out of the process that would be useful to know. The particular video I'd been watching over and over again did not show keys at all, and I assumed for a long time it was due to some special property of the Plasti-Paste mother mold material. 


adding keys to silicone for mother mold
 When I called to double check on this, the support person said that no, it was just to make the instructions easier to follow. If anything, I really could have applied more keys than I did.  
building dividing walls for mother mold

To the left, getting ready to apply the Plasti Paste mother mold. I've trimmed the edge of the rubber, applied a dividing wall made of Klean Klay and covered the wall with tinfoil. I then applied Sonite Wax and Ease Release over the whole thing. 

There's another difference between urethane and silicone mold rubbers- they each need their own kind of release. The universal release spray used with urethane is made with silicone- if it's used with silicone rubber, it will act like a glue instead!
To the right and below right, half the Plasti Paste mother mold applied.

The chief advantage of a Plasti Paste mother mold over the traditional plaster is its much lighter weight. I was planning on hand-slushing resin in this mold, which means holding it and turning it for fifteen minutes while the resin sets up. Something not easily done with a 40# plus plaster mold!  

I was dreading using this material as the instructions said it was very sticky, set very fast, and got very hot, but all this turned out to be manageable. The trick was to learn to mix only what could be applied in ten minutes. A saving grace was that, like silicone, additional coats of Plasti Paste could be applied after previous coats are fully cured. Whatever didn't get covered in one pass would get covered in the next, no big panic. It should be built up to be about 1/4" thick; in larger molds such as this one it should be more like 1/2" thick. 

As an additional bonus, it wasn't as stinky as I feared it would be either.

  
first half of mother mold for wolf head

The instructions also said to smooth the Plasti Paste down with wet paper towels or denatured alcohol before it was fully cured to avoid "an aggressive surface". And when they say "aggressive surface", they mean it. This is one downside of this material- even smoothed down, it is fairly "toothy". I nick my fingers on the edges routinely, and rip my rubber gloves while casting. I need to find heavier gloves!

first half of mother mold for wolf head alternate view
clay dividing wall removed while making mother mold for wolf head

To the left, the clay dividing wall removed, under the careful supervision of the Feline Assistance Department.

Again I applied tinfoil over the Plasti Paste, and applied Sonite Wax and the release spray over that. Supposedly the tinfoil keeps the two Plasti Paste halves from sticking together, and helps to mark the parting line when separating them. The downside of the tinfoil is that it very badly wants to stick to the uncured Plasti Paste and pull away from the cured material, making a gap in between the two halves. Fortunately it did not turn out to be at all critical, especially since the halves were bolted together.

Below, holes drilled through the two mold halves so that they later can be bolted together.  And then, time to remove the mold from the sculpt- the moment of truth!
holes drilled for bolting together mother mold
Houston, we have liftoff!!!
mother mold removed from silicone inner mold for wolf head
finished mold for resin wolf head removed from sculpt
There is definitely room for improvement for next time. The "halo" could be about half the width it was, in order to save on both weight and cost of material. (I made it that wide because the video said to!) The Plasti Paste shell could be more uniform in thickness. Most importantly, the cut seam down the center of the sculpt's face is not really needed, the sculpt is fairly simple, the rubber is flexible enough it will just peel off like a glove, and it's nice not to have to worry about seam lines. But for right now, I am very excited to have a functional mold!
0 Comments

    Author

    I make masks. Because art is more fun when you put it on your head.

    Categories

    All
    A Day In The Life
    Airbrushing
    Artemis
    Casting
    Cat Masks
    Color Design
    Deer Mask
    Ears
    Eyes
    Foam
    Fur
    Garm
    Handpaws
    Head Base
    Horse/unicorn Masks
    Jawsets
    Lips
    Maxine
    Methods And Materials
    Moldmaking
    Moving Jaw
    Noses
    Painting
    Paper Mache
    Patterning
    Photography
    Rabbit Masks
    Resin
    Rip
    Sculpting
    Sewing
    Shaving And Trimming
    Silas
    Silicone
    Strapping
    Studio Announcements
    Tails
    Tongues
    Videos
    Wolf Masks

    Archives

    September 2024
    August 2024
    April 2024
    December 2023
    September 2023
    April 2023
    March 2023
    December 2022
    October 2022
    July 2022
    June 2022
    May 2022
    March 2022
    February 2022
    November 2021
    October 2021
    September 2021
    May 2021
    March 2021
    July 2020
    November 2019
    March 2019
    January 2019
    December 2018
    June 2018
    April 2018
    March 2018
    December 2017
    June 2017
    May 2017
    April 2017
    February 2017
    January 2017
    December 2016
    November 2016
    October 2016
    July 2016
    August 2014
    June 2014
    February 2014
    November 2013
    October 2013
    March 2012
    October 2011
    September 2011
    March 2011
    November 2010
    September 2010
    August 2010
    June 2010
    October 2009
    September 2009
    March 2009
    February 2009
    February 2008
    June 2007
    April 2007

    Enter your email address:

    Delivered by FeedBurner

    RSS Feed

Proudly powered by Weebly